[HNTRS2024] Huntress 2024 (Reverse Engineering): That’s Life

⚠️⚠️⚠️ This is a solution to the challenge. This post will be full of spoilers.
Download the binaries here: https://github.com/mlesterdampios/huntress-2024-binary-challenges

THIS IS ONE OF MY FAVORITE CHALLEGE FOR HUNTRESS 2024 AS THIS REMIND’S ME OF VERITASIUM’S “MATH’S FUNDAMENTAL FLAW”

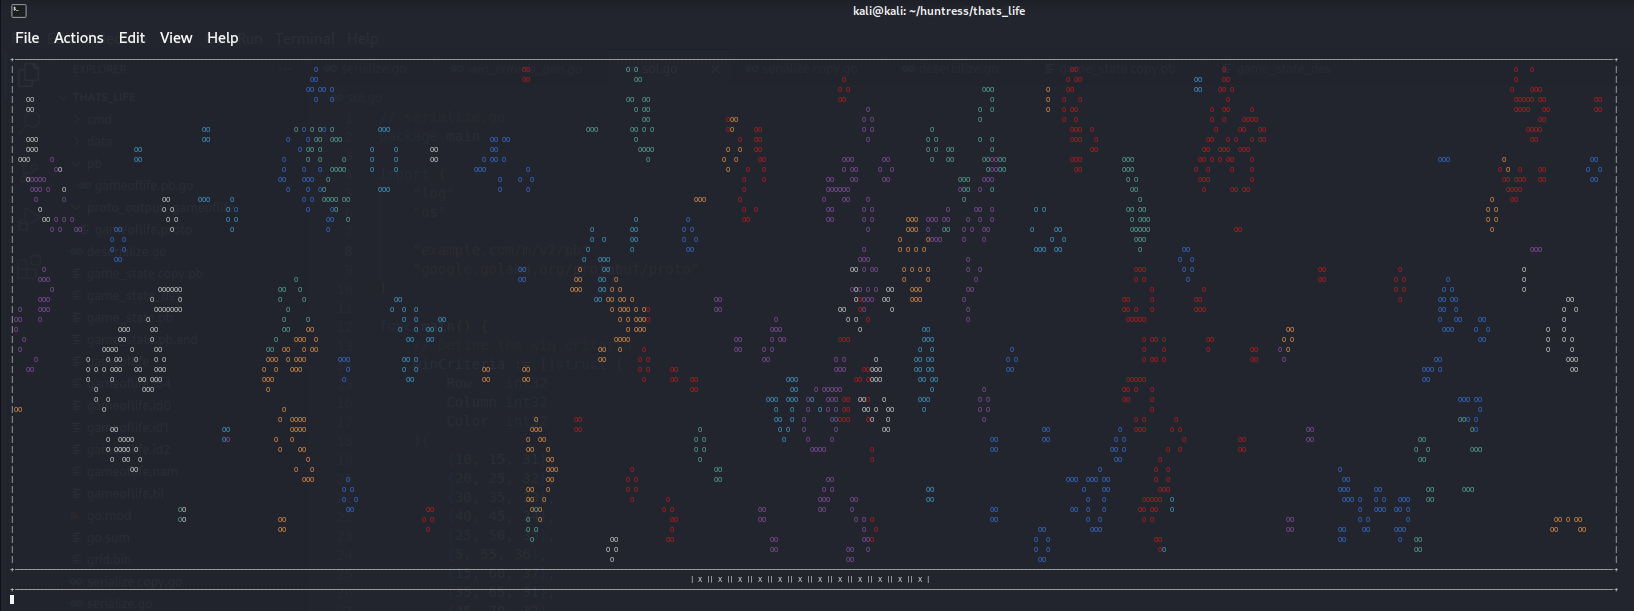
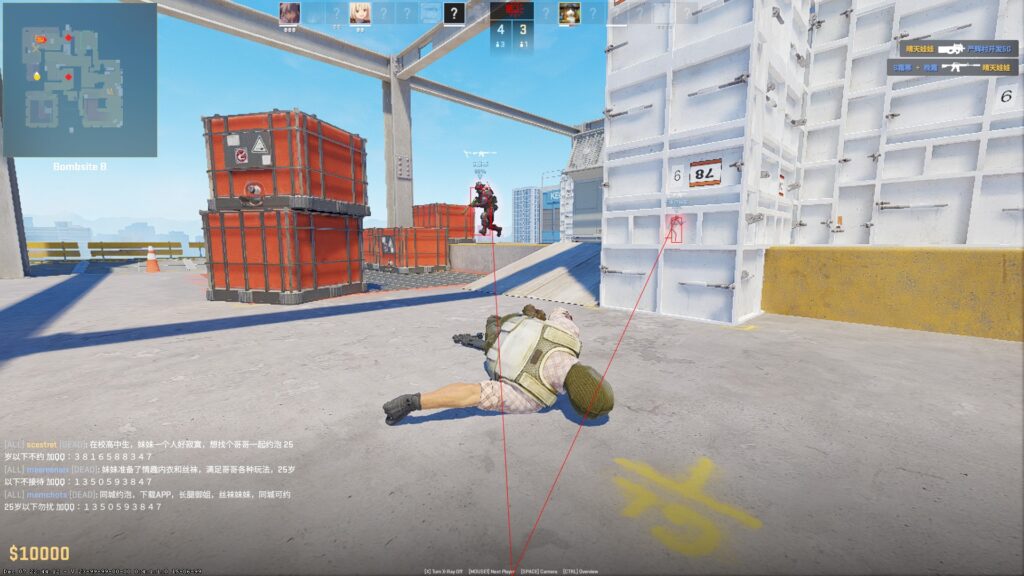
Upon initial triage, the binary is built from protobuf and every tick is saved in file named game_state.pb. Upon observation, there are 12 X and O below the game screen. Sometimes they switch. Based from inference, we must at least meet all 12 to be O. A single O, means a condition was met, so we must investigate to get the conditions so we can probably win this game.

We start first by extracting the protobuf definitions from the binary using https://github.com/arkadiyt/protodump.

syntax = "proto3";

package thats_life;

option go_package = "github.com/HuskyHacks/thats_life/pb;pb";

message Cell {
    bool alive = 1;
    int32 color = 2;
}

message CellRow {
    repeated Cell cells = 1;
}

message Grid {
    int32 width = 1;
    int32 height = 2;
    repeated CellRow rows = 3;
}

We are able to get the protobuf definition. Now we try to parse the game_state.pb

// cmd/deserialize.go

package main

import (
    "fmt"
    "io/ioutil"
    "log"
    "strings"

    "example.com/m/v2/pb"
    "google.golang.org/protobuf/proto"
)

func main() {
    // Path to the serialized Grid file
    filePath := "game_state.pb"

    // Read the serialized Grid from the file
    data, err := ioutil.ReadFile(filePath)
    if err != nil {
        log.Fatalf("Failed to read file %s: %v", filePath, err)
    }

    // Create an empty Grid object
    var grid pb.Grid

    // Deserialize the data into the Grid object
    err = proto.Unmarshal(data, &grid)
    if err != nil {
        log.Fatalf("Failed to deserialize Grid: %v", err)
    }

    // Generate Go code representation
    goCode := formatGridAsGoCode("grid", &grid)

    // Print the generated Go code
    fmt.Println(goCode)
}

// formatGridAsGoCode formats the Grid object into a Go code snippet
func formatGridAsGoCode(varName string, grid *pb.Grid) string {
    var sb strings.Builder

    sb.WriteString(fmt.Sprintf("%s := &pb.Grid{\n", varName))
    sb.WriteString(fmt.Sprintf("    Width:  %d,\n", grid.Width))
    sb.WriteString(fmt.Sprintf("    Height: %d,\n", grid.Height))
    sb.WriteString("    Rows: []*pb.CellRow{\n")

    for _, row := range grid.Rows {
        sb.WriteString("        {\n")
        sb.WriteString("            Cells: []*pb.Cell{\n")
        for _, cell := range row.Cells {
            sb.WriteString(fmt.Sprintf("                {Alive: %t, Color: %d},\n", cell.Alive, cell.Color))
        }
        sb.WriteString("            },\n")
        sb.WriteString("        },\n")
    }

    sb.WriteString("    },\n")
    sb.WriteString("}\n")

    return sb.String()
}

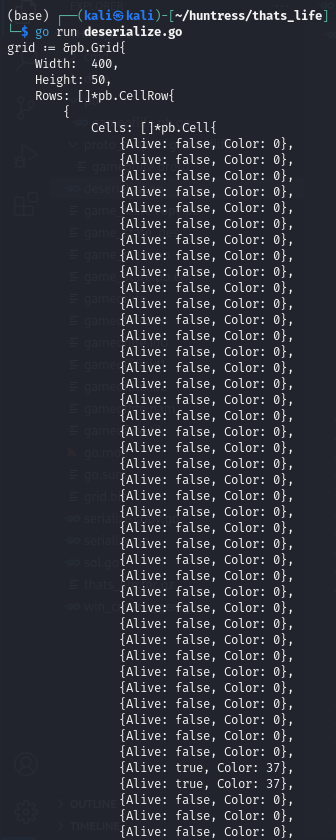
We have successfully deserialized the pb file. Therefore we can create a solution too by forging our own data based on winning conditions and serialize it.

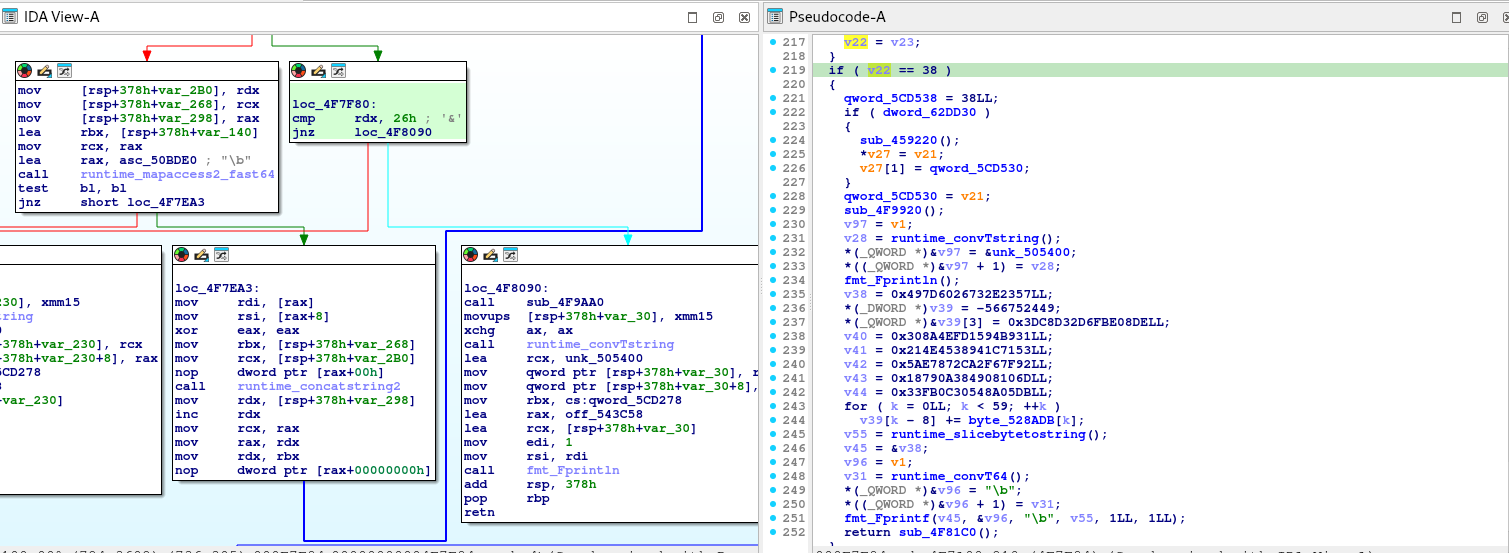
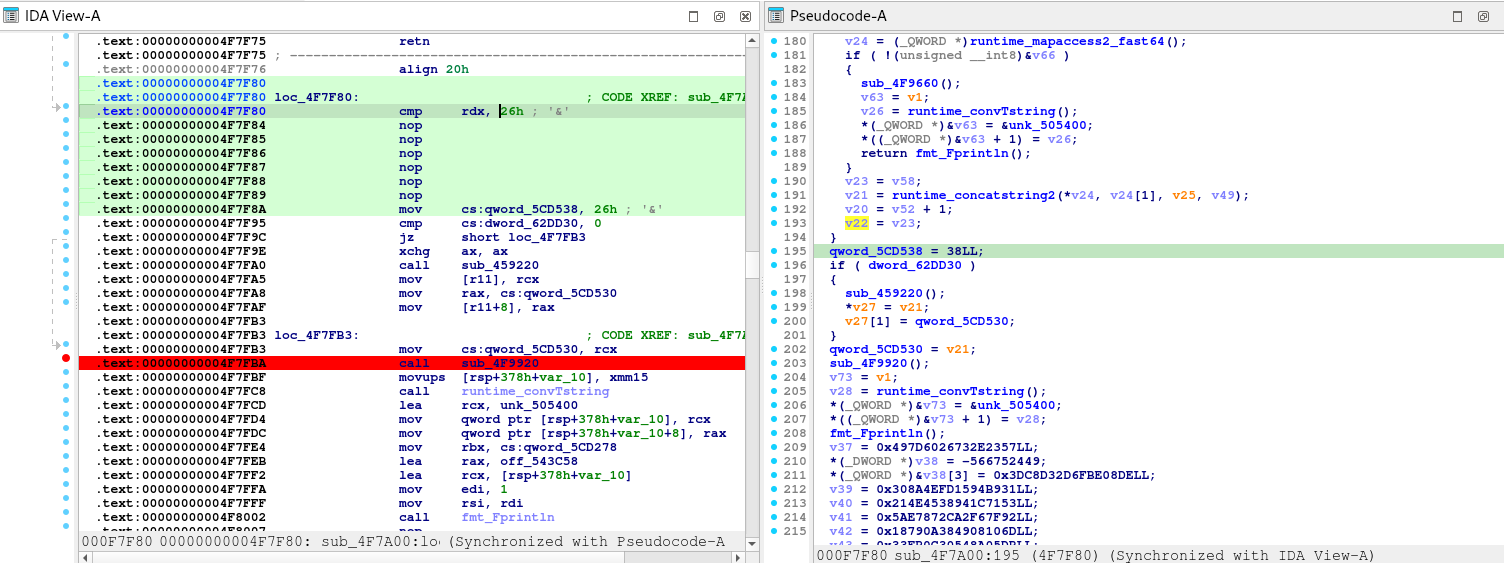
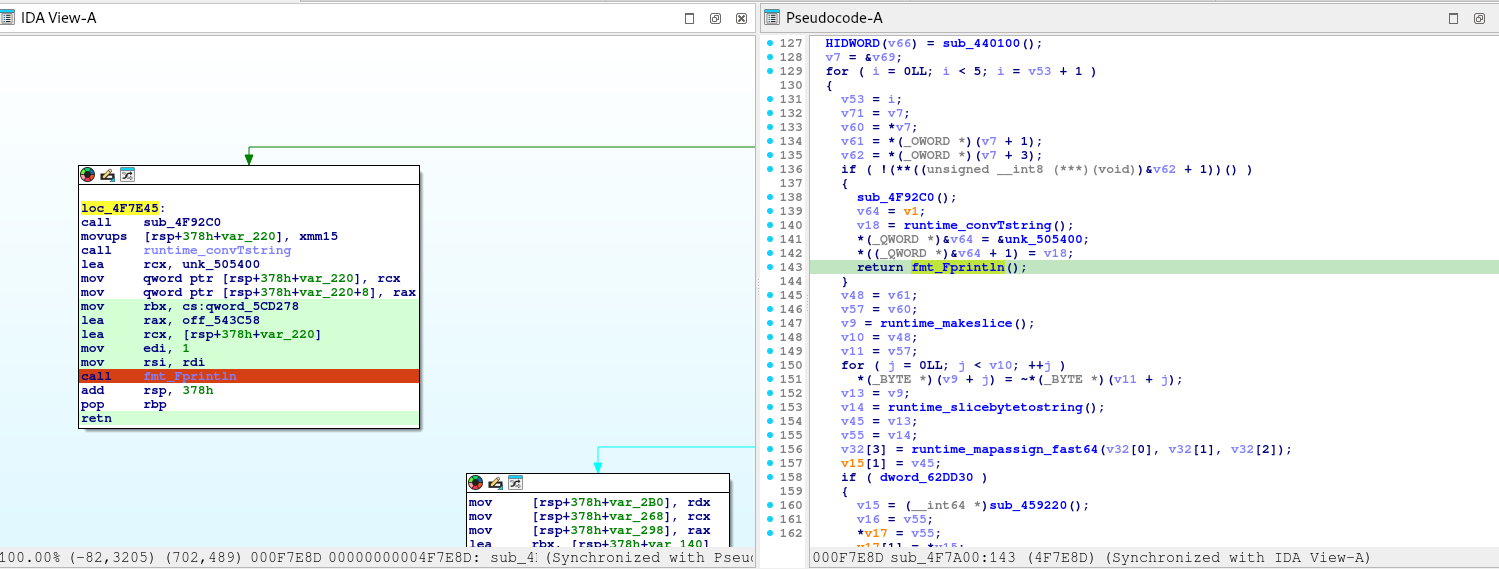
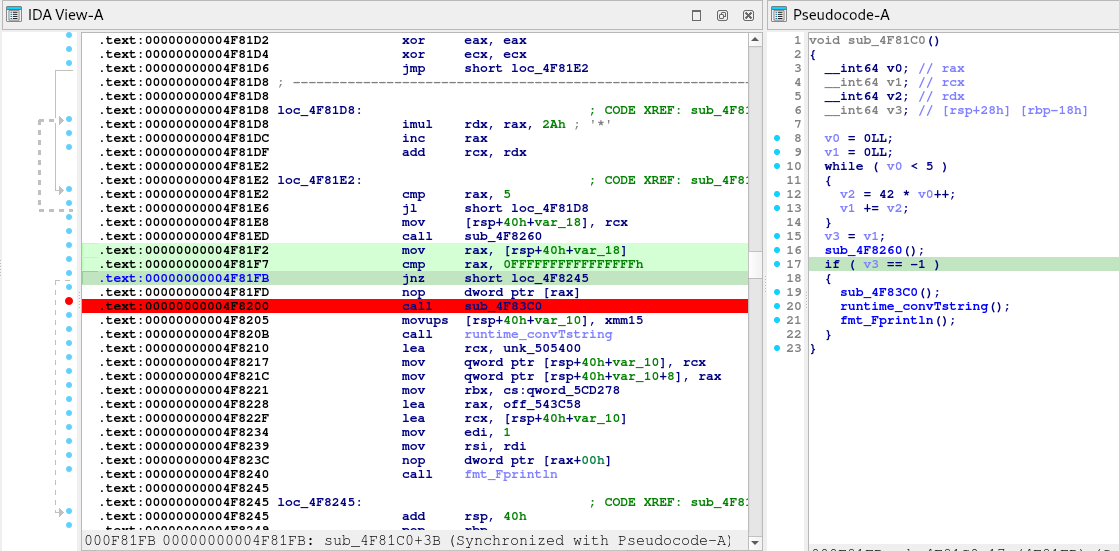
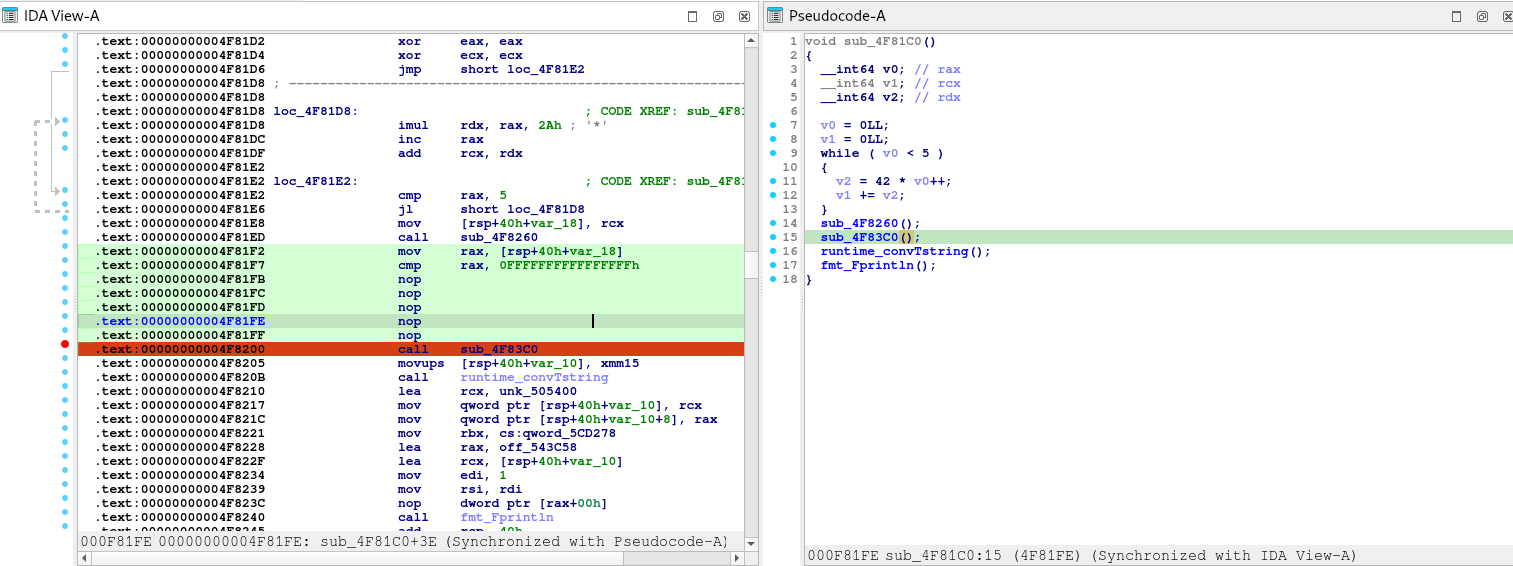
Upon further reverse engineering, there is a win criteria generation in the binary.

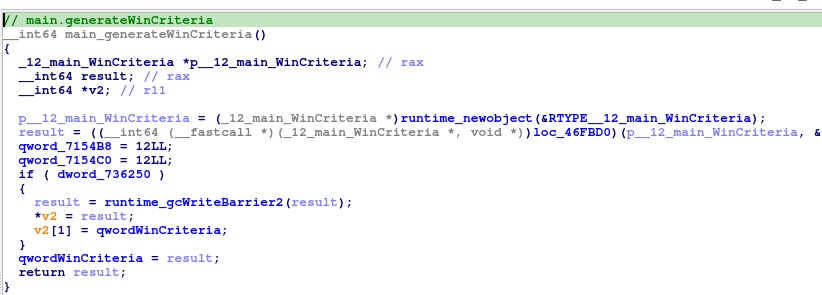
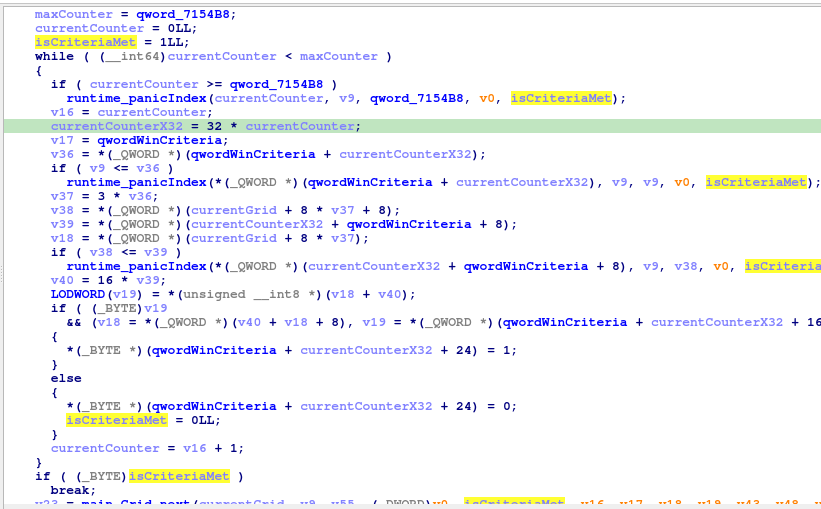
Upon investigating the qwordWinCriteria, it seems like it stores the data for the win condition.
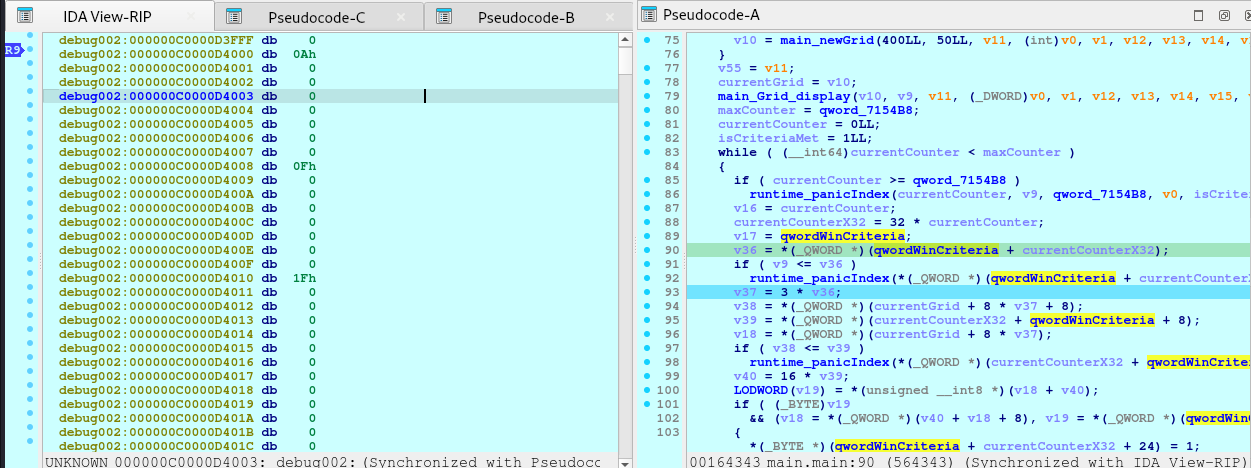
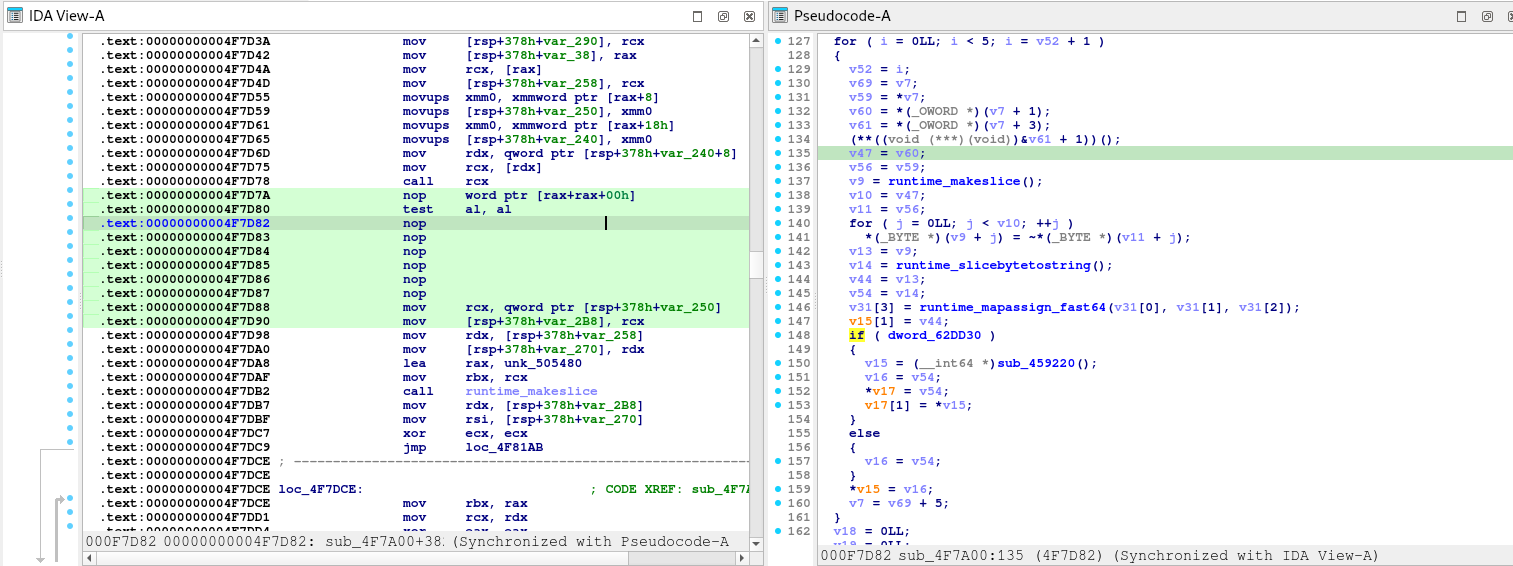
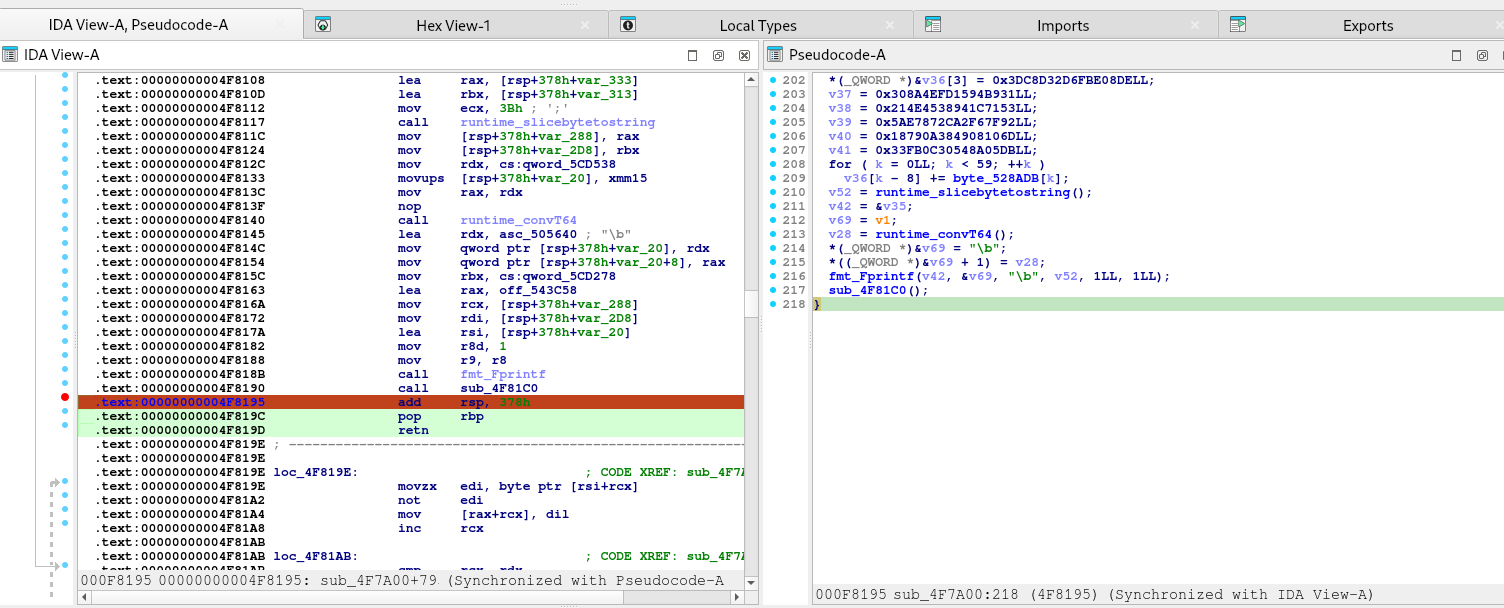
Entry 0:
- Field 0 (Row):    0x0A00000000000000 -> 10
- Field 8 (Column): 0x0F00000000000000 -> 15
- Field 16 (Value): 0x1F00000000000000 -> 31

Entry 1:
- Field 0 (Row):    0x1400000000000000 -> 20
- Field 8 (Column): 0x1900000000000000 -> 25
- Field 16 (Value): 0x2000000000000000 -> 32

... and so on.

With these information, we are now ready to craft the solution.

// serialize.go
package main

import (
    "log"
    "os"

    "example.com/m/v2/pb"
    "google.golang.org/protobuf/proto"
)

func main() {
    // Define the win criteria
    winCriteria := []struct {
        Row    int32
        Column int32
        Color  int32
    }{
		{10, 15, 31},
		{20, 25, 32},
		{30, 35, 33},
		{40, 45, 34},
		{25, 50, 35},
		{5, 55, 36},
		{15, 60, 37},
		{35, 65, 31},
		{45, 70, 32},
		{0, 75, 33},
		{1, 80, 34},
		{2, 85, 35},
    }

    // Initialize the grid
    width := int32(400)
    height := int32(50)
    grid := &pb.Grid{
        Width:  width,
        Height: height,
        Rows:   make([]*pb.CellRow, height),
    }

    // Initialize all cells to dead and color 0
    for i := int32(0); i < height; i++ {
        row := &pb.CellRow{
            Cells: make([]*pb.Cell, width),
        }
        for j := int32(0); j < width; j++ {
            row.Cells[j] = &pb.Cell{
                Alive: false,
                Color: 0,
            }
        }
        grid.Rows[i] = row
    }

    // Apply the win criteria
    for _, wc := range winCriteria {
        if wc.Row >= 0 && wc.Row < height && wc.Column >= 0 && wc.Column < width {
            grid.Rows[wc.Row].Cells[wc.Column].Alive = true
            grid.Rows[wc.Row].Cells[wc.Column].Color = wc.Color
        } else {
            log.Fatalf("Win criteria position out of bounds: (%d, %d)", wc.Row, wc.Column)
        }
    }

    // Serialize the Grid to binary format
    data, err := proto.Marshal(grid)
    if err != nil {
        log.Fatalf("Failed to serialize Grid: %v", err)
    }

    // Write to a file
    file, err := os.Create("game_state.pb") // The game expects this filename
    if err != nil {
        log.Fatalf("Failed to create file: %v", err)
    }
    defer file.Close()

    _, err = file.Write(data)
    if err != nil {
        log.Fatalf("Failed to write data to file: %v", err)
    }

    log.Println("Grid serialized to game_state.pb successfully.")
}

[HNTRS2024] Huntress 2024 (Reverse Engineering): OceanLocust

⚠️⚠️⚠️ This is a solution to the challenge. This post will be full of spoilers.
Download the binaries here: https://github.com/mlesterdampios/huntress-2024-binary-challenges

We are given a png file and a binary with it. Upon initial triage, seems like the binary is a tool for Steganography. Our task is to retrieve the file from the png by reversing the binary and make a decryption tool.

Finding the entry point:

Now we reverse this gigantic function.

First, let’s understand the PNG file.

1. Understand the PNG File Structure

PNG files consist of an 8-byte signature followed by a series of chunks. Each chunk has the following format:

  • Length: 4 bytes (big-endian integer)
  • Chunk Type: 4 bytes (ASCII characters)
  • Chunk Data: Variable length
  • CRC: 4 bytes (Cyclic Redundancy Check)

Standard chunk types include IHDRPLTEIDAT, and IEND. However, PNG files can also contain custom ancillary chunks, which can be used to store additional data without affecting the image’s visual appearance.

2. Identify Custom Chunks

From the code snippet, it seems the application is adding custom chunks to the PNG file. Look for chunk types that are not standard. In the code, you can see references to functions that handle chunks, such as sub_140005D60, which appears to add a chunk with a given type.

sub_140005D60(&v70, &v50, "IHDR", 4i64);

But since IHDR is a standard chunk, look for other custom chunk types being used. Since the code is obfuscated, we might not see the actual chunk names directly. However, we can infer that custom chunks are being added to store the flag data.

So what I did was to put a breakpoint at `v19 = v69` as this variables would likely contain the information how the chunks are stored.

1st bp hit:

debug023:0000023C584F7EC0                 db  62h ; b
debug023:0000023C584F7EC1                 db  69h ; i
debug023:0000023C584F7EC2                 db  54h ; T
debug023:0000023C584F7EC3                 db  61h ; a
debug023:0000023C584F7EC4                 db  3Ch ; <
debug023:0000023C584F7EC5                 db    2

2nd bp hit:

debug023:0000023C584F7EC0                 db  62h ; b
debug023:0000023C584F7EC1                 db  69h ; i
debug023:0000023C584F7EC2                 db  54h ; T
debug023:0000023C584F7EC3                 db  62h ; b
debug023:0000023C584F7EC4                 db  3Ch ; <
debug023:0000023C584F7EC5                 db    2

3rd bp hit:

debug023:0000023C584F7EC0                 db  62h ; b
debug023:0000023C584F7EC1                 db  69h ; i
debug023:0000023C584F7EC2                 db  54h ; T
debug023:0000023C584F7EC3                 db  63h ; c
debug023:0000023C584F7EC4                 db  3Ch ; <
debug023:0000023C584F7EC5                 db    2

It just repeats, but only the 0000023C584F7EC3 changes alphabetically until reaching `i`.

Notable Patterns:

  • The bytes at offsets 0 to 2 are constant: 'b''i''T'.
  • The byte at offset 3 changes from 'a' to 'b' to 'c', incrementing alphabetically up to 'i'.
  • The rest of the bytes remain constant or contain padding.

Interpreting the Data

Given that the data starts with 'biT' followed by a changing letter, it’s likely that this forms a chunk type in the PNG file.

Chunk Type Formation:

Chunk Type: 4 ASCII characters.

The observed chunk types are:

  • 'biTa'
  • 'biTb'
  • 'biTc'
  • 'biTi'

Understanding the Application’s Behavior

From your decompiled code and observations, the application seems to:

  1. Create Custom PNG Chunks:
    • It generates multiple custom chunks with types 'biTa''biTb', …, 'biTi'.
    • These chunks are likely used to store encrypted portions of the flag.
  2. Encrypt Flag Data:
    • The flag is divided into segments.
    • Each segment is XORed with a key derived from the chunk type or chunk data.
    • The encrypted segments are stored in the corresponding custom chunks.
  3. Key Derivation:
    • The key used for XORing seems to be derived from the chunk data (v69) or possibly the chunk type.
    • Since v19 = v69, and v69 points to the data starting with 'biTa', it’s possible that the chunk data itself is used as the key.

Reversing the Process

To extract and decode the embedded flag, we’ll need to:

  1. Parse the PNG File and Extract Custom Chunks:
    • Read the PNG file and extract all chunks, including custom ones with types 'biTa''biTb', …, 'biTi'.
  2. Collect Encrypted Data and Keys:
    • For each custom chunk:
      • Extract the encrypted data (chunk data).
      • Derive the key from the chunk data or type.
  3. Decrypt the Data:
    • XOR the encrypted data with the derived key to recover the original flag segments.
    • Concatenate the decrypted segments to reconstruct the full flag.

1. Read the PNG File and Extract Chunks

import struct

def read_chunks(file_path):
    with open(file_path, 'rb') as f:
        # Read the PNG signature
        signature = f.read(8)
        if signature != b'\x89PNG\r\n\x1a\n':
            raise Exception('Not a valid PNG file')

        chunks = []
        while True:
            # Read the length (4 bytes)
            length_bytes = f.read(4)
            if len(length_bytes) < 4:
                break  # End of file
            length = struct.unpack('>I', length_bytes)[0]

            # Read the chunk type (4 bytes)
            chunk_type = f.read(4).decode('ascii')

            # Read the chunk data
            data = f.read(length)

            # Read the CRC (4 bytes)
            crc = f.read(4)

            chunks.append({
                'type': chunk_type,
                'data': data,
                'crc': crc
            })

        return chunks

2. Identify Custom Chunks

def extract_custom_chunks(chunks):
    standard_chunks = {
        'IHDR', 'PLTE', 'IDAT', 'IEND', 'tEXt', 'zTXt', 'iTXt',
        'bKGD', 'cHRM', 'gAMA', 'hIST', 'iCCP', 'pHYs', 'sBIT',
        'sPLT', 'sRGB', 'tIME', 'tRNS'
    }
    custom_chunks = []
    for chunk in chunks:
        if chunk['type'] not in standard_chunks:
            custom_chunks.append(chunk)
    return custom_chunks

3. Sort Chunks Based on Sequence

def sort_custom_chunks(chunks):
    # Sort chunks based on the fourth character of the chunk type
    return sorted(chunks, key=lambda c: c['type'][3])

4. Extract Encrypted Data and Keys

def derive_key_from_chunk_type(chunk_type):
    return chunk_type.encode('ascii')

5. Decrypt the Encrypted Data

def xor_decrypt(data, key):
    decrypted = bytearray()
    key_length = len(key)
    for i in range(len(data)):
        decrypted_byte = data[i] ^ key[i % key_length]
        decrypted.append(decrypted_byte)
    return bytes(decrypted)

6. Combine Decrypted Segments

def extract_flag_from_chunks(chunks):
    flag_parts = []
    for chunk in chunks:
        key = derive_key_from_chunk_type(chunk['type'])
        # Or use derive_key_from_chunk_data(chunk)
        encrypted_data = chunk['data']
        decrypted_data = xor_decrypt(encrypted_data, key)
        flag_parts.append(decrypted_data)
    flag = b''.join(flag_parts)
    return flag.decode()

7. Full Extraction Script

def extract_flag(file_path):
    chunks = read_chunks(file_path)
    custom_chunks = extract_custom_chunks(chunks)
    sorted_chunks = sort_custom_chunks(custom_chunks)
    flag = extract_flag_from_chunks(sorted_chunks)
    return flag

# Example usage
flag = extract_flag('embedded_flag.png')
print("Recovered Flag:", flag)

Full Code

import struct
import sys

def read_chunks(file_path):
    """
    Reads all chunks from a PNG file.

    :param file_path: Path to the PNG file.
    :return: List of chunks with their type, data, and CRC.
    """
    chunks = []
    with open(file_path, 'rb') as f:
        # Read the PNG signature (8 bytes)
        signature = f.read(8)
        if signature != b'\x89PNG\r\n\x1a\n':
            raise Exception('Not a valid PNG file')

        while True:
            # Read the length of the chunk data (4 bytes, big-endian)
            length_bytes = f.read(4)
            if len(length_bytes) < 4:
                break  # End of file reached
            length = struct.unpack('>I', length_bytes)[0]

            # Read the chunk type (4 bytes)
            chunk_type = f.read(4).decode('ascii')

            # Read the chunk data
            data = f.read(length)

            # Read the CRC (4 bytes)
            crc = f.read(4)

            chunks.append({
                'type': chunk_type,
                'data': data,
                'crc': crc
            })

    return chunks

def extract_custom_chunks(chunks):
    """
    Filters out standard PNG chunks to extract custom chunks.

    :param chunks: List of all chunks from the PNG file.
    :return: List of custom chunks.
    """
    standard_chunks = {
        'IHDR', 'PLTE', 'IDAT', 'IEND', 'tEXt', 'zTXt', 'iTXt',
        'bKGD', 'cHRM', 'gAMA', 'hIST', 'iCCP', 'pHYs', 'sBIT',
        'sPLT', 'sRGB', 'tIME', 'tRNS'
    }
    custom_chunks = []
    for chunk in chunks:
        if chunk['type'] not in standard_chunks:
            custom_chunks.append(chunk)
    return custom_chunks

def sort_custom_chunks(chunks):
    """
    Sorts custom chunks based on the fourth character of the chunk type.

    :param chunks: List of custom chunks.
    :return: Sorted list of custom chunks.
    """
    return sorted(chunks, key=lambda c: c['type'][3])

def derive_key_from_chunk_type(chunk_type):
    """
    Derives the key from the chunk type.

    :param chunk_type: Type of the chunk (string).
    :return: Key as bytes.
    """
    return chunk_type.encode('ascii')

def xor_decrypt(data, key):
    """
    Decrypts data by XORing it with the key.

    :param data: Encrypted data as bytes.
    :param key: Key as bytes.
    :return: Decrypted data as bytes.
    """
    decrypted = bytearray()
    key_length = len(key)
    for i in range(len(data)):
        decrypted_byte = data[i] ^ key[i % key_length]
        decrypted.append(decrypted_byte)
    return bytes(decrypted)

def extract_flag_from_chunks(chunks):
    """
    Extracts and decrypts the flag from custom chunks.

    :param chunks: List of sorted custom chunks.
    :return: Decrypted flag as a string.
    """
    flag_parts = []
    for chunk in chunks:
        key = derive_key_from_chunk_type(chunk['type'])
        encrypted_data = chunk['data']
        decrypted_data = xor_decrypt(encrypted_data, key)
        flag_parts.append(decrypted_data)
    flag = b''.join(flag_parts)
    # Remove padding if any (e.g., 0xAB bytes)
    flag = flag.rstrip(b'\xAB')
    return flag.decode('utf-8', errors='replace')

def extract_flag(file_path):
    """
    Main function to extract the flag from the PNG file.

    :param file_path: Path to the PNG file.
    :return: Decrypted flag as a string.
    """
    # Read all chunks from the PNG file
    chunks = read_chunks(file_path)
    # Extract custom chunks where the flag is hidden
    custom_chunks = extract_custom_chunks(chunks)
    # Sort the custom chunks based on their sequence
    sorted_chunks = sort_custom_chunks(custom_chunks)
    # Extract and decrypt the flag from the custom chunks
    flag = extract_flag_from_chunks(sorted_chunks)
    return flag

if __name__ == '__main__':
    if len(sys.argv) != 2:
        print("Usage: python extract_flag.py <path_to_png_file>")
        sys.exit(1)
    png_file_path = sys.argv[1]
    try:
        recovered_flag = extract_flag(png_file_path)
        print("Recovered Flag:", recovered_flag)
    except Exception as e:
        print("An error occurred:", str(e))
        sys.exit(1)

Flag!

[HNTRS2024] Huntress 2024 (Reverse Engineering): GoCrackMe3

⚠️⚠️⚠️ This is a solution to the challenge. This post will be full of spoilers.
Download the binaries here: https://github.com/mlesterdampios/huntress-2024-binary-challenges

This challenge is an executable file with areas or regions that can never be reached due to logic conditions built in. The challenge is to redirect the flow to force it reach the memory regions that contains the flag.

In the main function:

Notice that what ever happens, it always lands on that else block. How about we force it to satisfy the condition to true? Or just simply nop the jump to the else block

Before:

After:

Another interesting function is this one.

However, the logic prevents in getting to that block so we patch it.

Before:

After:

We also notice a function return that prevents us going further down. So we patch it too.

Before:

After:

Now we are going places.

And then, there’s another one.

Before:

After:

However, no flag here:

So we put breakpoint before the function ends.

Then we search for flag signature

GGz!

Basic Anti-Cheat Evasion

So it’s been a while since I posted a blog. I was so busy with other things, especially adjusting the schedule with my work and my studies.

This short article I’ll discuss some very basic techniques on evading anti-cheat. Of course, you would still need to adjust the evasion mechanism depending on the anti-cheat you are trying to defeat.

On this blog, we will focus on Internal anti-cheat evasion techniques.

Part 1: The injector

First part of making your “cheat” is creating an executable that would inject your .dll into the process, A.K.A the game.

There are lot of injection mechanisms (copied from cynet). Below is the list but not limited to:

Classic DLL injection 

Classic DLL injection is one of the most popular techniques in use. First, the malicious process injects the path to the malicious DLL in the legitimate process’ address space. The Injector process then invokes the DLL via a remote thread execution. It is a fairly easy method, but with some downsides: 

Reflective DLL injection

Reflective DLL injection, unlike the previous method mentioned above, refers to loading a DLL from memory rather than from disk. Windows does not have a LoadLibrary function that supports this. To achieve the functionality, adversaries must write their own function, omitting some of the things Windows normally does, such as registering the DLL as a loaded module in the process, potentially bypassing DLL load monitoring. 

Thread execution hijacking

Thread Hijacking is an operation in which a malicious shellcode is injected into a legitimate thread. Like Process Hollowing, the thread must be suspended before injection.

PE Injection / Manual Mapping

Like Reflective DLL injection, PE injection does not require the executable to be on the disk. This is the most often used technique seen in the wild. PE injection works by copying its malicious code into an existing open process and causing it to execute. To understand how PE injection works, we must first understand shellcode. 

Shellcode is a sequence of machine code, or executable instructions, that is injected into a computer’s memory with the intent of taking control of a running program.  Most shellcodes are written in assembly language. 

Manual Mapping + Thread execution hijacking = Best Combo

Above all of this, I think the very stealthy technique is the manual mapping with thread hijacking.
This is because when you manual map a DLL into a memory, you wouldn’t need to call DLL related WinAPI as you are emulating the whole process itself. Windows isn’t aware that a DLL has been loaded, therefore it wouldn’t link the DLL to the PEB, and it would not create structs nor thread local storage.
Aside from these, since you would be having thread hijacking to execute the DLL, then you are not creating a new thread, therefore you are safe from anti-cheat that checks for suspicious threads that are spawned. After the DLL sets up all initialization and hooks, it would return the control of the hijacked thread its original state, therefore, like nothing happened.

POC

https://github.com/mlesterdampios/manual_map_dll-imgui-d3d11/blob/main/injector/injection.cpp

This repository demonstrate a very simple injector. The following are the steps to achieve the DLL injection:

  • Elevate injector’s process to allow to get handle with PROCESS_ALL_ACCESS permission
  • VirtualAllocEx the dll image to the memory
  • Resolve Imports
  • Resolve Relocations
  • Initialize Cookie
  • VirtualAllocEx the shellcode
  • Fix the shellcode accordingly
  • Stop the thread and adjust it’s RIP pointing to the EntryPoint
  • Resume the thread

The shellcode

byte thread_hijack_shell[] = {
	0x51, // push rcx
	0x50, // push rax
	0x52, // push rdx
	0x48, 0x83, 0xEC, 0x20, // sub rsp, 0x20
	0x48, 0xB9, // movabs rcx, ->
	0x00, 0x00, 0x00, 0x00, 0x00, 0x00, 0x00, 0x00,
	0x48, 0xBA, // movabs rdx, ->
	0x00, 0x00, 0x00, 0x00, 0x00, 0x00, 0x00, 0x00,
	0x48, 0xB8, // movabs rax, ->
	0x00, 0x00, 0x00, 0x00, 0x00, 0x00, 0x00, 0x00,
	0xFF, 0xD0, // call rax
	0x48, 0xBA, // movabs rdx, ->
	0x00, 0x00, 0x00, 0x00, 0x00, 0x00, 0x00, 0x00,
	0x48, 0x89, 0x54, 0x24, 0x18, // mov qword ptr [rsp + 0x18], rdx
	0x48, 0x83, 0xC4, 0x20, // add rsp, 0x20
	0x5A, // pop rdx
	0x58, // pop rax
	0x59, // pop rcx
	0xFF, 0x64, 0x24, 0xE0 // jmp qword ptr [rsp - 0x20]
};

The line 7 is where you put the image base address, the line 9 is for dwReason, the line 11 is for DLL’s entrypoint and the line 14 is for the original thread RIP that it would jump back after finishing the DLL’s execution.

This injection mechanism is prone to lot of crashes. Approximately around 1 out of 5 injection succeeds. You need to load the game until on the lobby screen, then open the injector, if it crashes, just reboot the game and repeat the process until successful injection.

Part 2: The DLL

Of course, in the dll itself, you still need to do some cleanups. The injection part is done but the “main event of the evening” is just getting started.

POC

https://github.com/mlesterdampios/manual_map_dll-imgui-d3d11/blob/main/example_dll/dllmain.cpp

In the DLL main, we can see cleanups.

UnlinkModuleFromPEB

This one is unlinking the DLL from PEB. But since we are doing Manual Map, it wouldn’t have an effect at all, because windows didn’t even know that a DLL is loaded at all. This is useful tho, if we injected the DLL using classic injection method.

FakePeHeader

This one is replacing the PE header of DLL with a fakeone. Most memory scanner, tries to find suspicious memory location by checking if a PE exists. An MS-DOS header begins with the magic code 0x5A4D, so if an opcodes begin with that magic bytes, chances are, a PE is occupying that space. After that, the memory scanner might read that header for more information on what is really loaded with that memory location.

No Thread Creation

THIS IS IMPORTANT! Since we are hooking the IDXGISwapChain::Present, then we don’t see any reason to keep another thread running, so after our DLL finishes the setup, we then return the control of the thread to its original state. We can use the PresentHook to continue our “dirty business” inside the programs memory. Besides, as mentioned earlier, having threads can lead to anti-cheat flagging.

Obfuscation thru Polymorphism and Instantiation

This technique is already discussed on another blog: Obfuscation thru Polymorphism and Instantiation.

CALLBACKS_INSTANCE = new CALLBACKS();
MAINMENU_INSTANCE = new MAINMENU();

XORSTR

Ah, yes, the XORSTR. We can use this to hide the real string and will only be calculated upon usage.
To demonstrate the XORSTR, here is a sample usage. Focus on the line with “##overlay” string.

xorstr

And this is what it looks like after compiling and putting it under decompiler.

IDA Decompile

Other methodologies

There are some few more basic methodologies that wasn’t applied in the project. Below are following but not limited to:

  • Anti-debugging
  • Anti-VM
  • Polymorphism and Code mutation (to avoid heuristic patten scanners)
  • Syscall hooks
  • Hypervisor-assisted hooking
  • Scatter Manual Mapper (https://github.com/btbd/smap)
  • and etc…

This blog is not meant to teach reversing a game, but if you would like to deep dive more on reverse engineering, checkout: https://www.unknowncheats.me/ and https://guidedhacking.com/

Other resources:

POC and Conclusion

So, with the basic knowledge we have here, we tried to inject this on one of a common game that is still on ring3 (because ring0 AC’s are much more harder to defeat ?).

BEWARE THAT THE ABOVE SCREENSHOTS ARE ONLY DONE IN A NON-COMPETITIVE MODE, AND ONLY STANDS FOR EDUCATIONAL PURPOSES ONLY. I AM NOT RESPONSIBLE FOR ANY ACTION YOU MAKE WITH THE KNOWLEDGE THAT I SHARED WITH YOU.

And now, we reached the end of this blog, but before I finished this article, I want to say thank you for reading this entire blog, also, I just want to say that I also passed the CISSP last October 2023, but wasn’t able to update here due to lot of workloads.

Again, I am really grateful for your time. Until next time!

Why so trusting?

Quick Context: Okay, so recently, we come across some fancy NFT project wherein “Students” are invited to join “Quizzes” and “Projects” to “Graduate”.

A “Graduate” means whitelisted for the mint of the NFT collection.

Our Goal

Our goal is to get into the top leaderboard so we can ensure our whitelist slot. And we want this by all means, so we use our hacker instinct to get advantage on the quiz.

However, we wouldn’t wanna overkill the contest. We didn’t spawn bots to automatically answer the quizzes (which is easy to do), so we just sticked with our bare hands, manually answering the quizzes. And we just stick to one-to-one account to human. We don’t want to disrupt the experience of other people.

The quiz

The quiz is a client sided web app. Meaning, all of the password for the quiz and questions are given to client without levels of authorization. Below are the steps of our reconnaissance and enumeration to extract the password and the set of question for a quiz.

Cracking the Password

Every quiz has different password. And our goal is to crack the password before the quiz starts (hours before the quiz so we have the chance to crack it).

Upon logging-in and browsing to /quiz page, we could see a web api requests. We can see that a request has a response that includes juicy information. We saw a json response that includes quiz details and we write down the _id and the password to our notes.

$2a$10$msFPZnG.NKHaCcVupGsQyuvpB8IwtZ7v3UxPBwf3fXe8hGdCMEwsu

The password is a bcrypt hash.

The first thing we did was to list all possible passwords and try to compare them against the hash.
But sadly, we didn’t got any “possible password” correct.

What is Bcrypt?

The input to the bcrypt function is the password string (up to 72 bytes), a numeric cost, and a 16-byte (128-bit) salt value. The salt is typically a random value. The bcrypt function uses these inputs to compute a 24-byte (192-bit) hash. The final output of the bcrypt function is a string of the form:

$2<a/b/x/y>$[cost]$[22 character salt][31 character hash]

For example, with input password abc123xyz, cost 12, and a random salt, the output of bcrypt is the string

$2a$12$R9h/cIPz0gi.URNNX3kh2OPST9/PgBkqquzi.Ss7KIUgO2t0jWMUW
\__/\/ \____________________/\_____________________________/
Alg Cost      Salt                        Hash

Where:

  • $2a$: The hash algorithm identifier (bcrypt)
  • 12: Input cost (212 i.e. 4096 rounds)
  • R9h/cIPz0gi.URNNX3kh2O: A base-64 encoding of the input salt
  • PST9/PgBkqquzi.Ss7KIUgO2t0jWMUW: A base-64 encoding of the first 23 bytes of the computed 24 byte hash

The base-64 encoding in bcrypt uses the table ./ABCDEFGHIJKLMNOPQRSTUVWXYZabcdefghijklmnopqrstuvwxyz0123456789,[9] which is different than RFC 4648 Base64 encoding.

Back to our discussion

So now we know the basics of bcrypt, we could now start attacking the password hash.

Well, luckily, we got a tool named hashcat.
Without having any more ideas about the password, we can now use the bruteforce technique.
We also know that the password only contains numbers.
So we could go bruteforce increment from ZERO until 10^n. Where n is the number of digits.

hashcat.exe -a 3 -m 3200 --increment --increment-min 1 --increment-max 8 $2a$10$msFPZnG.NKHaCcVupGsQyuvpB8IwtZ7v3UxPBwf3fXe8hGdCMEwsu ?d?d?d?d?d?d?d?d?d?d?d?d?d?d?d?d?d?d?d?d?d?d

Here, we tell hashcat that our attack mode is Brute-force (-a 3), increment each password iteration (–increment), start from 1 digit (–increment-min 1), end the iteration with maximum of 8 digit (–increment-max 8), password hash that we found earlier ($2a$10$msFPZnG.NKHaCcVupGsQyuvpB8IwtZ7v3UxPBwf3fXe8hGdCMEwsu) and the pattern that we want our hashcat to follow (?d?d?d?d?d?d?d?d?d?d?d?d?d?d?d?d?d?d?d?d?d?d).

To know more about hashcat, check this out: https://hashcat.net/wiki/doku.php?id=hashcat

And after some couple of minutes, we cracked the hash!

It took only 8 minutes for my GTX1050 to crack a 5-digit password. But it would definitely lasts more longer if the password was longer than 5-digit.
Luckily, the password for this quiz is shorter than the first set of quizzes so we are able to bruteforce this in a very small amount of time.

Extracting Questions

We found a page where we can browse the quiz. We just enter the password that we found for this quiz.

The web app then make a request to the web api and we could see a juicy information here that includes the quiz questionnaires (testData).

We just parse the testData. And boom! Successfully extracted the PASSWORD and the QUESTIONS.

Conclusion

I understand the intention of the developer that they don’t want the participants kinda “DDoS” their servers by having a lot of authentication and authorization though their servers. They just give all their password and quiz data to the client because they want the validation to be on client’s side and not having loads to their server.

The web app’s architecture, does not really abide the Zero Trust Security because they just make the client’s authorized themselves and “trusts” them without proper validation.

Thanks for reading this short writeup!
I hope you enjoy and see you on my next writeup!