⚠️⚠️⚠️ This is a solution to the challenge. This post will be full of spoilers.
Download the binaries here: https://github.com/mlesterdampios/huntress-2024-binary-challenges
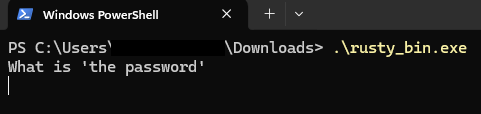
In this challenge we are given a binary to reverse. The flag is in the binary and we need to find it.
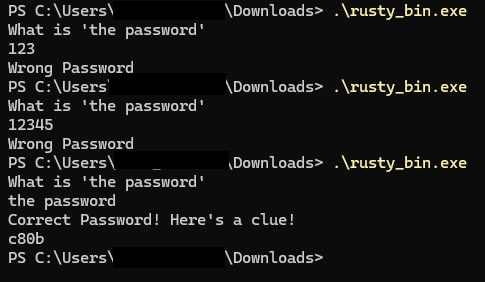
After some guessing we are able to get a clue. I tried finding the bytes on the memory but I couldn’t get whole flag.
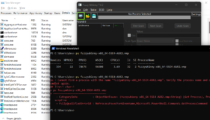
So what I did was to look around more, and try to check some function calls.
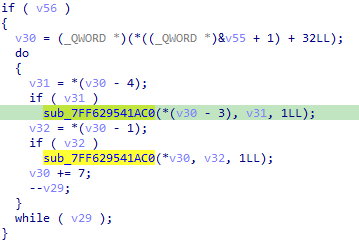
These 2 function calls are somewhat weird to me. I tried to check arguments passed to these 2 functions. I found out that the 1st function is a XOR cipher, and the 2nd call is a XOR key. There was 14 loops on it, so meaning there are 14 ciphers. You can just write down those values and manually xor for around 30 mins, or build an automated solution for 2 hours. Pick your poison. lol.
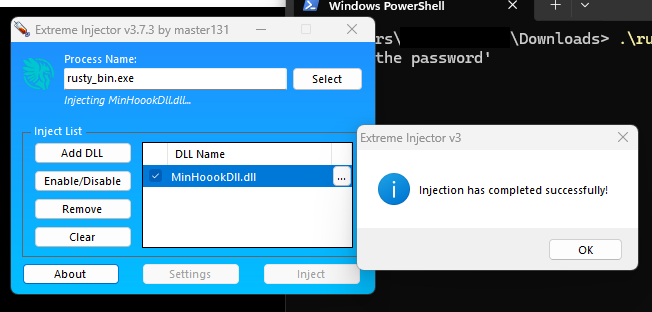
So I choose the automated solution
// FunctionHooks.cpp : Defines the exported functions for the DLL application.
//
#define NOMINMAX // Prevents Windows headers from defining min and max macros
//#define AllowDebug // uncomment to show debug messages
#include "pch.h"
#include <windows.h>
#include "detours.h"
#include <cstdint>
#include <mutex>
#include <fstream>
#include <string>
#include <vector>
#include <queue>
#include <thread>
#include <condition_variable>
#include <atomic>
#include <sstream>
#include <iomanip>
#include <cctype> // For isprint
#include <intrin.h>

// 1. Define the function pointer type matching the target function's signature.
typedef __int64(__fastcall* sub_0x1AC0_t)(__int64 a1, __int64 a2, __int64 a3);

// 2. Replace with the actual module name containing the target function.
const char* TARGET_MODULE_NAME = "rusty_bin.exe"; // Ensure this matches the actual module name

// 3. Calculated RVA of the target function (0x1AC0 based on previous calculation)
const uintptr_t FUNCTION_RVA = 0x1AC0;

// 4. Declare a pointer to the original function.
sub_0x1AC0_t TrueFunction = nullptr;

// 5. Logging components
std::queue<std::string> logQueue;
std::mutex queueMutex;
std::condition_variable cv;
std::thread logThread;
std::atomic<bool> isLoggingActive(false);
std::ofstream logFile;

// 6. Data management components
std::vector<std::vector<unsigned char>> byteVectors;
bool isOdd = true;
std::mutex dataMutex;

// 9. Helper function to convert uintptr_t to hex string
std::string ToHex(uintptr_t value)
{
    std::stringstream ss;
    ss << "0x"
        << std::hex << std::uppercase << value;
    return ss.str();
}

// 7. Helper function to convert a single byte to hex string
std::string ByteToHex(unsigned char byte)
{
    char buffer[3];
    sprintf_s(buffer, sizeof(buffer), "%02X", byte);
    return std::string(buffer);
}

// 8. Helper function to convert a vector of bytes to hex string with spaces
std::string BytesToHex(const std::vector<unsigned char>& bytes)
{
    std::string hexStr;
    for (auto byte : bytes)
    {
        hexStr += ByteToHex(byte) + " ";
    }
    if (!hexStr.empty())
        hexStr.pop_back(); // Remove trailing space
    return hexStr;
}

// 19. Helper function to convert a vector of bytes to a human-readable string
std::string BytesToString(const std::vector<unsigned char>& bytes)
{
    std::string result;
    result.reserve(bytes.size());

    for (auto byte : bytes)
    {
        if (isprint(byte))
        {
            result += static_cast<char>(byte);
        }
        else
        {
            result += '.'; // Placeholder for non-printable characters
        }
    }

    return result;
}

// 10. Enqueue a log message
void LogMessage(const std::string& message)
{
    {
        std::lock_guard<std::mutex> guard(queueMutex);
        logQueue.push(message);
    }
    cv.notify_one();
}

// 11. Logging thread function
void ProcessLogQueue()
{
    while (isLoggingActive)
    {
        std::unique_lock<std::mutex> lock(queueMutex);
        cv.wait(lock, [] { return !logQueue.empty() || !isLoggingActive; });

        while (!logQueue.empty())
        {
            std::string msg = logQueue.front();
            logQueue.pop();
            lock.unlock(); // Unlock while writing to minimize lock contention

            if (logFile.is_open())
            {
                logFile << msg;
                // Optionally, implement log rotation or size checks here
            }

            lock.lock();
        }
    }

    // Flush remaining messages before exiting
    while (true)
    {
        std::lock_guard<std::mutex> guard(queueMutex);
        if (logQueue.empty())
            break;

        std::string msg = logQueue.front();
        logQueue.pop();

        if (logFile.is_open())
        {
            logFile << msg;
        }
    }
}

// 12. Initialize logging system
bool InitializeLogging()
{
    {
        std::lock_guard<std::mutex> guard(queueMutex);
        logFile.open("rusty_bin.log", std::ios::out | std::ios::app);
        if (!logFile.is_open())
        {
            return false;
        }
    }

    isLoggingActive = true;
    logThread = std::thread(ProcessLogQueue);
    return true;
}

// 13. Shutdown logging system
void ShutdownLogging()
{
    isLoggingActive = false;
    cv.notify_one();
    if (logThread.joinable())
    {
        logThread.join();
    }

    {
        std::lock_guard<std::mutex> guard(queueMutex);
        if (logFile.is_open())
        {
            logFile.close();
        }
    }
}

// 14. Implement the HookedFunction with the same signature.
__int64 __fastcall HookedFunction(__int64 a1, __int64 a2, __int64 a3)
{
    // Retrieve the return address using the MSVC intrinsic
    void* returnAddress = _ReturnAddress();

    // Get the base address of the target module
    HMODULE hModule = GetModuleHandleA(TARGET_MODULE_NAME);
    if (!hModule)
    {
        // If unable to get module handle, log and call the true function
        std::string errorLog = "Failed to get module handle for " + std::string(TARGET_MODULE_NAME) + ".\n";
#ifdef AllowDebug
        LogMessage(errorLog);
#endif
        return TrueFunction(a1, a2, a3);
    }

    uintptr_t moduleBase = reinterpret_cast<uintptr_t>(hModule);
    uintptr_t retAddr = reinterpret_cast<uintptr_t>(returnAddress);
    uintptr_t rva = retAddr - moduleBase;

    // Define the specific RVAs to check against
    const std::vector<uintptr_t> validRVAs = { 0x17B1, 0x17C8 };

    // Check if the return address RVA matches 0x17B1 or 0x17C8
    bool shouldProcess = false;
    for (auto& validRVA : validRVAs)
    {
        if (rva == validRVA)
        {
            shouldProcess = true;
            break;
        }
    }

    if (shouldProcess)
    {
        // Convert a1 and a3 to uintptr_t using static_cast
        uintptr_t ptrA1 = static_cast<uintptr_t>(a1);
        uintptr_t ptrA3 = static_cast<uintptr_t>(a3);

        // Log the function call parameters using ToHex
        std::string logMessage = "HookedFunction called with a1=" + ToHex(ptrA1) +
            ", a2=" + std::to_string(a2) + ", a3=" + ToHex(ptrA3) + "\n";
#ifdef AllowDebug
        LogMessage(logMessage);
#endif

        // Initialize variables for reading bytes
        std::vector<unsigned char> currentBytes;
        __int64 result = 0;

        // Check if a1 is valid and a2 is positive
        if (a1 != 0 && a2 > 0)
        {
            unsigned char* buffer = reinterpret_cast<unsigned char*>(a1);

            // Reserve space to minimize reallocations
            currentBytes.reserve(static_cast<size_t>(a2));

            for (size_t i = 0; i < static_cast<size_t>(a2); ++i)
            {
                unsigned char byte = buffer[i];
                currentBytes.push_back(byte);
            }

            // Convert bytes to hex string
            std::string bytesHex = BytesToHex(currentBytes);

            // Log the bytes read
#ifdef AllowDebug
            LogMessage("Bytes read: " + bytesHex + "\n");
#endif
        }
        else
        {
            // Log invalid parameters
            std::string invalidParamsLog = "Invalid a1 or a2. a1: " + ToHex(ptrA1) +
                ", a2: " + std::to_string(a2) + "\n";
#ifdef AllowDebug
            LogMessage(invalidParamsLog);
#endif
        }

        // Data management: Handle isOdd and byteVectors
        {
            std::lock_guard<std::mutex> guard(dataMutex);
            if (isOdd)
            {
                // Odd call: push the bytes read to byteVectors
                byteVectors.push_back(currentBytes);
#ifdef AllowDebug
                LogMessage("Pushed bytes to array.\n");
#endif
            }
            else
            {
                // Even call: perform XOR with the last vector in byteVectors
                if (!byteVectors.empty())
                {
                    const std::vector<unsigned char>& lastVector = byteVectors.back();
                    size_t minSize = (currentBytes.size() < lastVector.size()) ? currentBytes.size() : lastVector.size();

                    std::vector<unsigned char> xorResult;
                    xorResult.reserve(minSize);

                    for (size_t i = 0; i < minSize; ++i)
                    {
                        xorResult.push_back(currentBytes[i] ^ lastVector[i]);
                    }

                    // Convert XOR result to hex string
                    std::string xorHex = BytesToHex(xorResult);

                    // Convert XOR result to human-readable string
                    std::string xorString = BytesToString(xorResult);

                    // Log both hex and string representations
#ifdef AllowDebug
                    LogMessage("XOR output (Hex): " + xorHex + "\n");
#endif
                    LogMessage("XOR output (String): " + xorString + "\n");
                }
                else
                {
#ifdef AllowDebug
                    // Log that there's no previous vector to XOR with
                    LogMessage("No previous byte vector to XOR with.\n");
#endif
                }
            }

            // Toggle isOdd for the next call
            isOdd = !isOdd;
        }

        // Call the original function
        result = TrueFunction(a1, a2, a3);

        // Log the function result
        std::string resultLog = "Original function returned " + std::to_string(result) + "\n";
#ifdef AllowDebug
        LogMessage(resultLog);
#endif

        // Return the original result
        return result;
    }
    else
    {
        // If the return address RVA is not 0x17B1 or 0x17C8, directly call the true function
        return TrueFunction(a1, a2, a3);
    }
}

// 15. Function to dynamically resolve the target function's address
sub_0x1AC0_t GetTargetFunctionAddress()
{
    HMODULE hModule = GetModuleHandleA(TARGET_MODULE_NAME);
    if (!hModule)
    {
#ifdef AllowDebug
        LogMessage("Failed to get handle of target module: " + std::string(TARGET_MODULE_NAME) + "\n");
#endif
        return nullptr;
    }

    // Calculate the absolute address by adding the RVA to the module's base address.
    uintptr_t funcAddr = reinterpret_cast<uintptr_t>(hModule) + FUNCTION_RVA;
    return reinterpret_cast<sub_0x1AC0_t>(funcAddr);
}

// 16. Attach hooks
BOOL AttachHooks()
{
    // Initialize logging system
    if (!InitializeLogging())
    {
        // If the log file cannot be opened, return FALSE to prevent hooking
        return FALSE;
    }

    // Dynamically resolve the original function address
    TrueFunction = GetTargetFunctionAddress();
    if (!TrueFunction)
    {
#ifdef AllowDebug
        LogMessage("TrueFunction is null. Cannot attach hook.\n");
#endif
        ShutdownLogging();
        return FALSE;
    }

    // Begin a Detour transaction
    DetourTransactionBegin();
    DetourUpdateThread(GetCurrentThread());

    // Attach the hooked function
    DetourAttach(&(PVOID&)TrueFunction, HookedFunction);

    // Commit the transaction
    LONG error = DetourTransactionCommit();
    if (error == NO_ERROR)
    {
#ifdef AllowDebug
        LogMessage("Hooks successfully attached.\n");
#endif
        return TRUE;
    }
    else
    {
#ifdef AllowDebug
        LogMessage("Failed to attach hooks. Error code: " + std::to_string(error) + "\n");
#endif
        ShutdownLogging();
        return FALSE;
    }
}

// 17. Detach hooks
BOOL DetachHooks()
{
    // Begin a Detour transaction
    DetourTransactionBegin();
    DetourUpdateThread(GetCurrentThread());

    // Detach the hooked function
    DetourDetach(&(PVOID&)TrueFunction, HookedFunction);

    // Commit the transaction
    LONG error = DetourTransactionCommit();
    if (error == NO_ERROR)
    {
#ifdef AllowDebug
        LogMessage("Hooks successfully detached.\n");
#endif
        // Shutdown logging system
        ShutdownLogging();
        return TRUE;
    }
    else
    {
#ifdef AllowDebug
        LogMessage("Failed to detach hooks. Error code: " + std::to_string(error) + "\n");
#endif
        return FALSE;
    }
}

// 18. DLL entry point
BOOL WINAPI DllMain(HINSTANCE hinst, DWORD dwReason, LPVOID reserved)
{
    switch (dwReason)
    {
    case DLL_PROCESS_ATTACH:
        DisableThreadLibraryCalls(hinst);
        DetourRestoreAfterWith();
        if (!AttachHooks())
        {
            // Handle hook attachment failure if necessary
            // Note: At this point, logging might not be fully operational
        }
        break;
    case DLL_PROCESS_DETACH:
        if (!DetachHooks())
        {
            // Handle hook detachment failure if necessary
        }
        break;
    }
    return TRUE;
}
Flag
XOR output (String): flag
XOR output (String): {e65
XOR output (String): cafb
XOR output (String): c80b
XOR output (String): d66a
XOR output (String): 1964
XOR output (String): b2e9
XOR output (String): debe
XOR output (String): f3ca
XOR output (String): e}
XOR output (String): the password
XOR output (String): What is 'the password'
XOR output (String): Wrong Password
XOR output (String): Correct Password! Here's a clue!